
Quick Reference Guide for WPRoster usage
OVERVIEW - WPRoster Plugin
WPRoster is a WordPress roster management plugin that lets your team create, maintain, and publish roster information using shortcodes. It supports both internal administration and public-facing roster pages.
(7A) Roster – Main workspace for managing roster entries and assignments.
(7B) Forecast – Shows roster projections across intervals (Previous/Next years).
(7C) Entities – Manages hierarchy and groupings (region, section, branch, group).
(7D) Interval – Creates and updates year interval used by rosters.
(7E) Manage Rosters – Edits roster records and opens position-level actions.
(7F) Shortcodes – Generates/reference shortcode outputs for publishing frontend pages.
(7A) Roster
Main Workspace (Roster Tab)
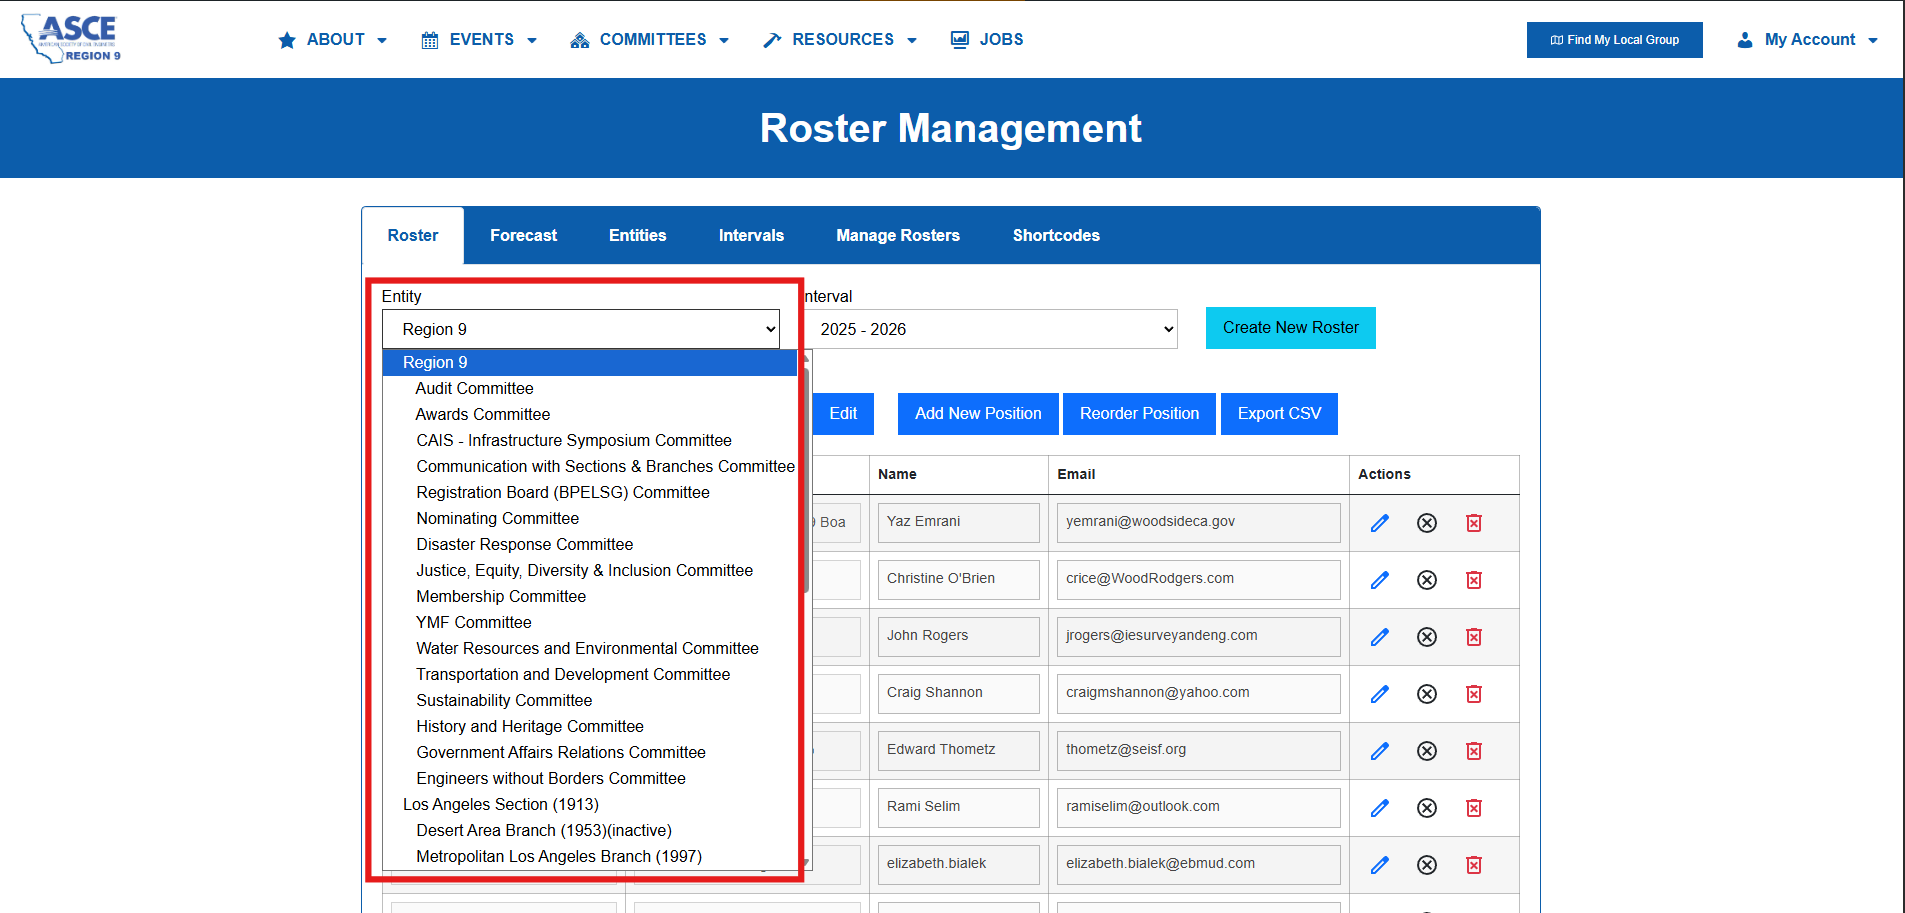
Entity Dropdown
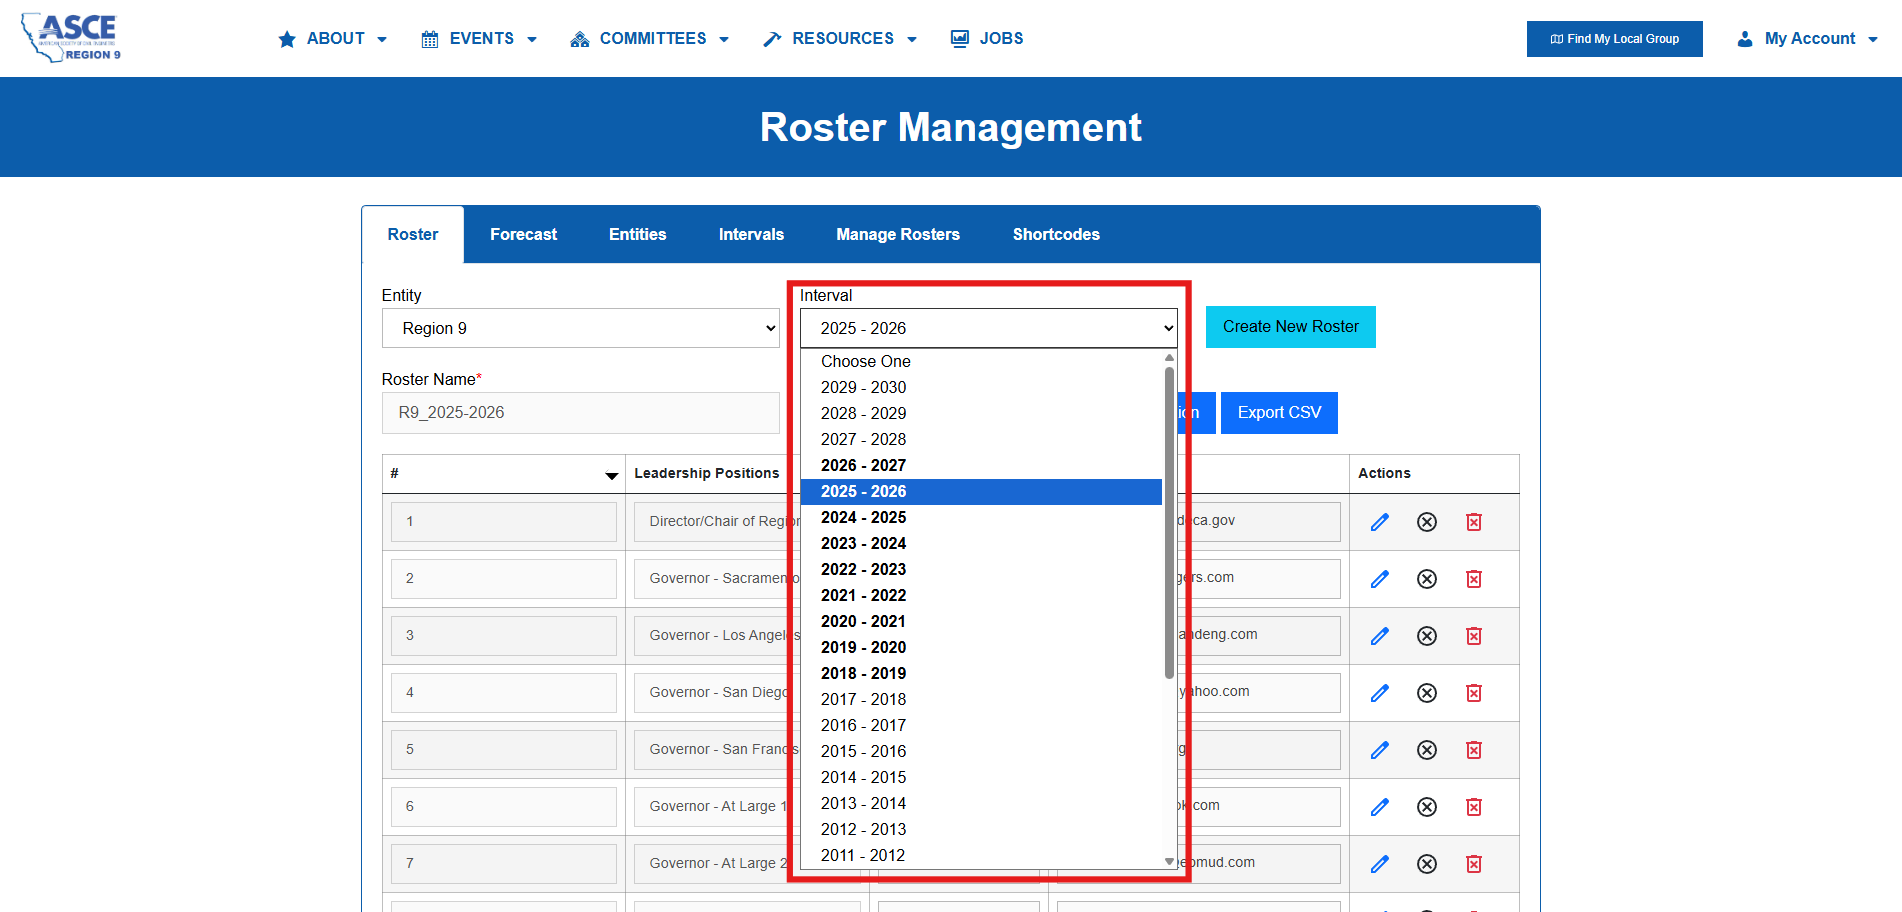
Interval Dropdown
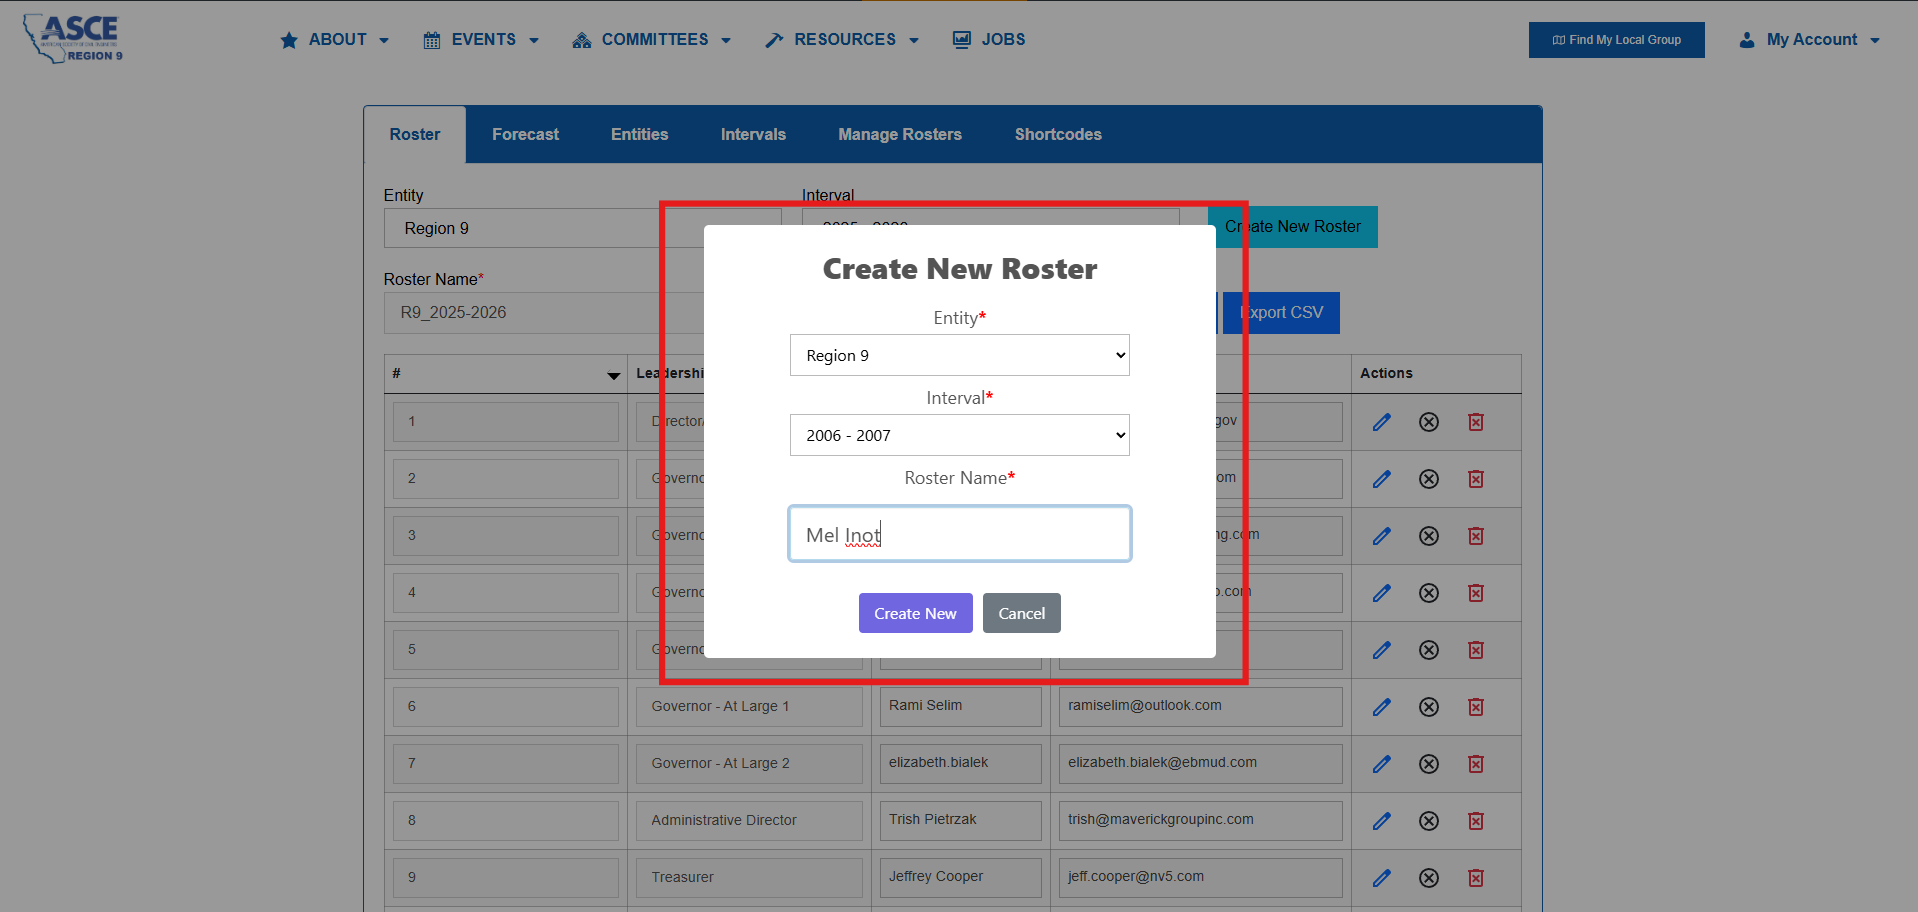
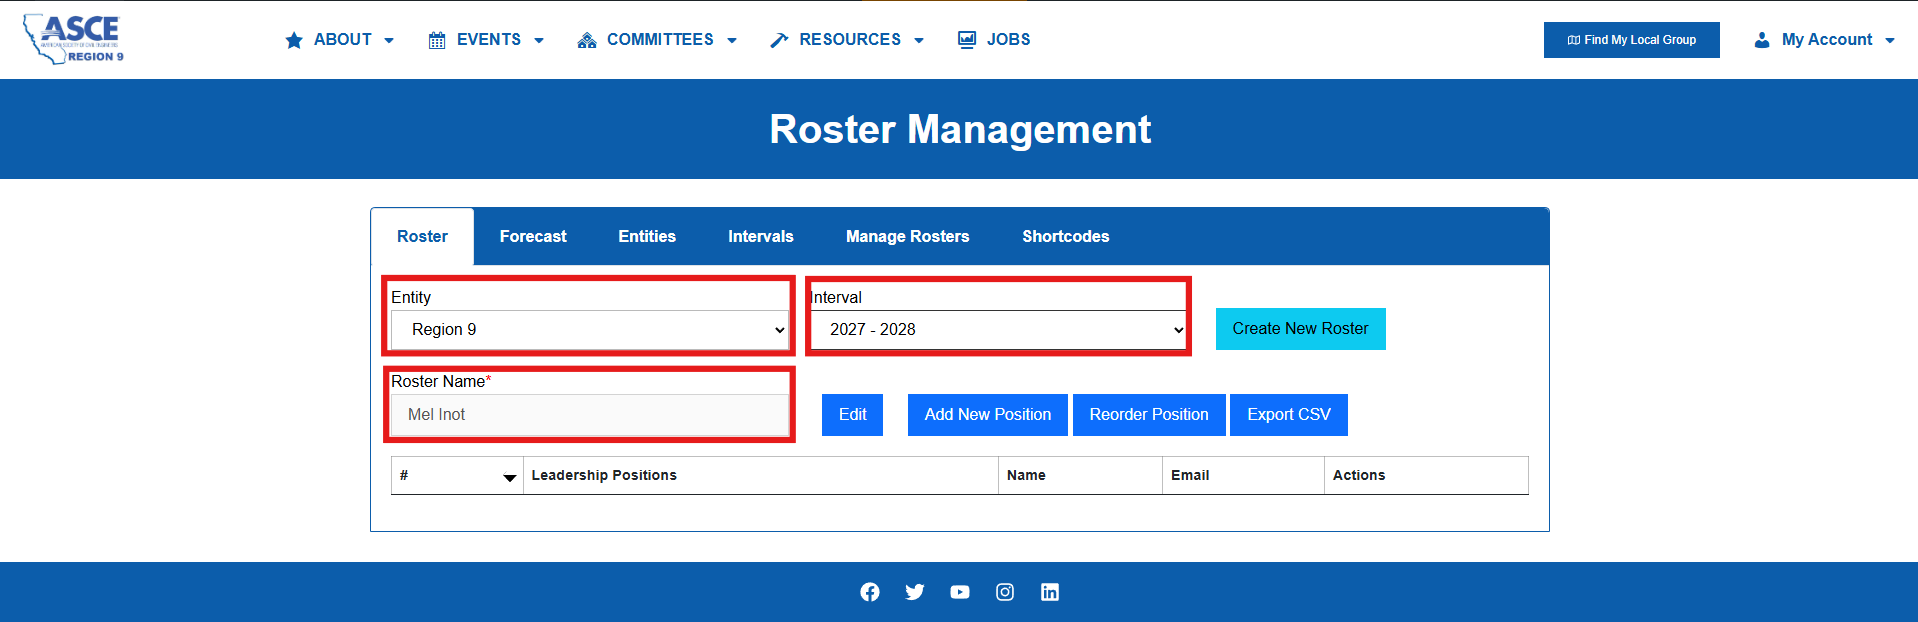
Example on How to Add Roster
Newly Created Roster
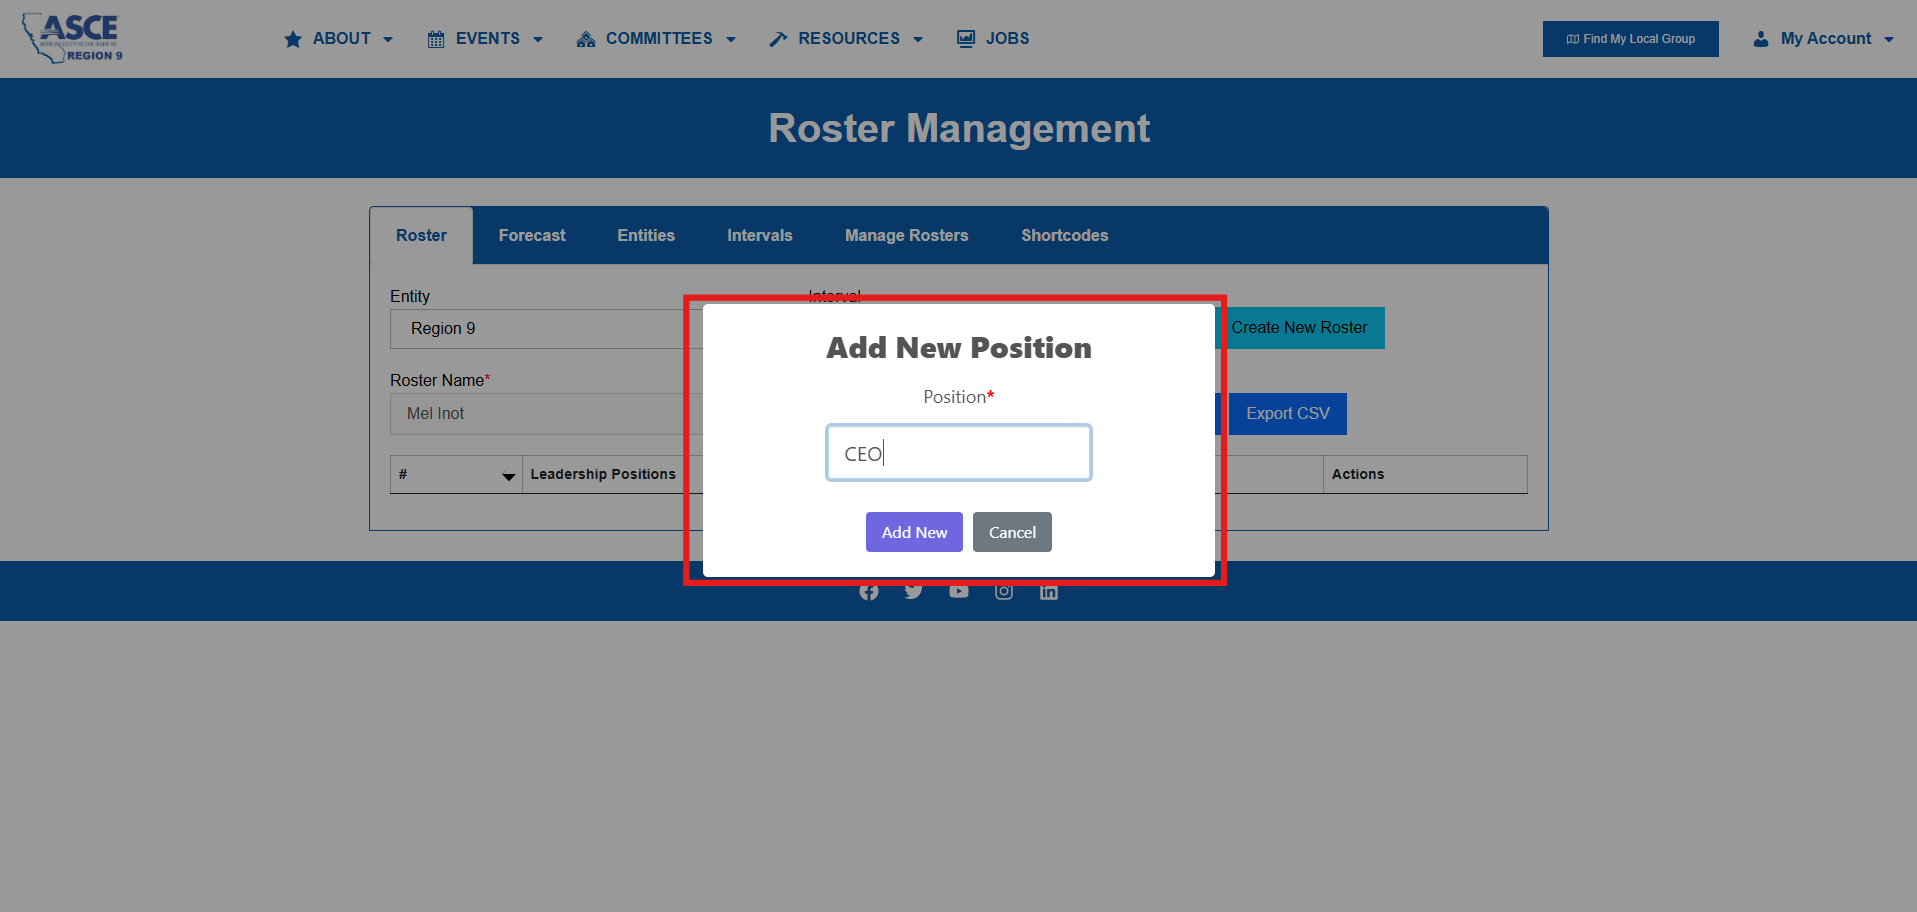
Add New Position
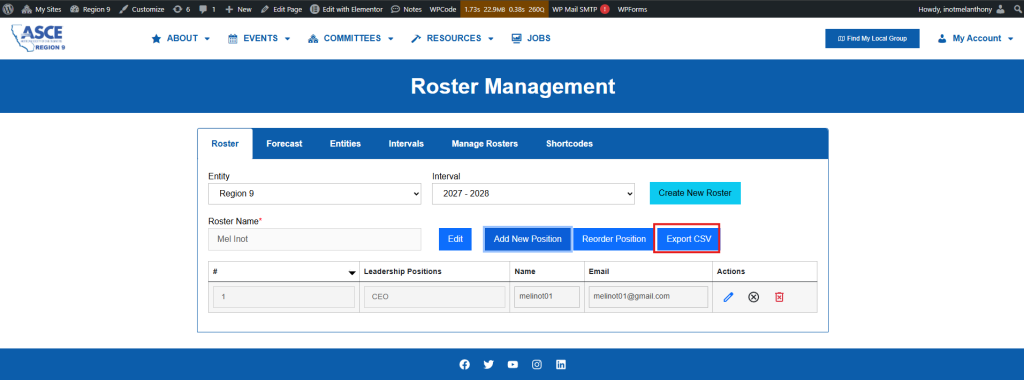
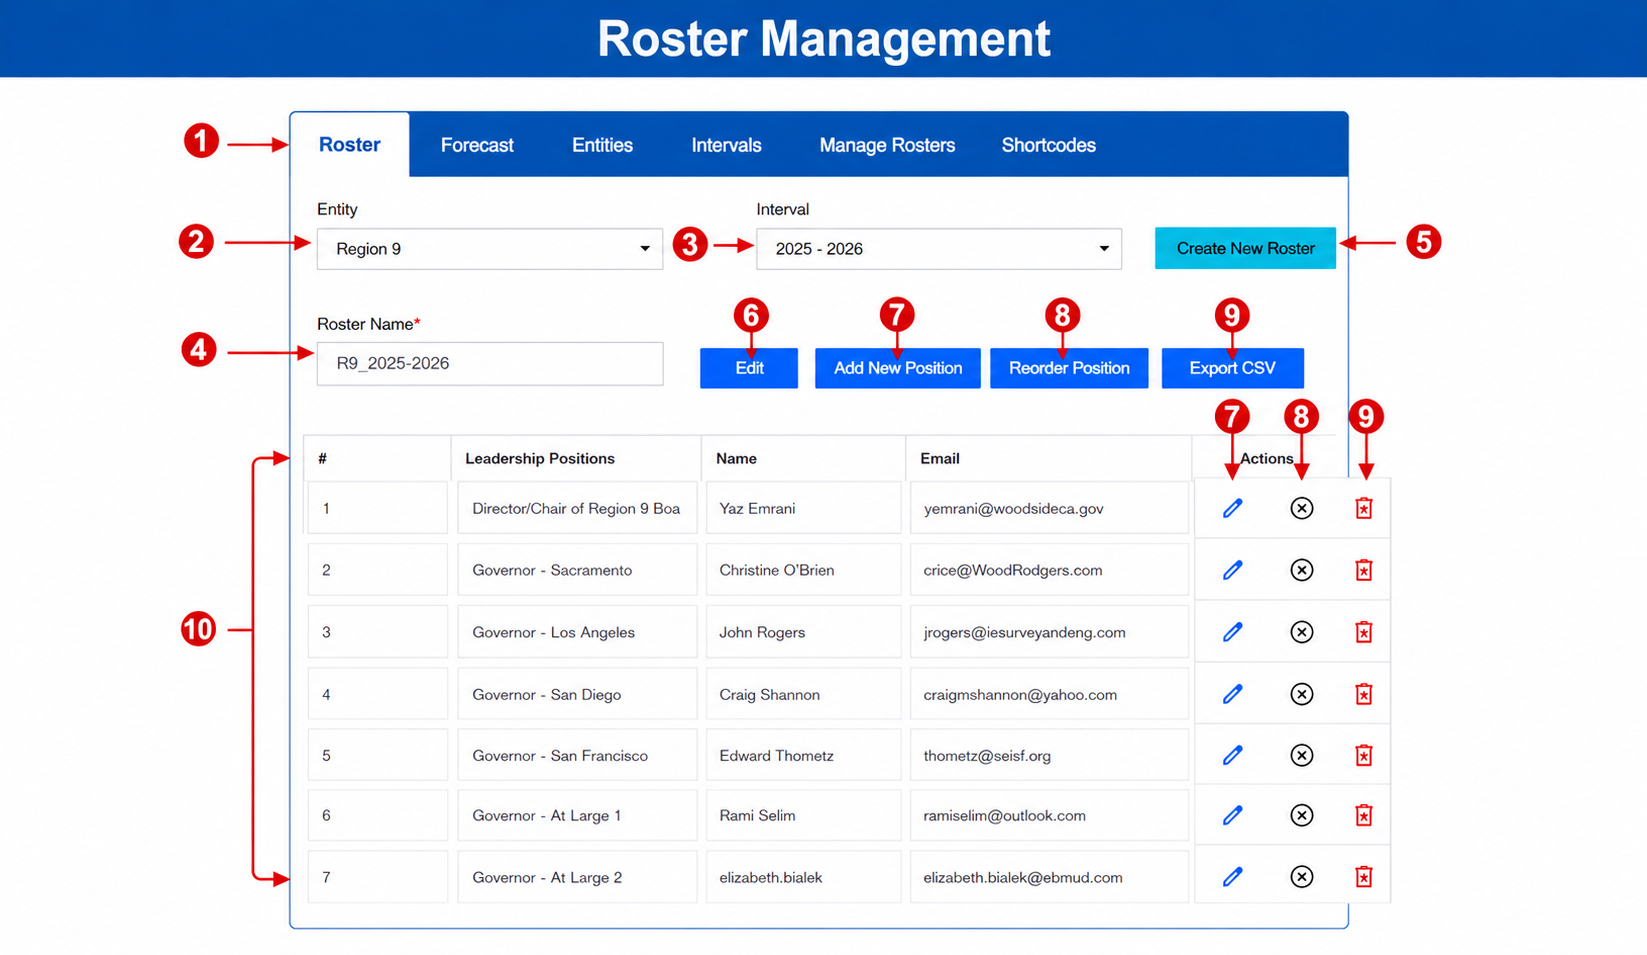
Roster main workspace
1. Roster Tab [RP]
Opens the main roster management workspace.
2. Entity dropdown
Chooses which entity (Region/Section/Branch/Group) you are managing.
3. Interval dropdown
Selects the year interval to load the roster for that entity.
4. Edit (Roster Name section)
Enables editing/updating the roster name field (Roster Name*).
5. Create New Roster
Opens modal to create a new roster record (entity + interval + roster name).
6. Add New Position
Adds a new leadership position row to the current roster.
7. Row Edit icon (pencil)
Enables editing for that specific position row.
8. Row Clear icon (circle X)
Clears the assigned person data in that row (name/email).
9. Row Delete icon (trash)
Deletes that roster position row.
10. Roster positions table body
The list of all leadership positions for the selected entity + interval.
Example on How to add Roster
- Create New Roster – User need to click the “Add Roster” Button, Popup modal will then appear and fill up the Entity, Interval and Roster Name. See image on the left side.
- Newly Created Roster – After clicking the “Create New” button it will then insert as data. You will then find the data you input on creating the Roster on Entity Dropdown and Interval Dropdown, for Roster Name it will automatically populated.
Example on How to add Position
- Adding a new position – User need to click the “Add New Position” button. Then popup will appear, you will input the position there and click the “Add New” button. You will notice it will add in the table.
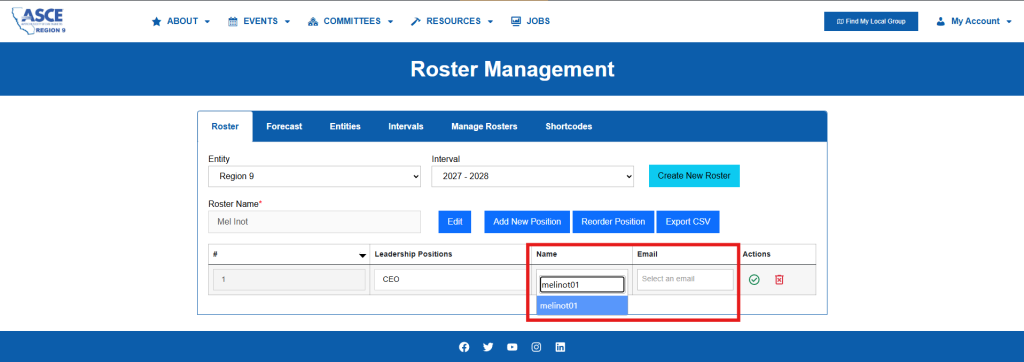
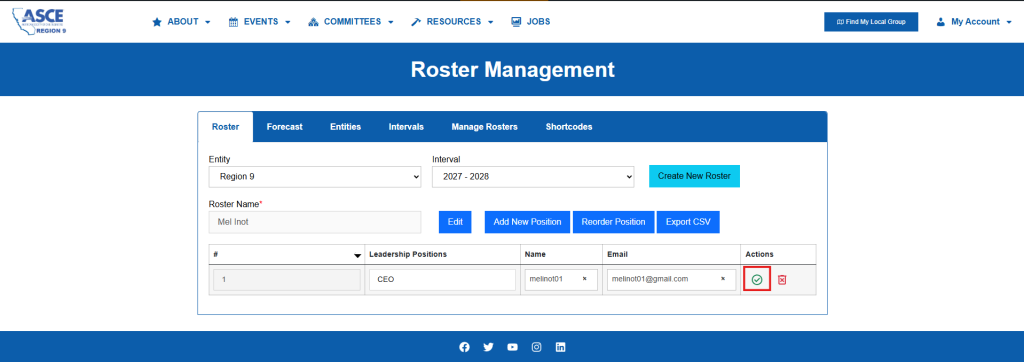
- To edit the row – User need to click the Pencil Icon to edit the Name and Email. These fields are dropdown so user need to type the name and it will output suggestion based on the input. User need to click the green check icon to proceed with the saving.
- Clicking the Trash Icon – If user click the trash icon, it will delete the specific row.
Export Feature
User is able to export roster data through a CSV file for easy backup, reporting, and external use. This feature allows administrators to download structured data that can be opened in tools like Excel or Google Sheets for further analysis, sharing, or record-keeping. Exported files include all relevant roster information, ensuring consistency and accessibility across different platforms.
(7B) Forecast
Forecast Tab
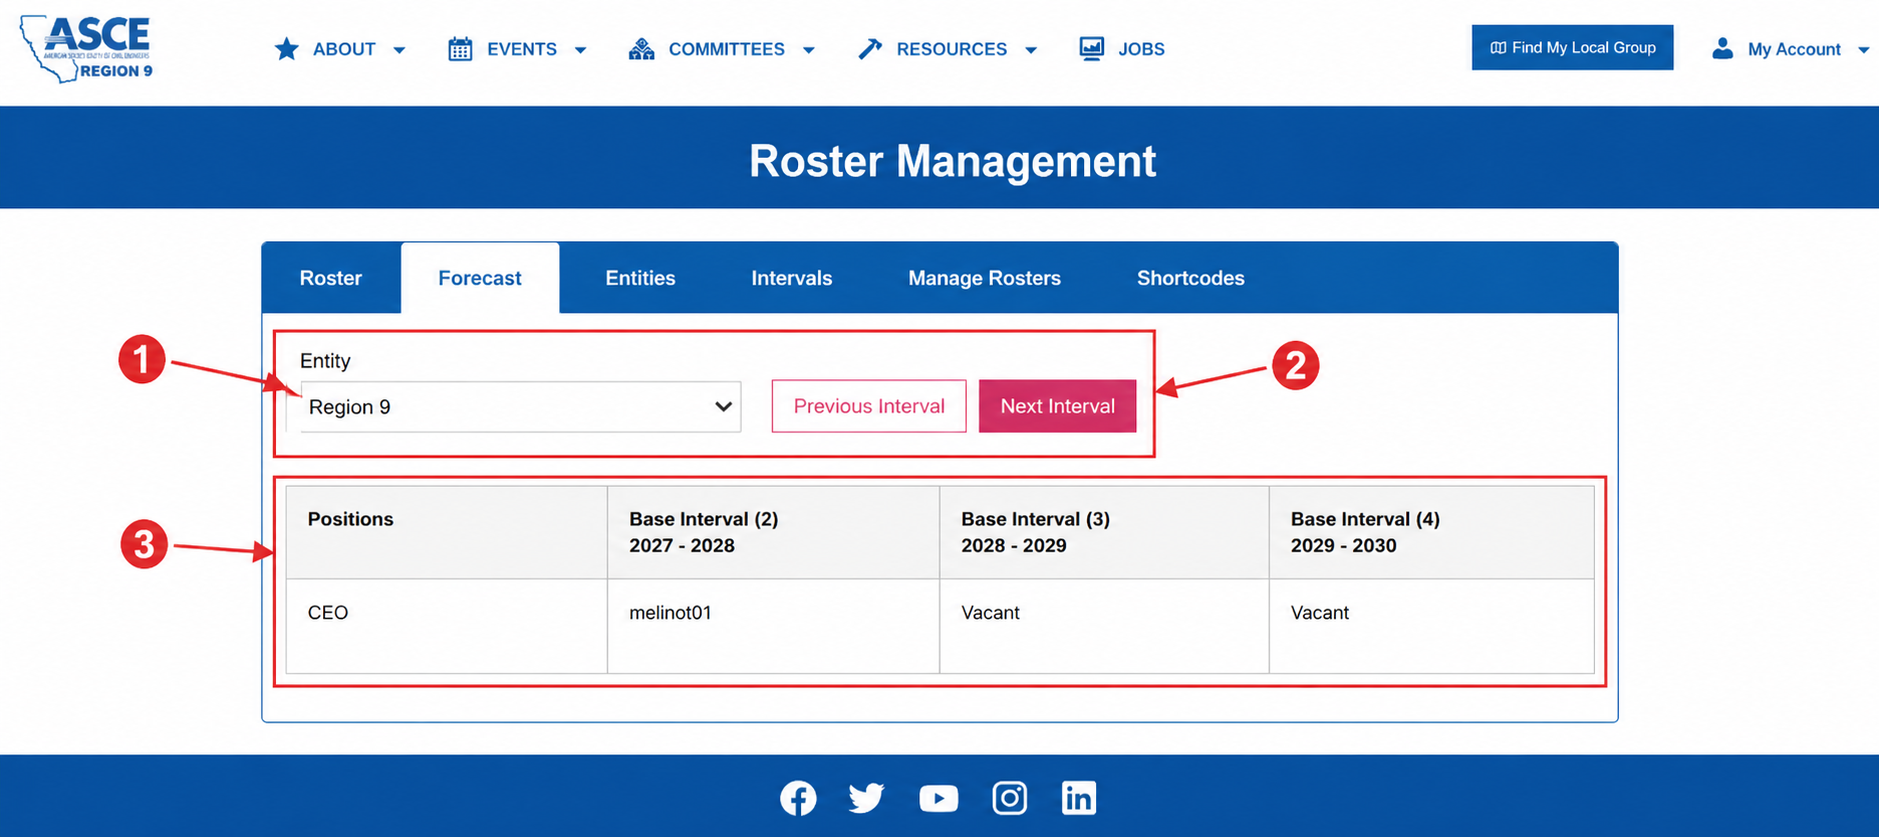
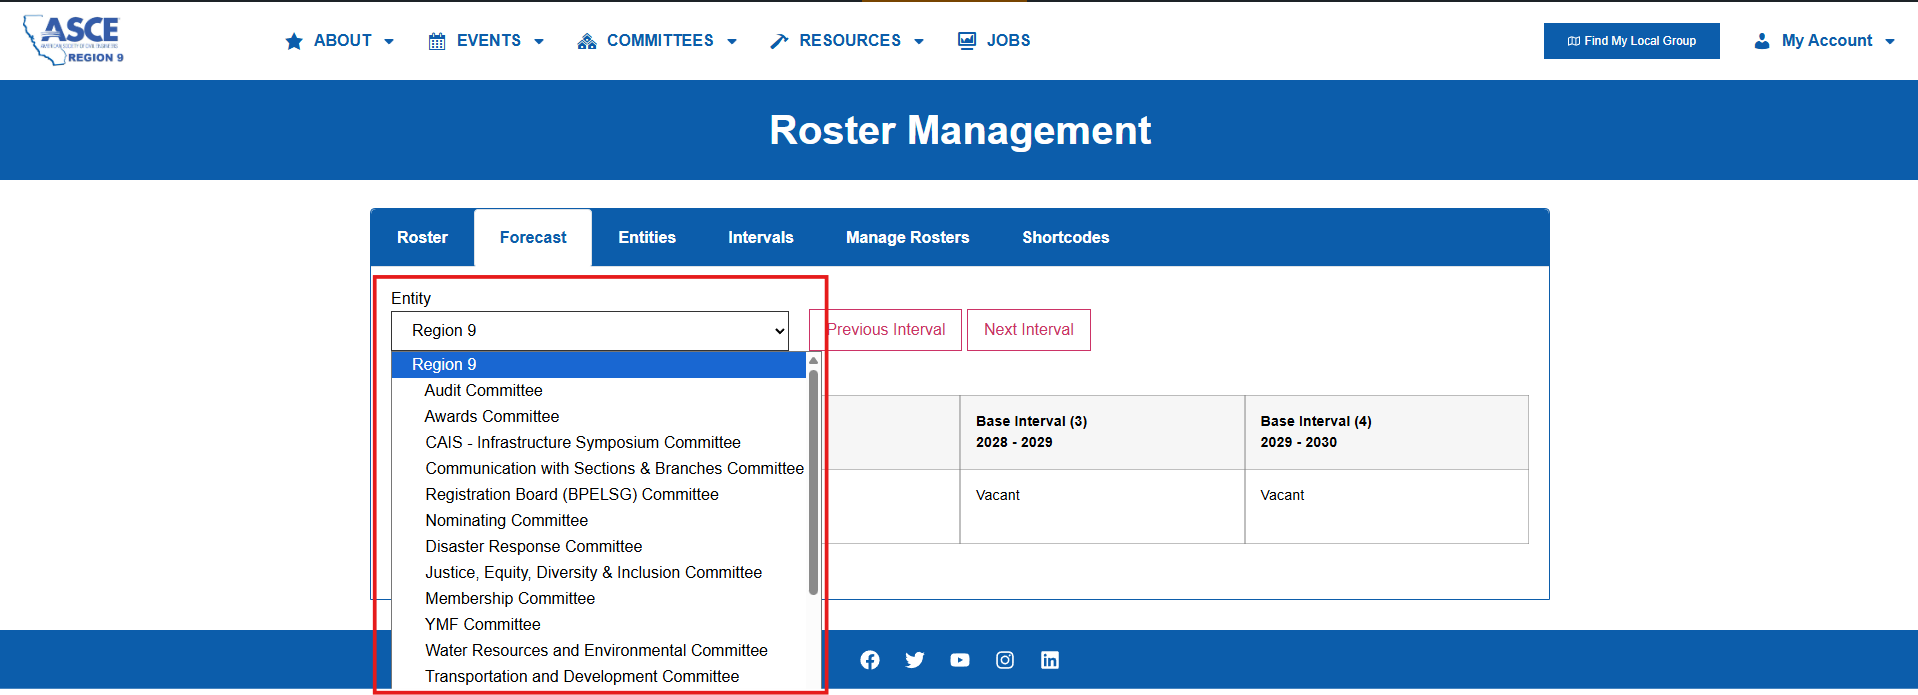
1. Entity Selector
- Chooses which organization scope to forecast (Region/Section/Branch/Group).
- When changed, it reloads forecast data for that selected entity.
2. Previous / Next Interval buttons
- Moves the forecast window backward or forward in time.
- It recalculates which intervals to display and updates the table.
- If no more intervals exist in that direction, it shows a “No next/previous interval found” alert.
3. Forecast comparison table
- Left column = fixed list of positions for that entity.
- Right columns = each interval (shown as “Base Interval (n) YYYY-YYYY”).
- Cell values = who occupies the position in that interval; shows Vacant when no assignment exists.
(7C) Entities
Entities Tab
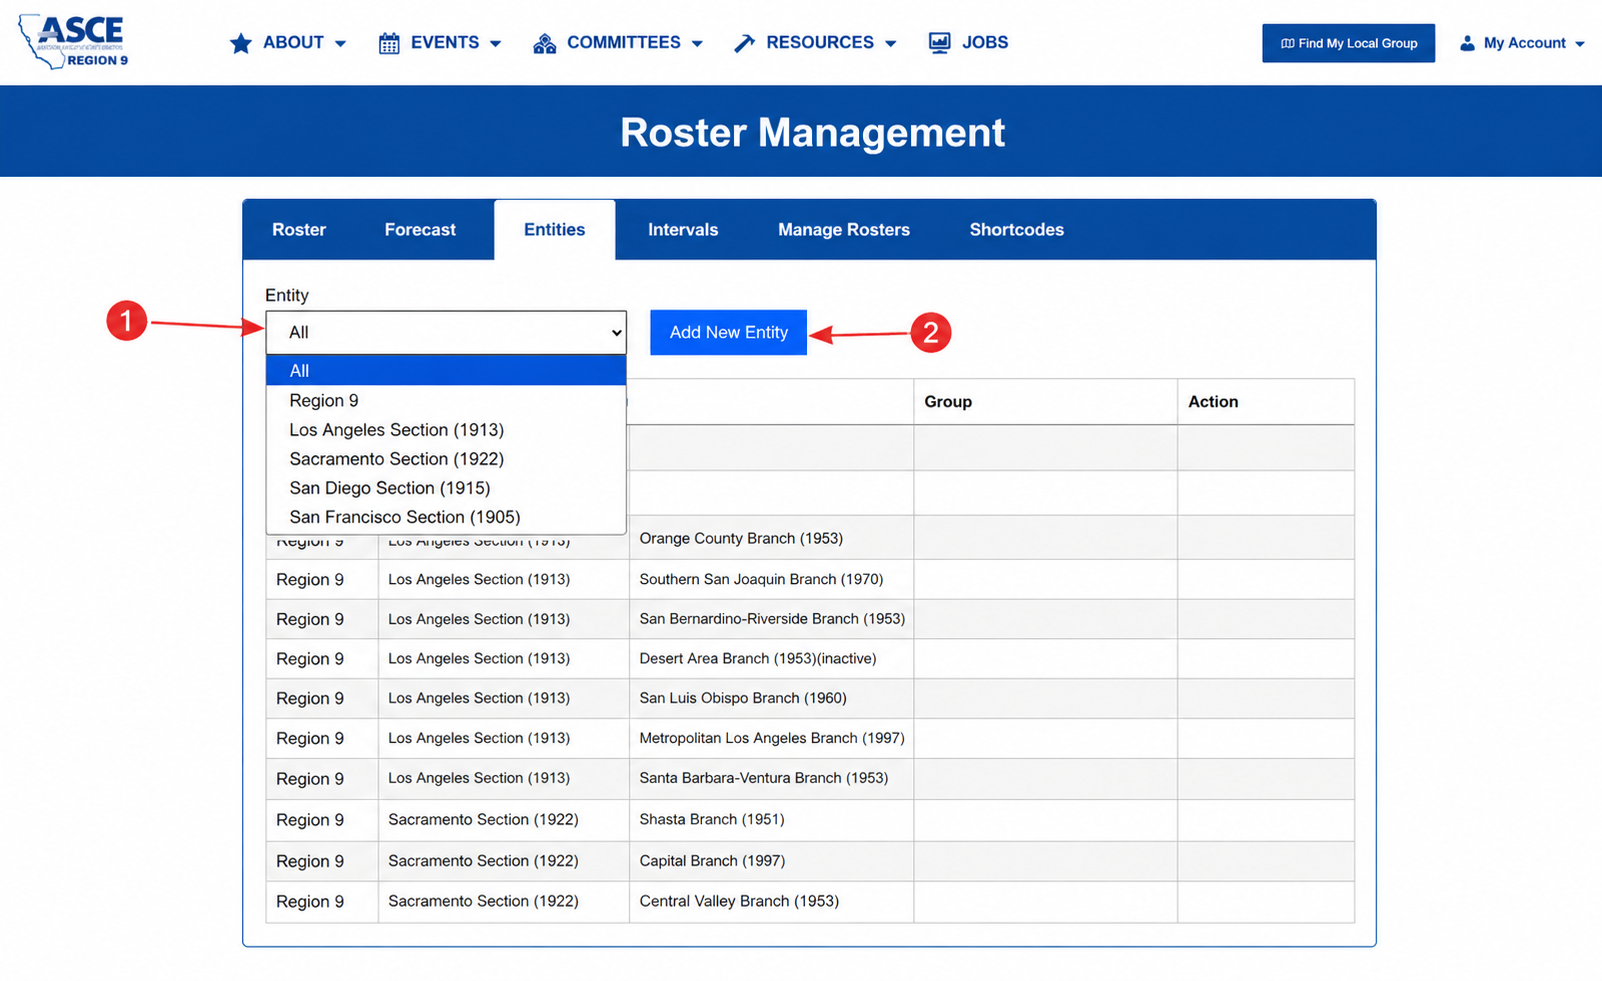
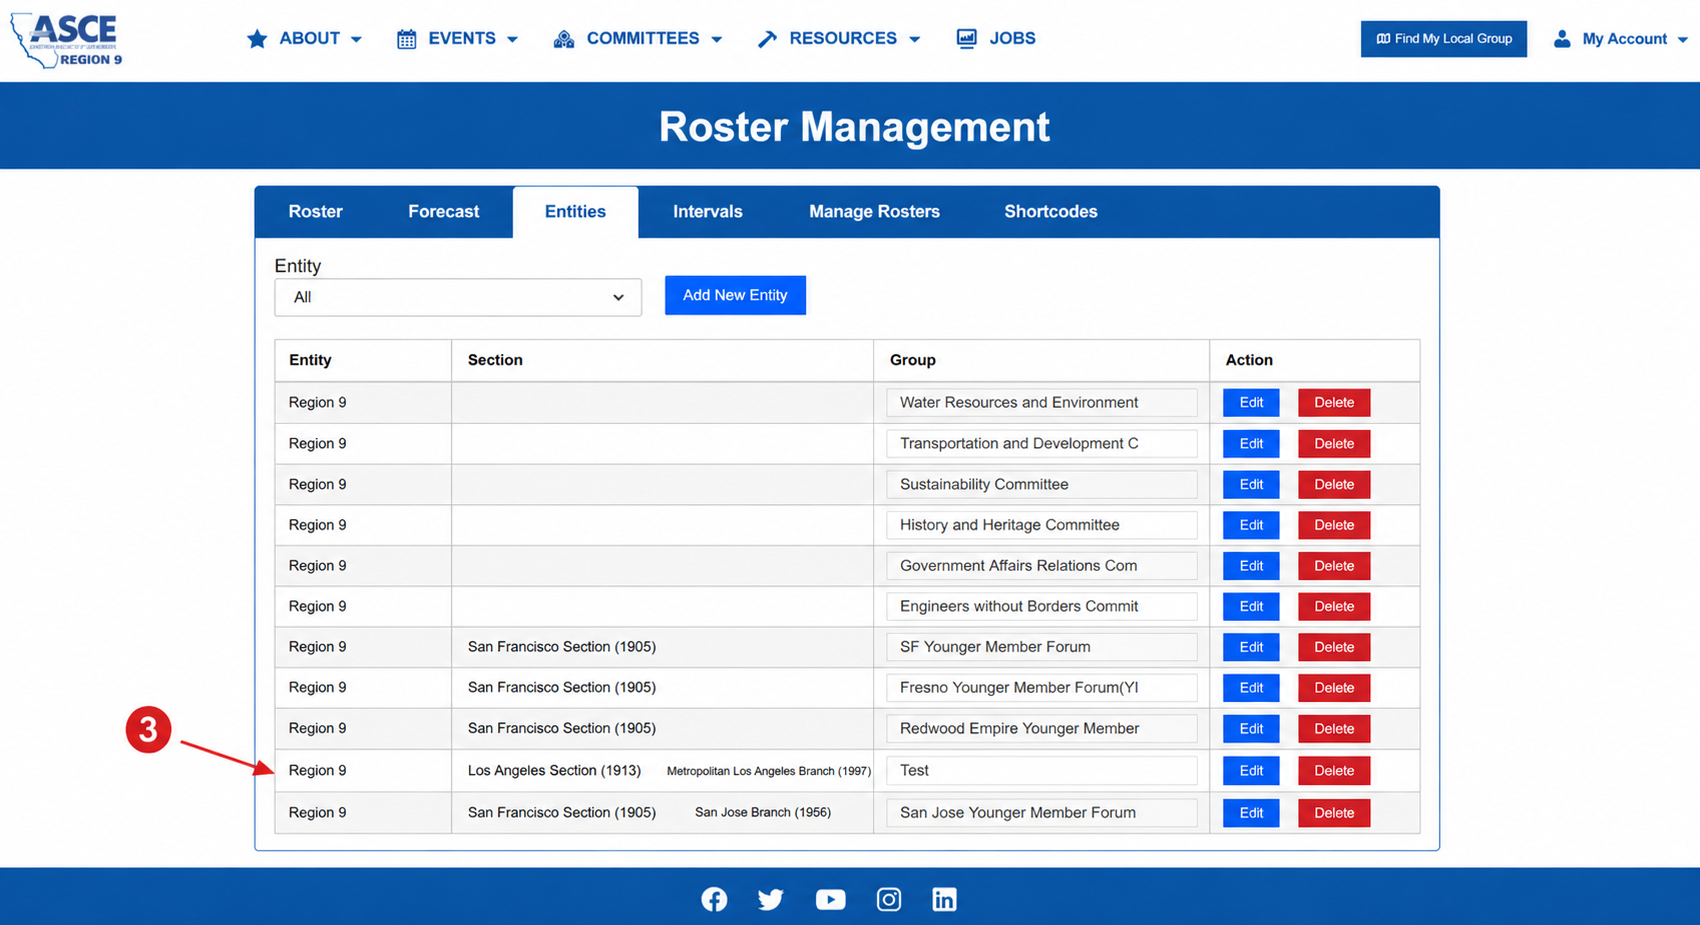
1. Entity filter dropdown
- Filters the table by selected level/scope (All, Region 9, or a specific Section).
- Purpose: quickly narrow visible entity rows (region/section/branch/group combinations) for easier review and editing.
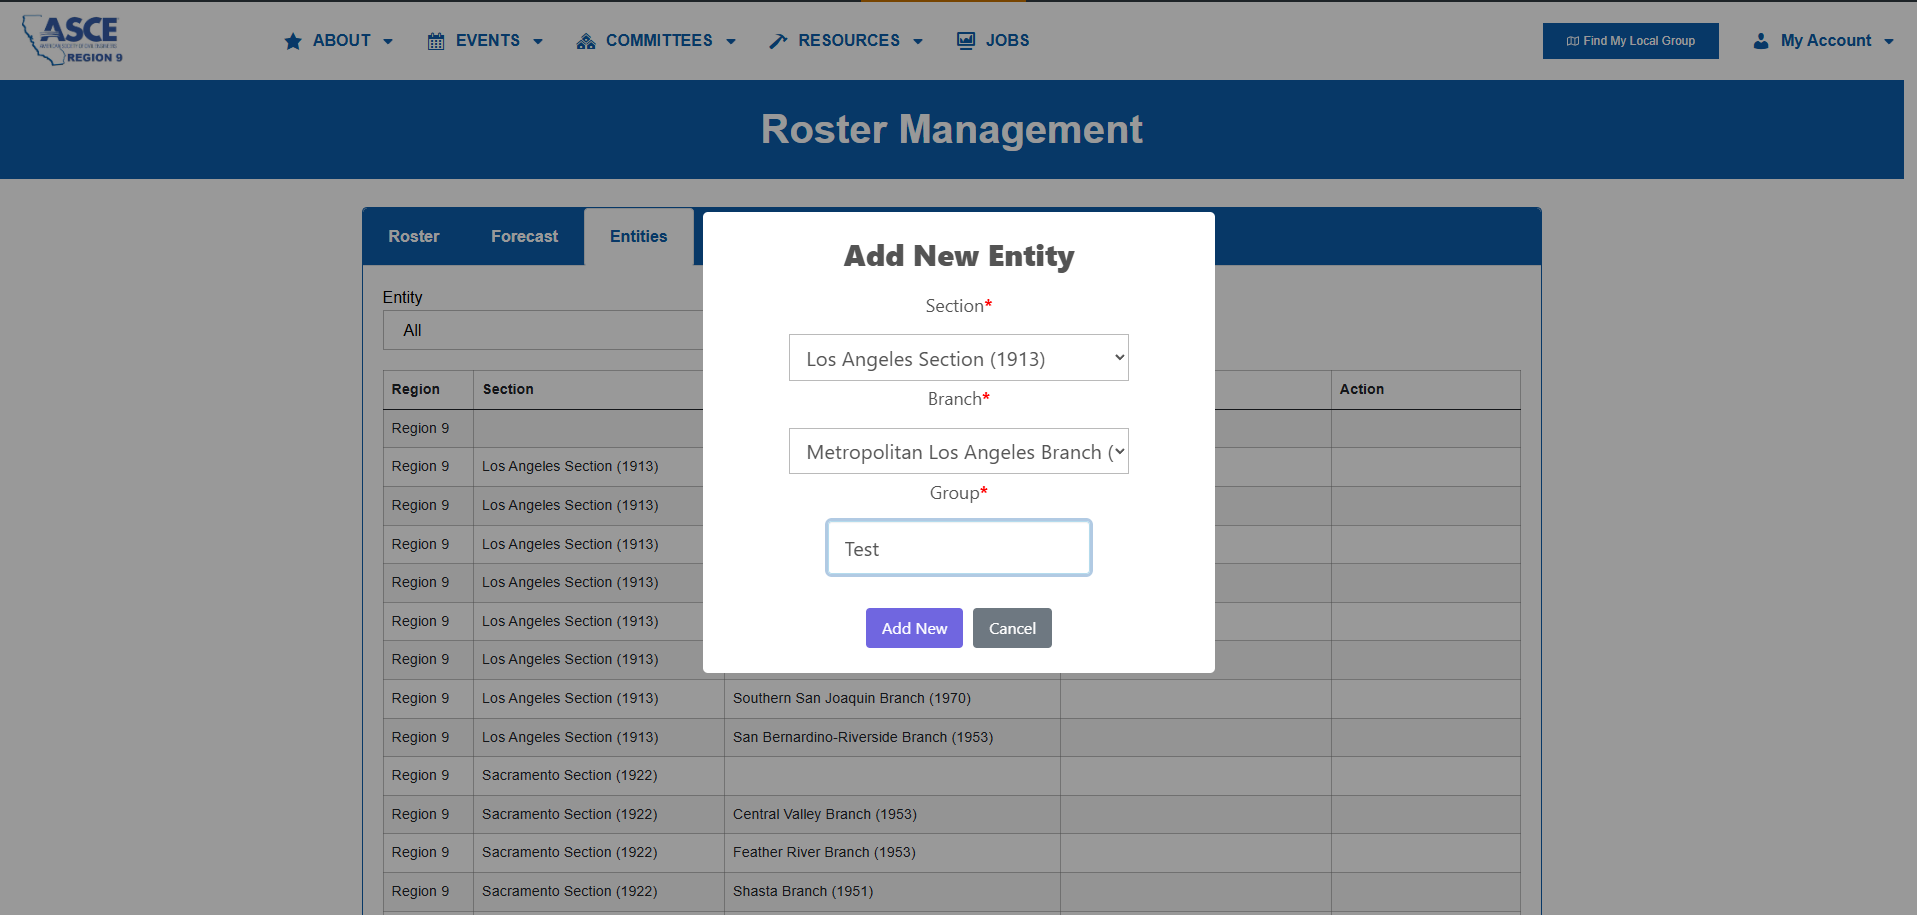
2. Add New Entity button
- Opens the “Add New Entity” modal to create a new group entity linked to a Region/Section/Branch.
- Purpose: add new organizational grouping rows that can later be used in roster management and forecasting.
- Section*
- Chooses the parent section (or None for region-level grouping).
- Branch*
- Chooses the parent branch inside that section (or None to attach group at section level).
- Group*
- The new custom group name to create (example: Test).
3. created entity row record
- It shows the exact hierarchy where the group is attached:
- Region 9 → Los Angeles Section (1913) → Metropolitan Los Angeles Branch (1997) → Group: Test
- This confirms the new entity/group was saved successfully.
- From this row, you can use:
- Edit to rename/update the group
- Delete to remove the group mapping
(7D) Interval
Interval Tab
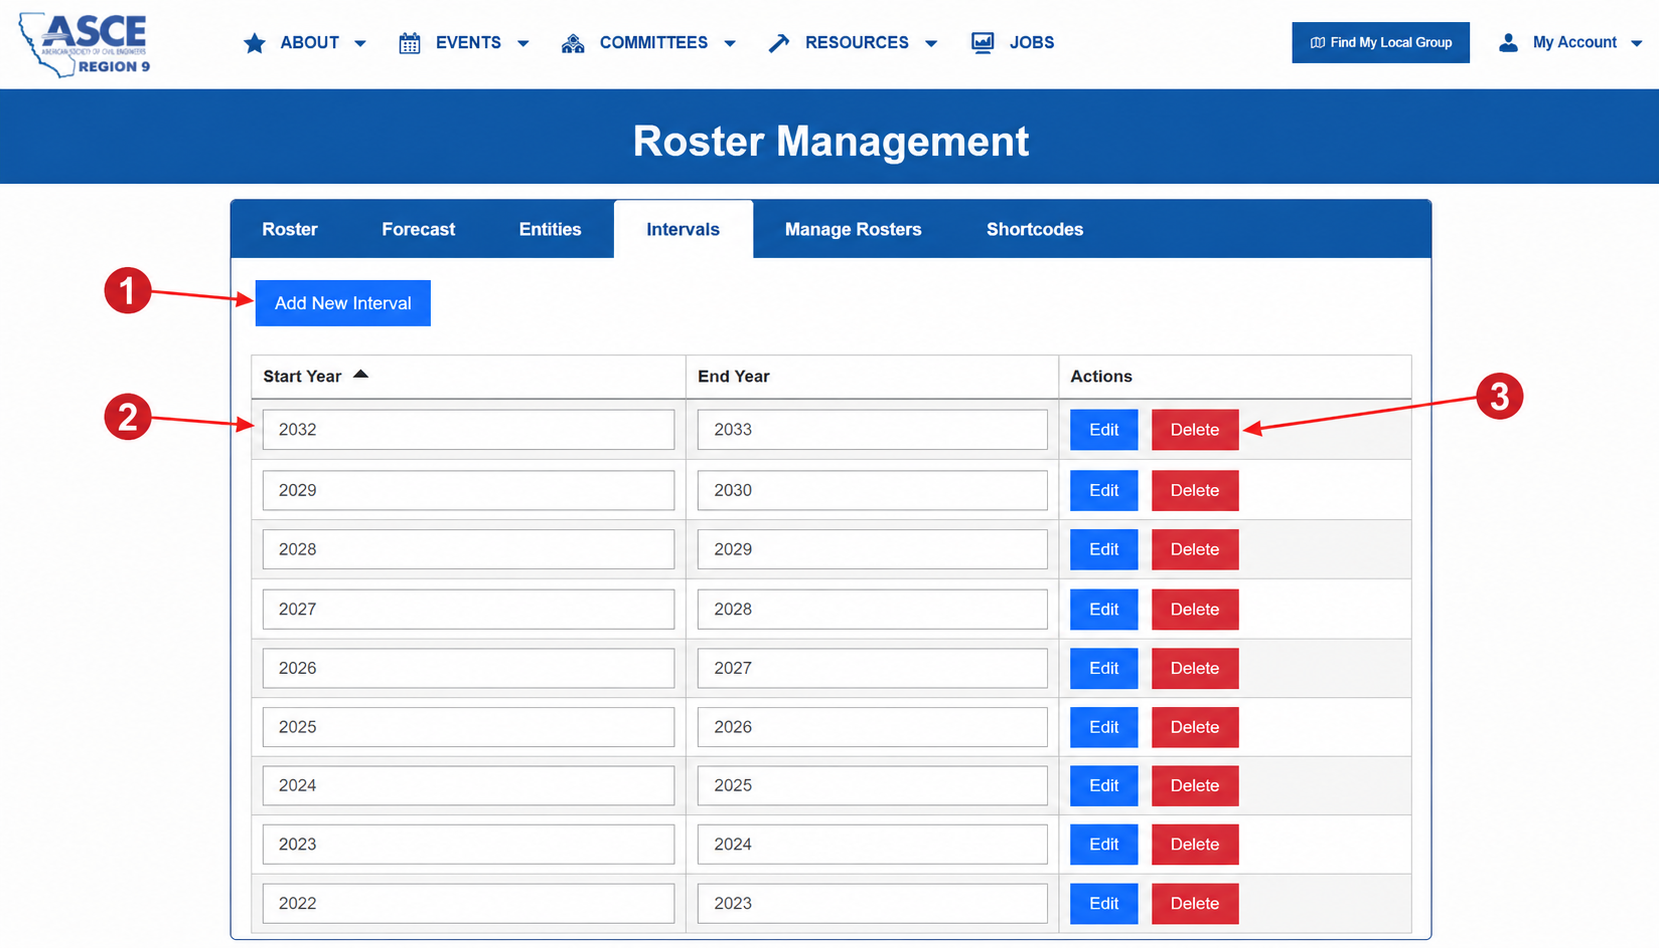
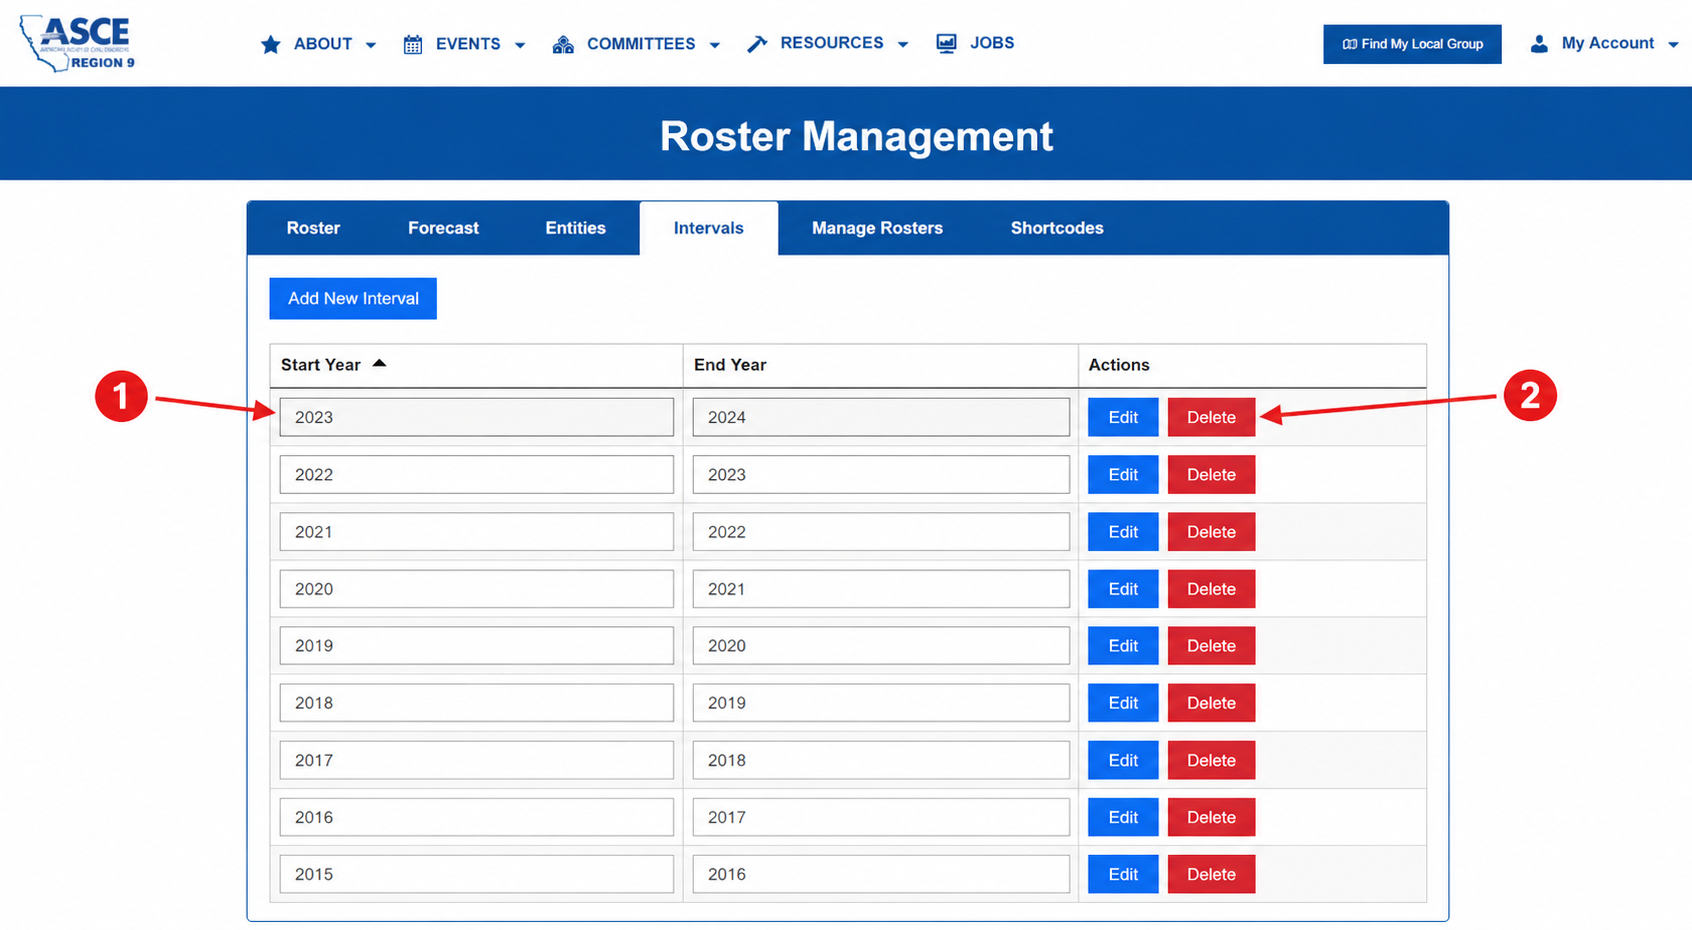
1. Add New Interval
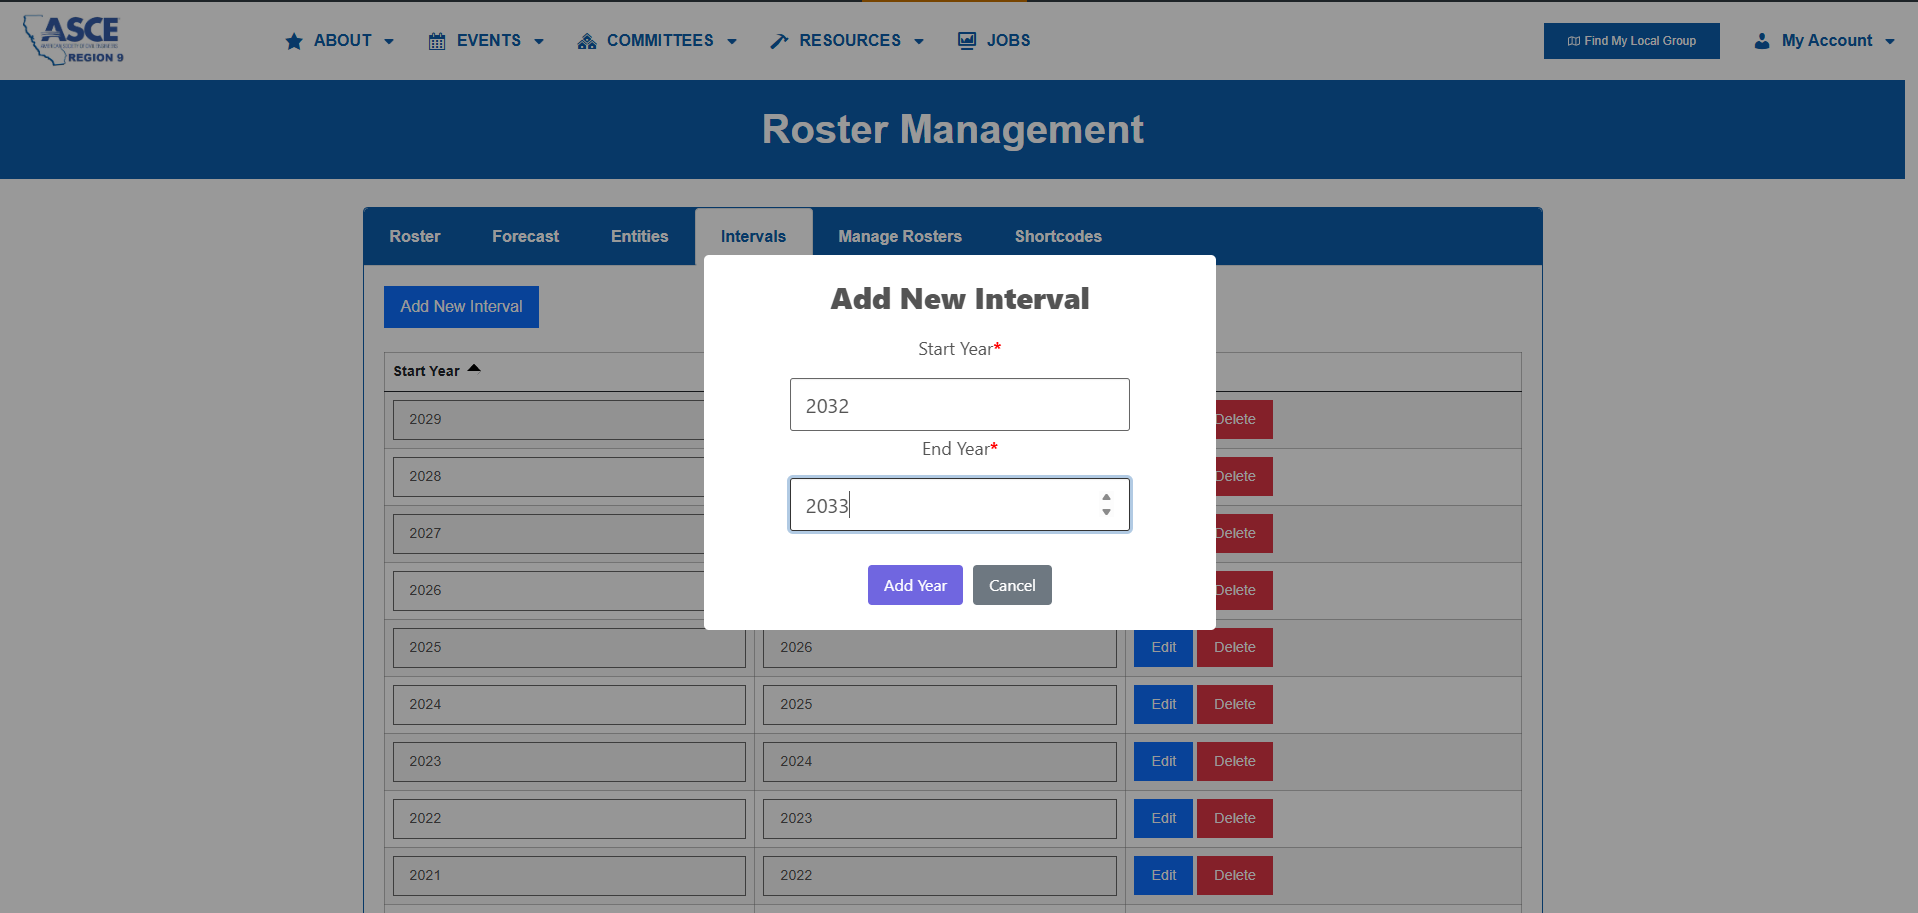
- Click Add New Interval.
- A modal opens asking for:
- Start Year (required)
- End Year (required)
- Click Add Year to save.
2. Intervals List/Table
- Each row is one interval record used by Roster/Forecast/Shortcodes logic.
- Example row: 2032 → 2033.
- The table is sorted by Start Year (descending in UI behavior), so newest years appear near top.
- These rows become selectable in Roster creation and forecast navigation.
3. Row Actions: Edit / Delete
- Edit:
- Enables Start Year and End Year inputs for that row.
- Click Update (button appears during edit mode) to save.
- Delete:
- Shows confirmation prompt.
- If confirmed, removes that interval row via delete-interval.
- Use carefully since this can affect roster/forecast behavior tied to that interval.
Recommended usage flow
- Add upcoming year intervals first (example: 2030-2031, 2031-2032).
- Verify they appear in the table.
- Go to Roster tab and use those intervals when creating new roster records.
- Use Forecast tab to move across those intervals and validate visibility.
(7E) Manage Rosters
Manage Roster Tab
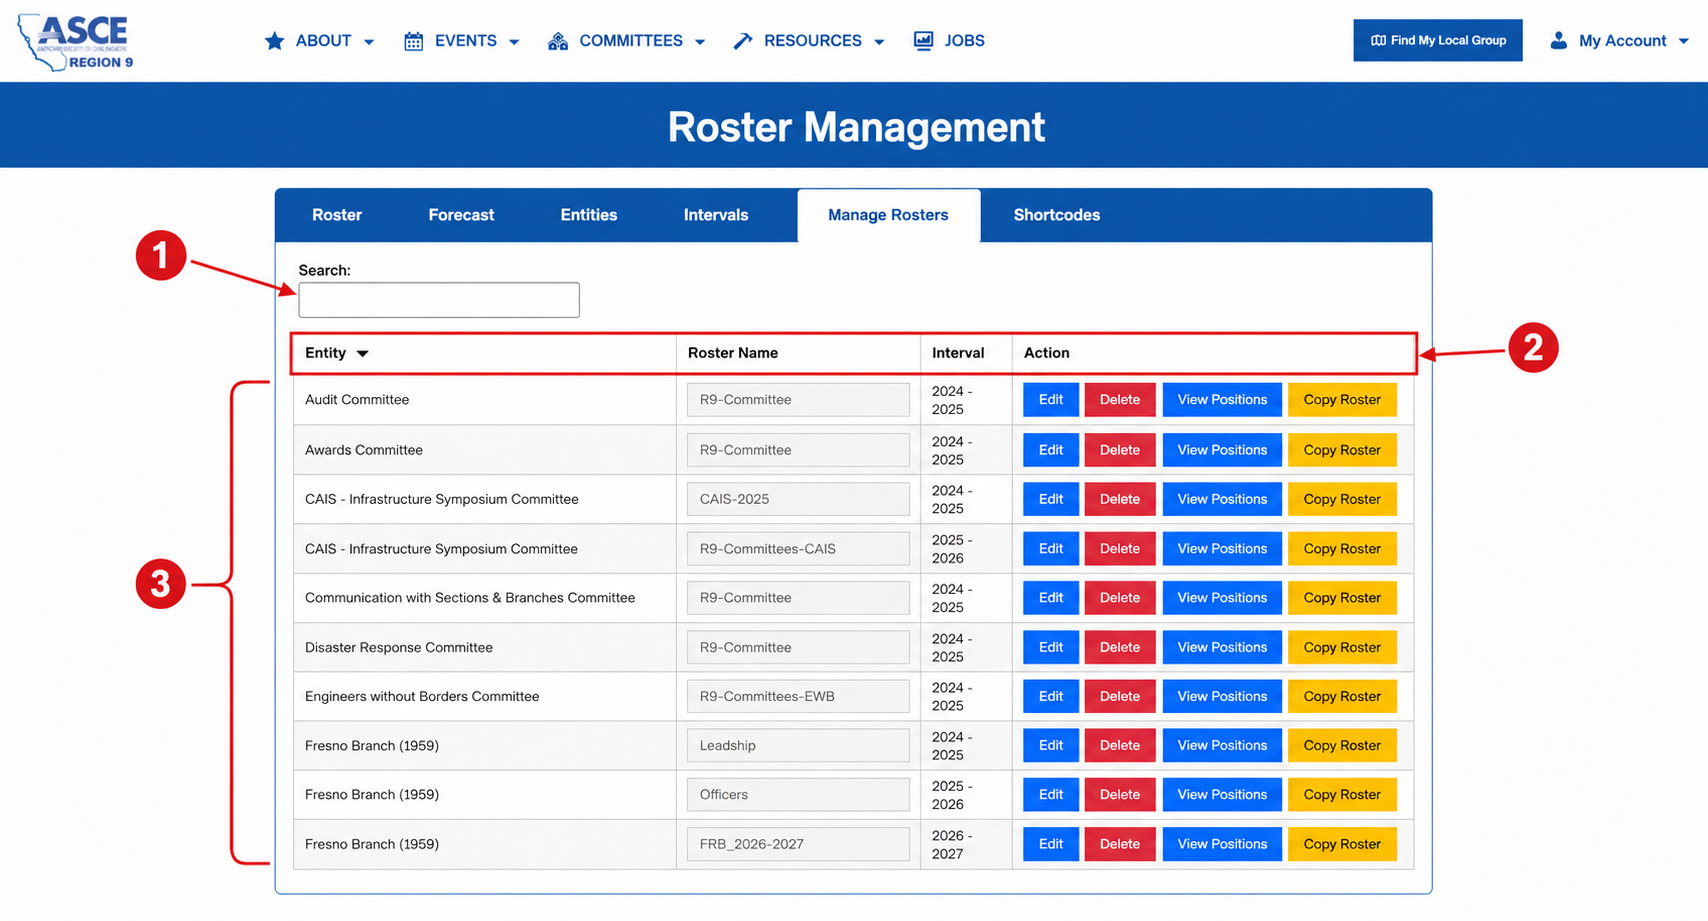
1. Search box
- Filters roster rows in the table for quick lookup.
- Used to find a roster by entity name, roster name, or visible row text.
2. Row action buttons
- Edit: enables roster name editing for that row, then updates via API.
- Delete: deletes the roster and its related positions.
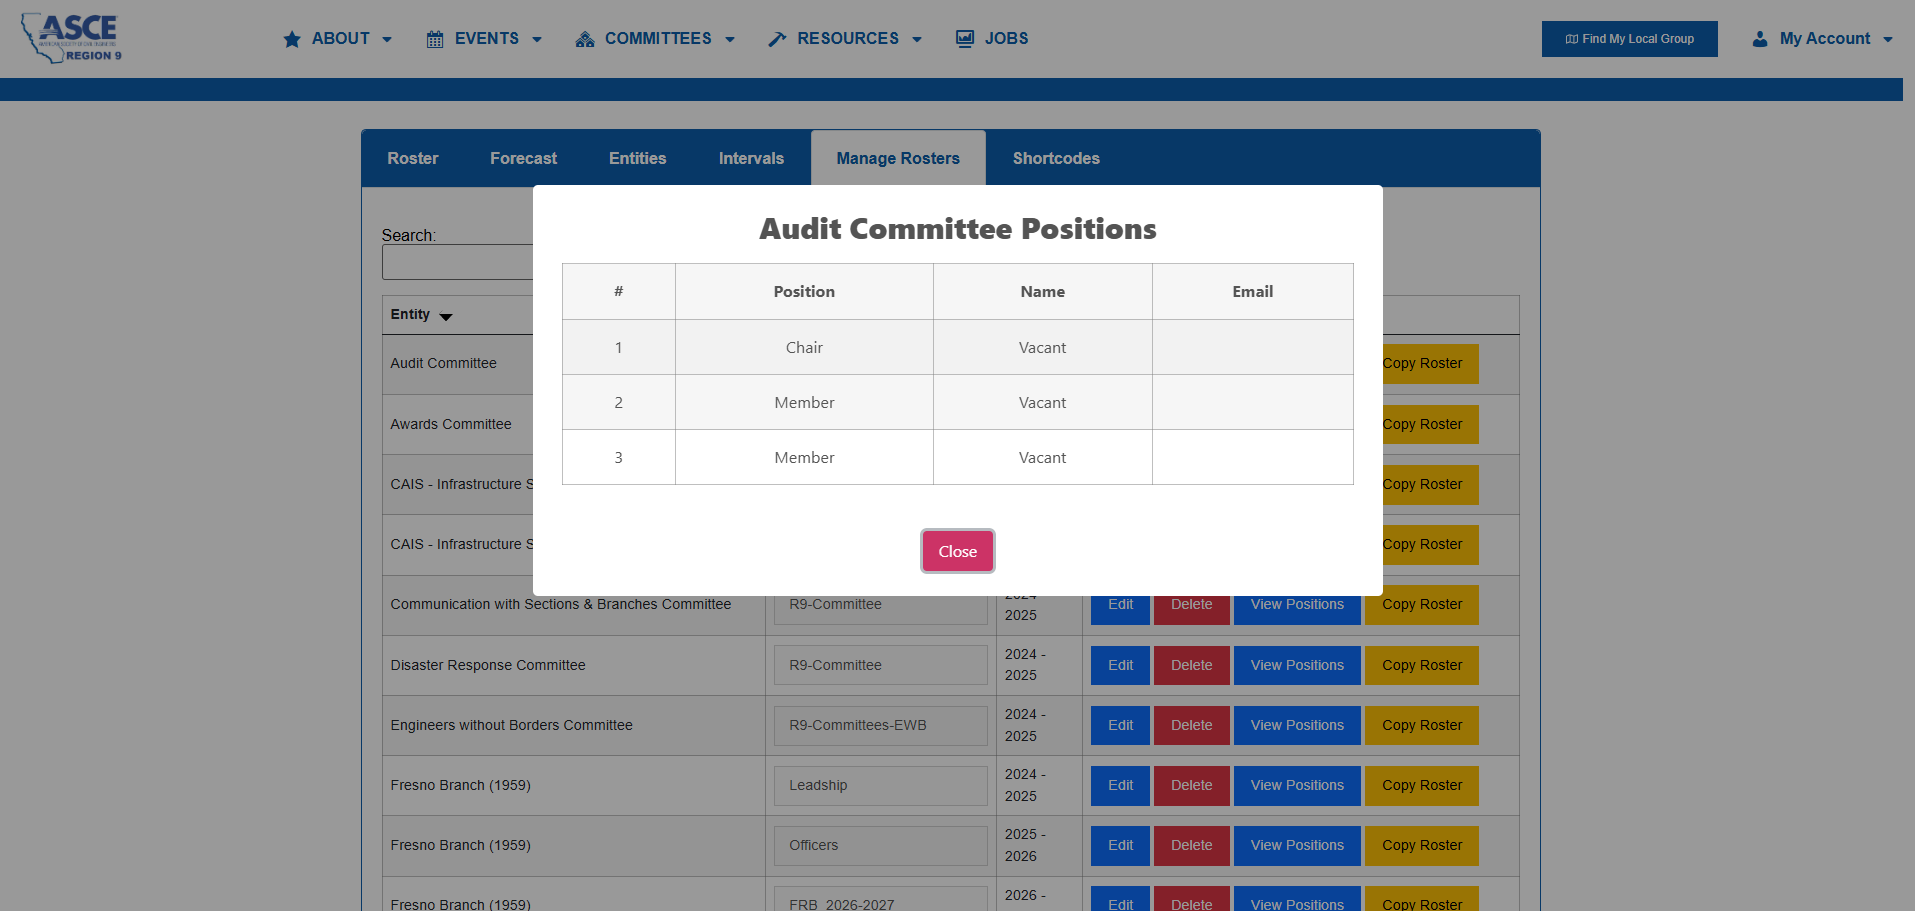
- View Positions: opens the roster’s position list (position-level records) for review/editing.
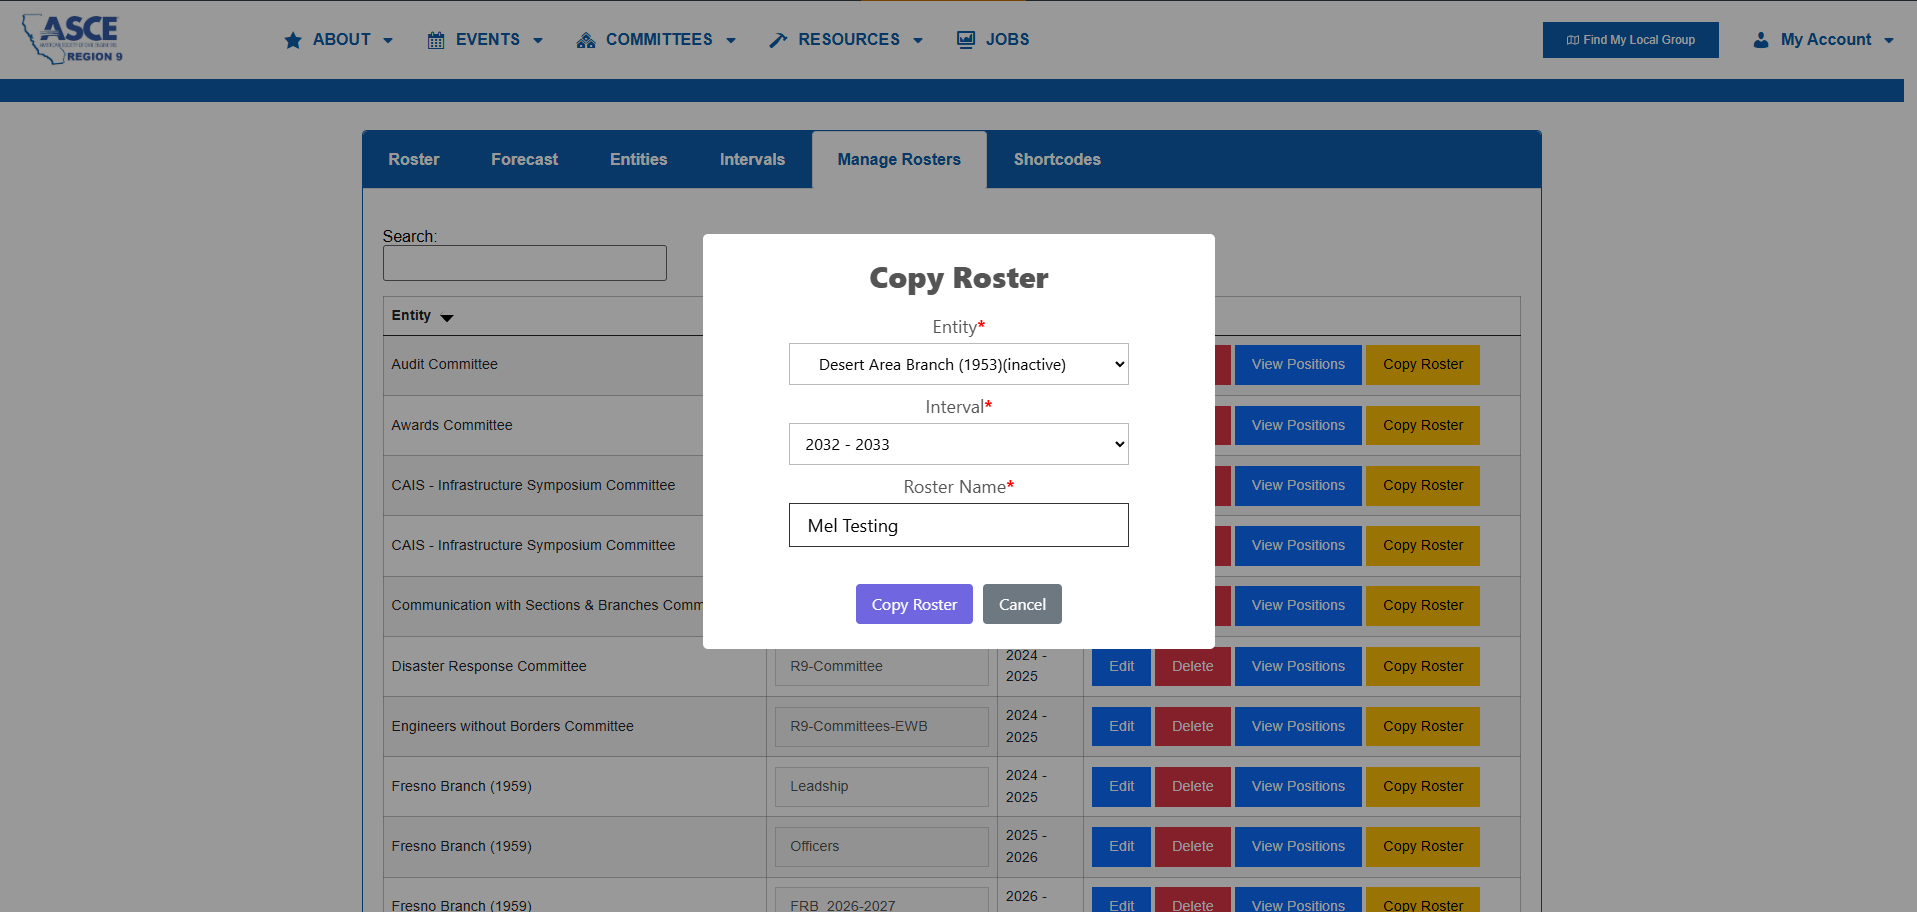
- Copy Roster: clones a selected roster structure into another interval/entity (used to speed up new-year setup).
3. Manage Rosters table
- Main listing of all roster records from rosters joined with entity + interval data.
- Columns:
- Entity: resolved name (region/section/branch/group)
- Roster Name
- Interval (start_year – end_year)
- Action buttons
Copy Roster
- Entity*
- Selects the destination entity (region/section/branch/group) where the copied roster will be created.
- Interval*
- Selects the destination interval (year range).
The dropdown is populated from available intervals only for that entity (intervals not yet used by that entity).
- Selects the destination interval (year range).
- Roster Name*
- Name of the new copied roster record.
(7F) Shortcodes
Shortcodes Tab
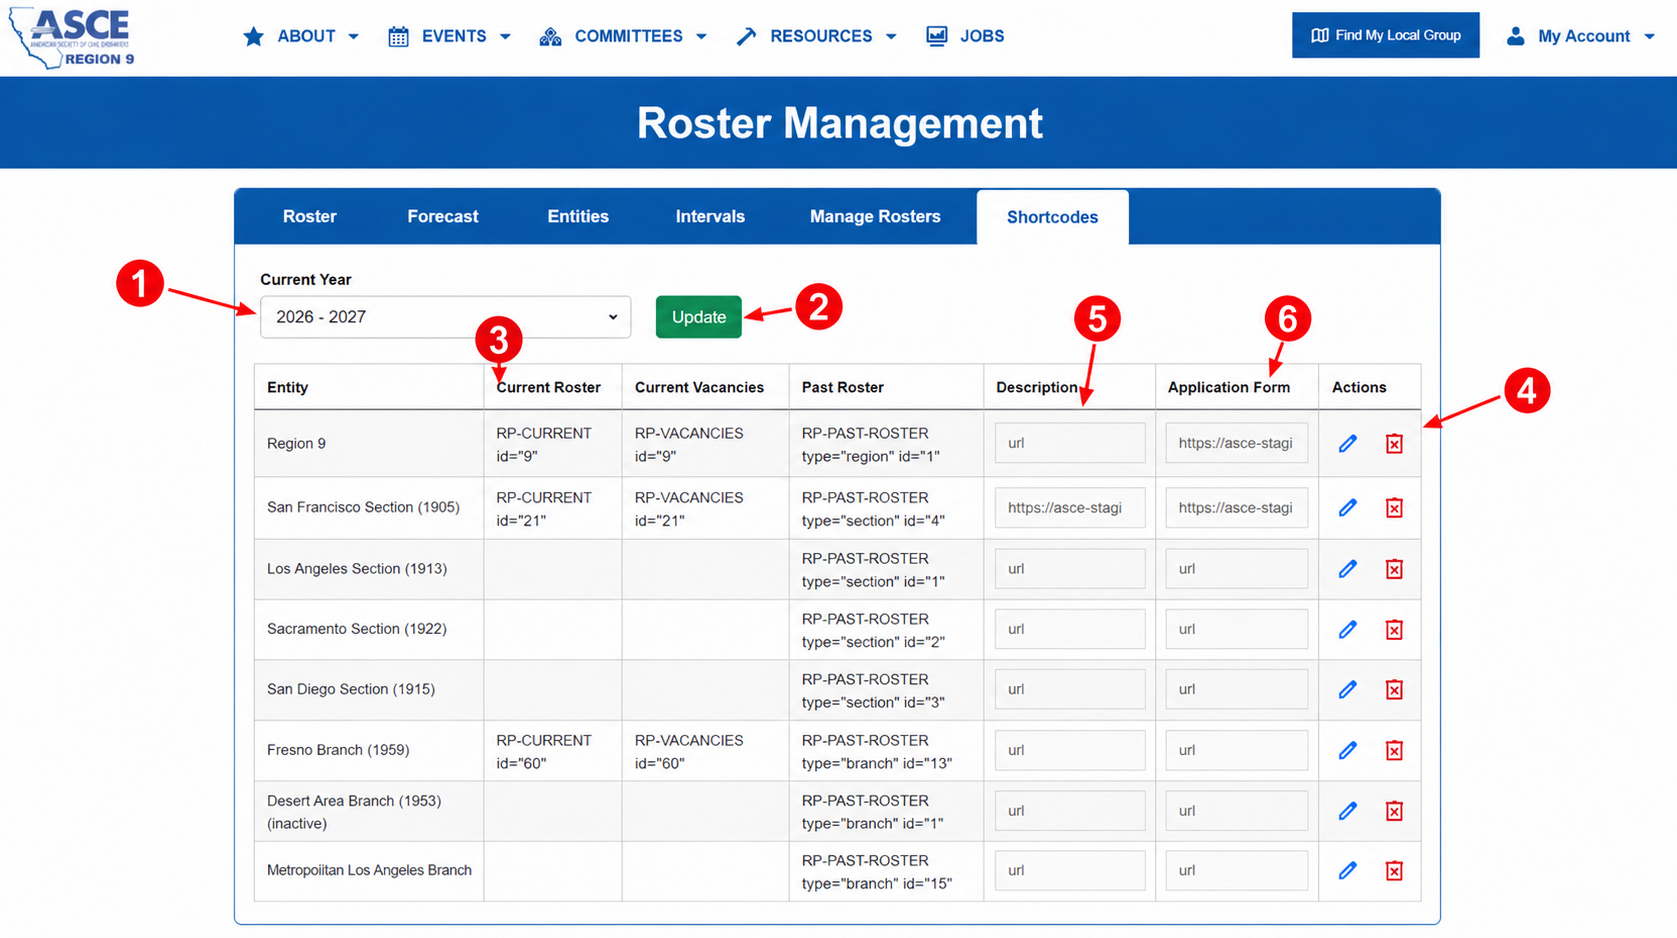
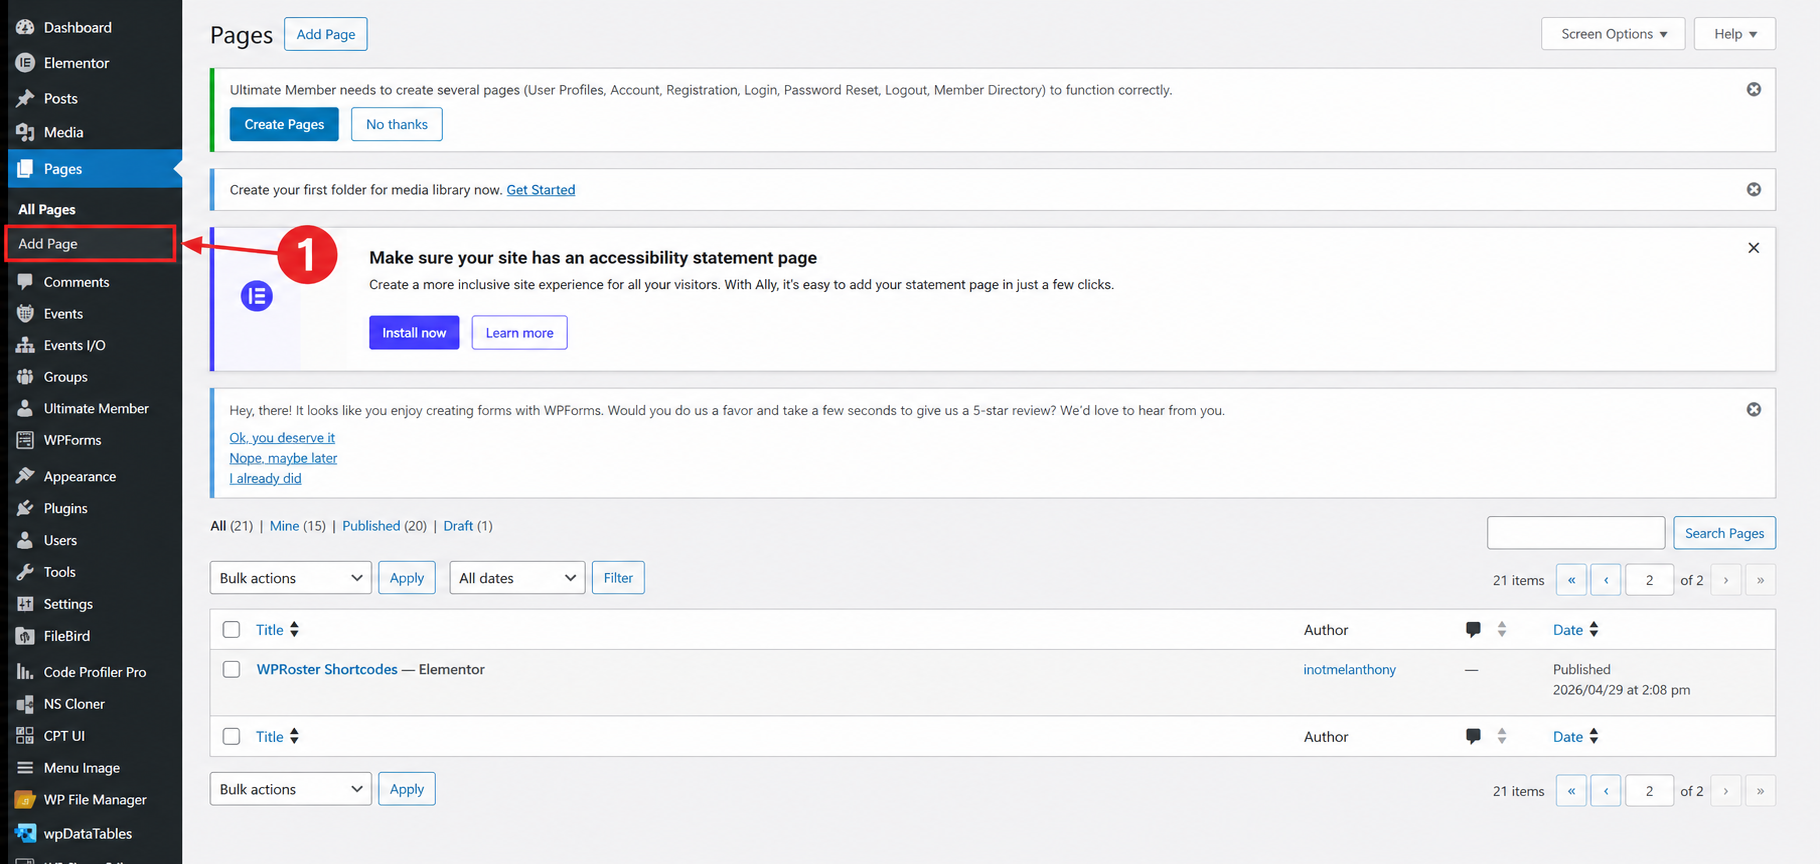
1.How to add page
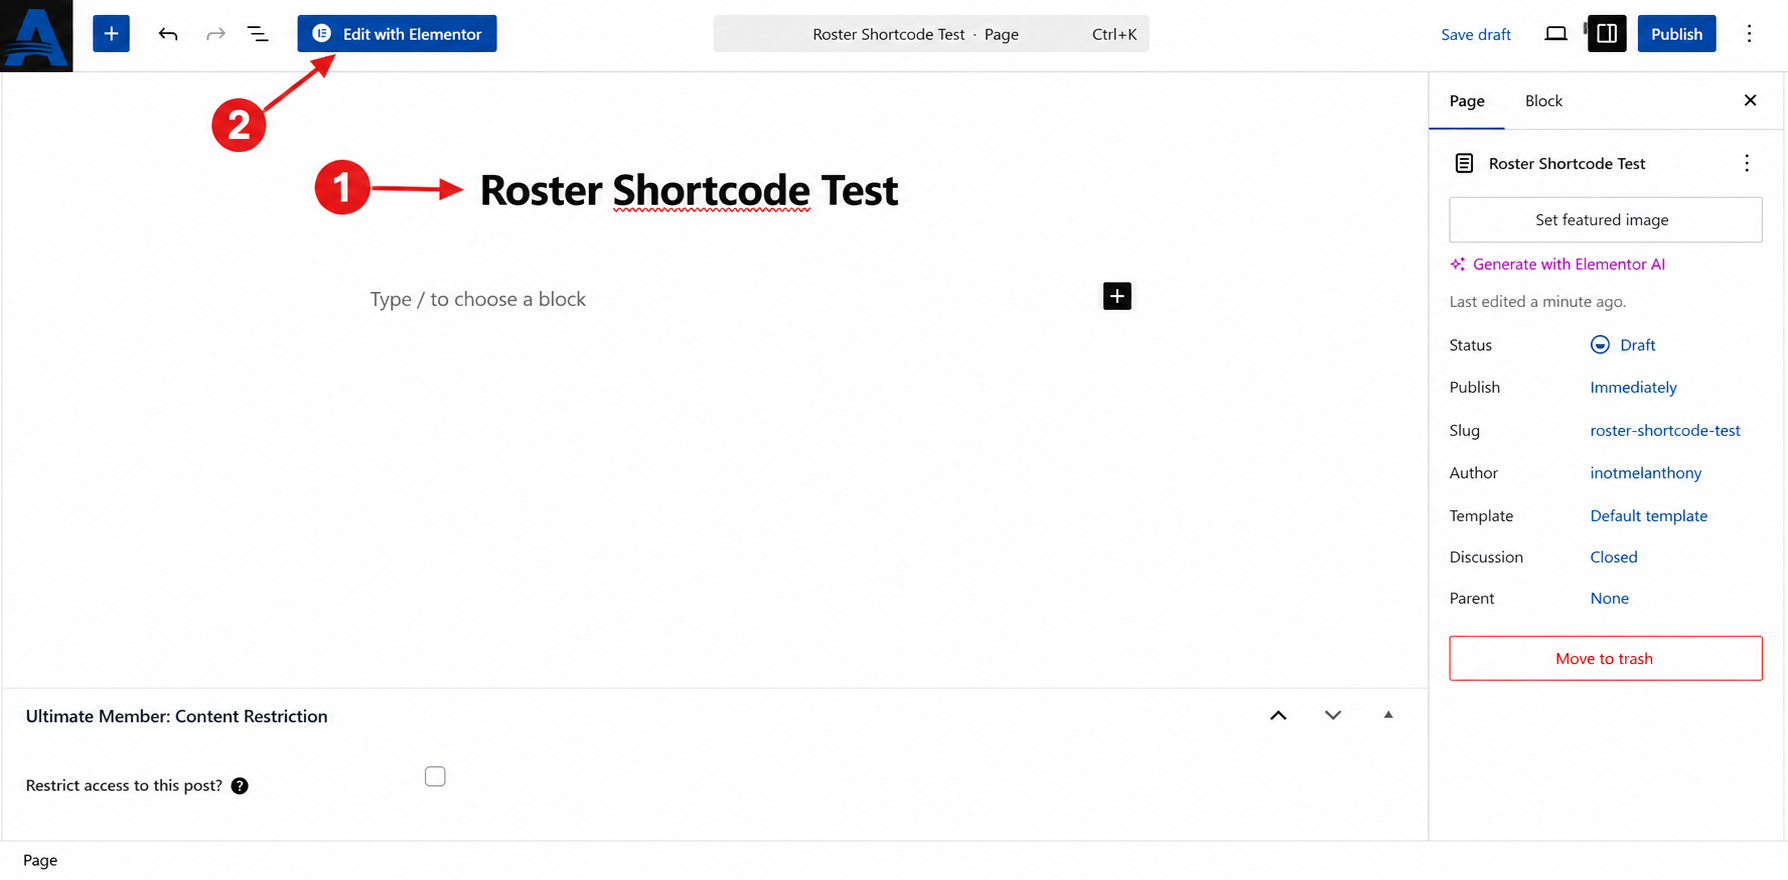
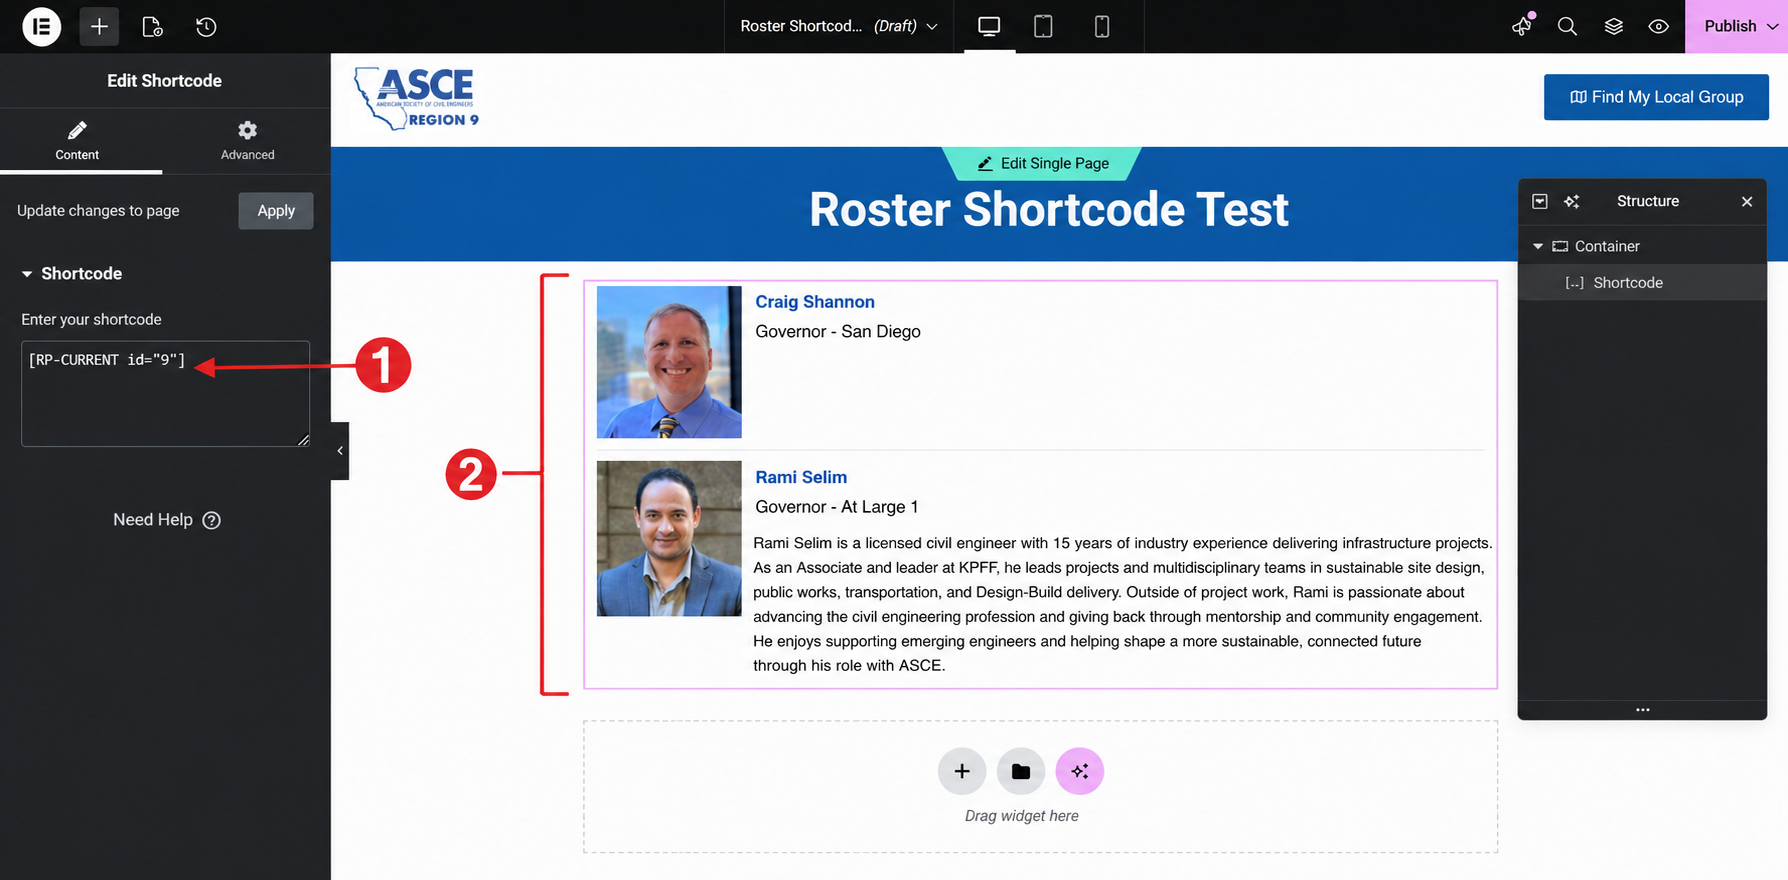
1.1 Name the page and edit with elementor
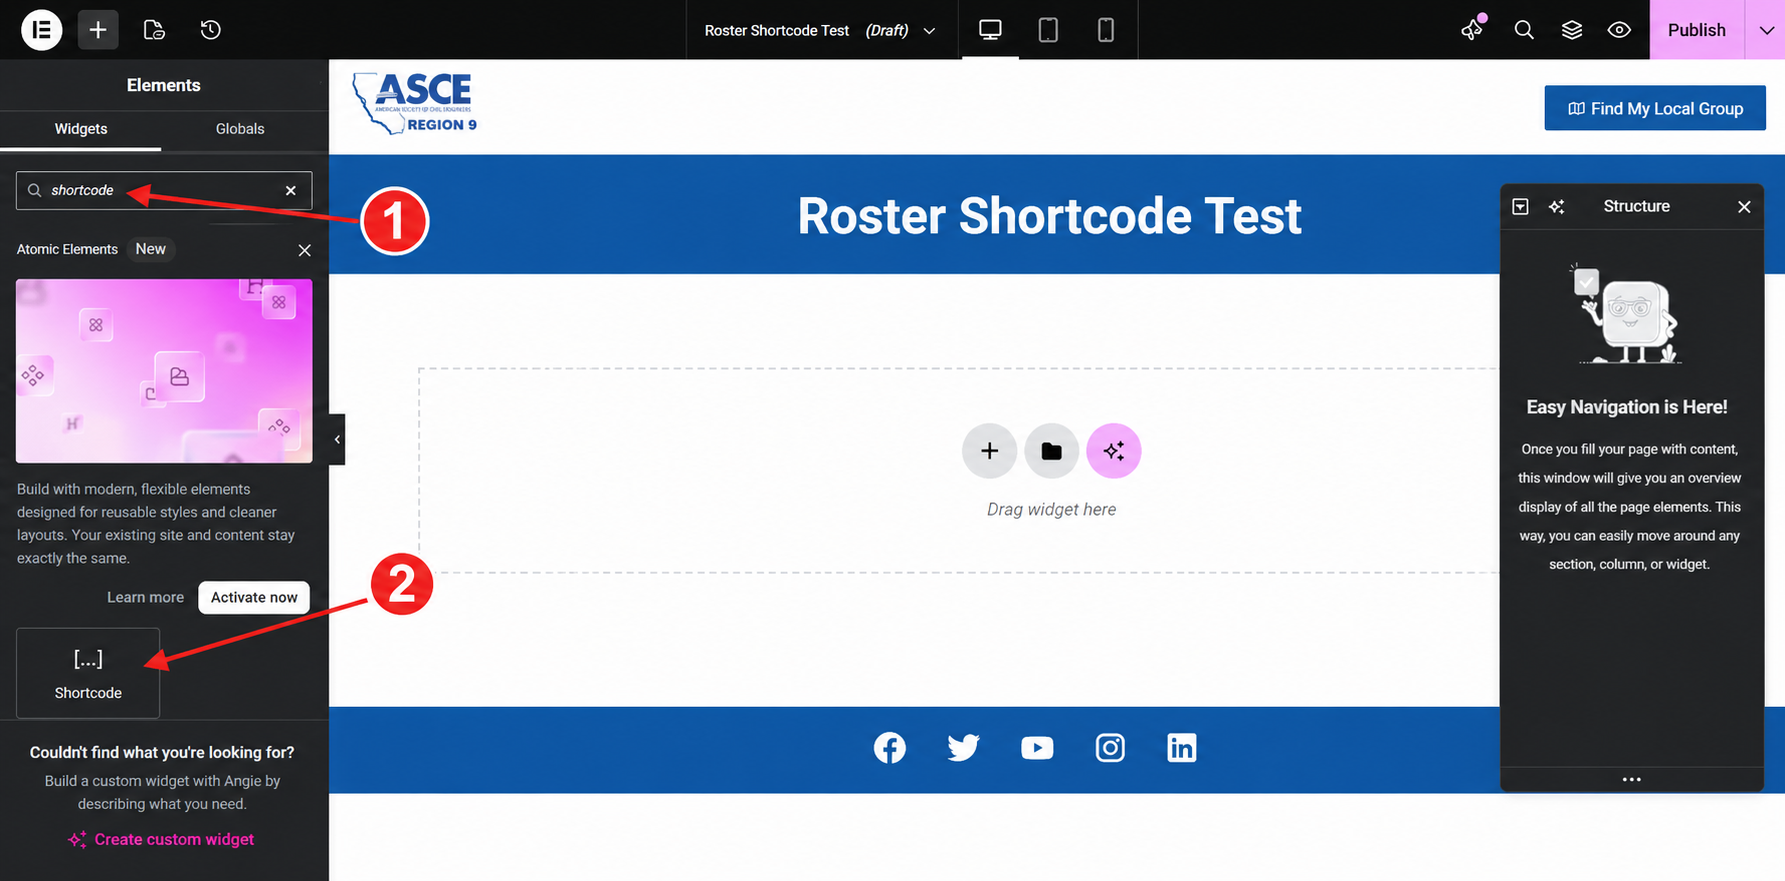
1.2 Search for Shortcode widget and click it
1.3 Paste the Shortcode from Roster
1. Current Year selector
- Chooses which interval is treated as the “current” publishing year for shortcode generation.
- Data comes from roster_settings.setting = ‘current_year’ and roster_intervals.
2. Update Button
- Saves selected Current Year interval into settings (roster_settings.value) via update-current-year-value.
- This affects what interval is treated as “current” across shortcode-related behavior.
3. Generated shortcode table
- For each entity row, code generates:
- Current roster shortcode (if a roster exists in selected interval)
- Current vacancies shortcode (if roster exists)
- Past roster shortcode (always based on entity type + id)
4. Actions column (edit/delete links for entity links)
- Edit icon: lets you update Description/Application URLs for that entity.
- Delete icon: removes stored entity links for that row.
5. Description column
- Stores optional description URL for that entity.
- Used by frontend views (like vacancies) to show a “Position Descriptions” link.
5. Description column
- Stores optional description URL for that entity.
- Used by frontend views (like vacancies) to show a “Position Descriptions” link.
6. Application Form column
- Stores optional application URL for that entity.
- Used by frontend views to show an “Apply Now” style link.
How to use the shortcode generated from the Roster Shortcode tab
Go to Roster Management → Shortcodes.
Set the correct Current Year at the top, then click Update.
- In the table, find the entity row you want to publish
- Copy the value from the Current Roster column
- Go to WP-Admin → Pages → Add New
- Enter your page title
If using Elementor, click Edit with Elementor.
Search for the Shortcode widget and drag it into the page.
Paste the copied value inside square brackets:
Click Publish/Update.
Open the page on frontend and verify the roster is displayed.
If nothing appears:
Recheck that you copied from the Current Roster column.
Confirm brackets are included: [ … ]
Confirm the id is correct for that entity and current year.
Confirm roster data exists for that roster ID in the Roster tab.