
Quick Reference Guide for WPForms Configuration
OVERVIEW - Setting-up WPForms
To properly configure WPForms, there are six (6) key components that must be set up. These elements work together to ensure a complete form workflow—from creation to submission, payment, integration, and data management.
(4A) Create a Form – Create a new form by selecting a template or starting from scratch. Define the form name and structure to serve as the foundation of data collection.
(4B) Add Form Fields – Add and arrange input fields such as name, email, dropdowns, file uploads, and payment fields. This step defines what information will be collected from users.
(4A) Create a Form
1 - Creation of Forms
Click each image to enlarge.
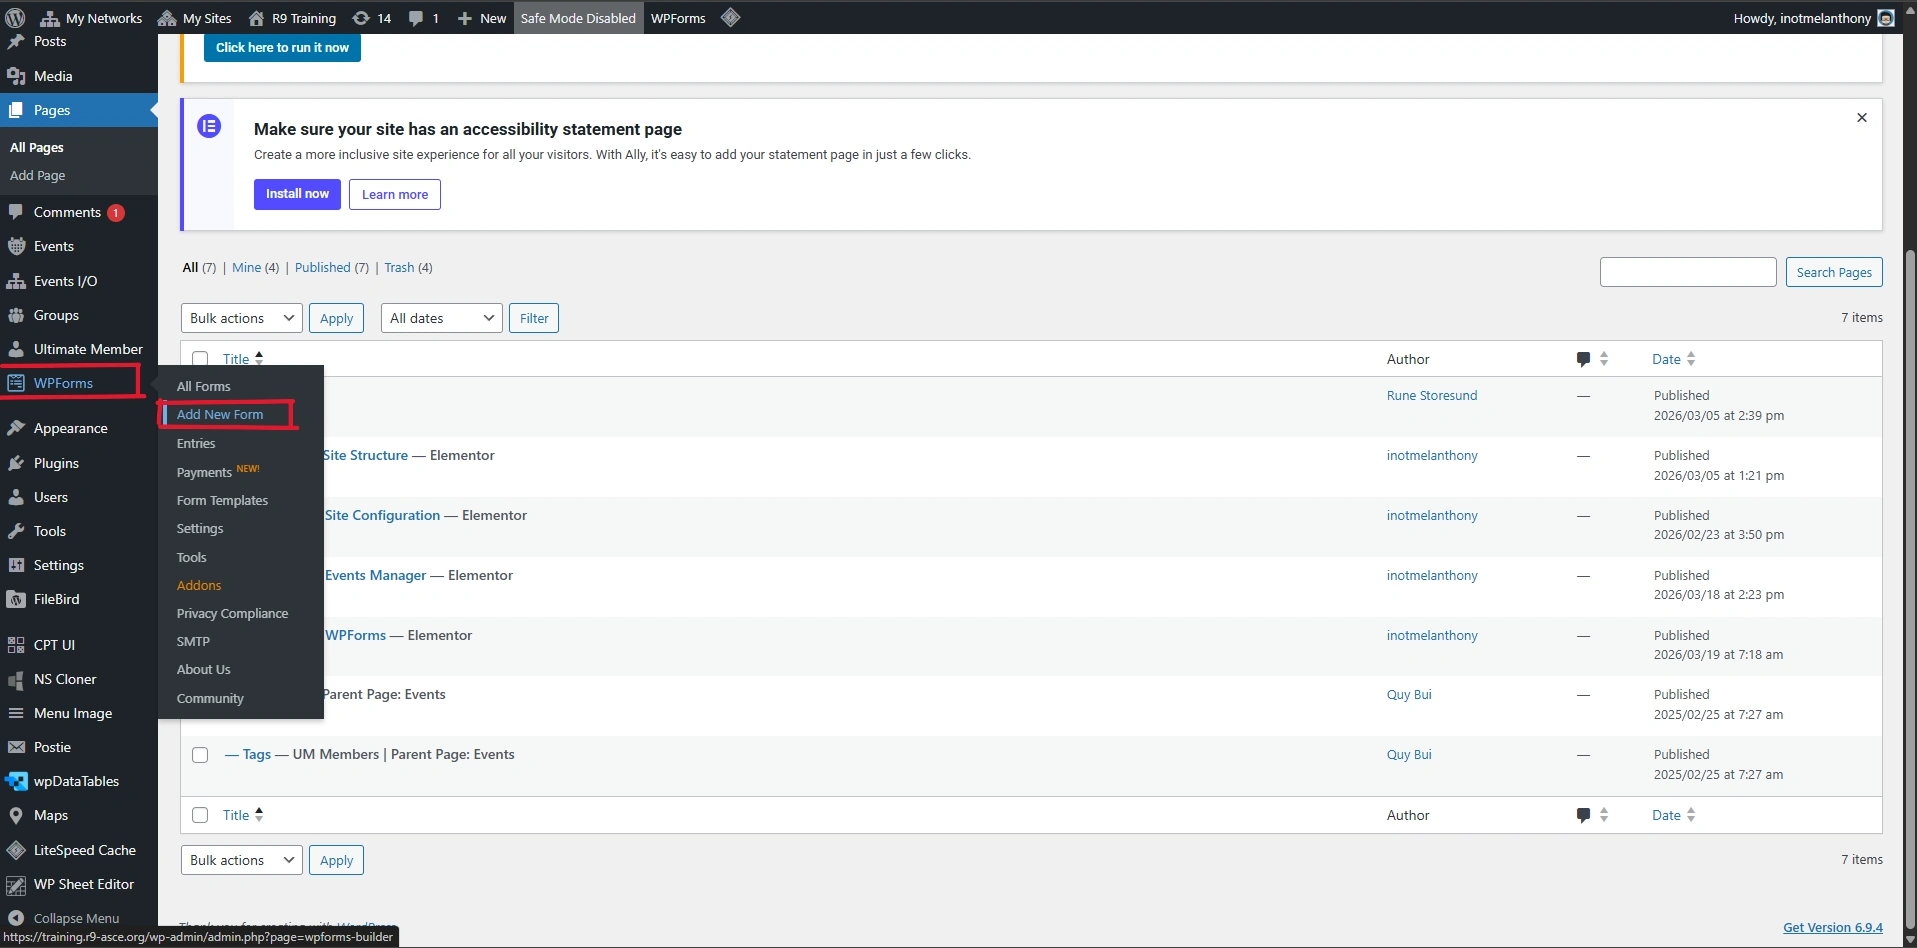
Form Creation Menu Access
The WPForms menu provides access to all form-related features, including creating, editing, and managing forms. Administrators can navigate to WPForms → Add New to start building a new form. This section serves as the main entry point for form creation and configuration.
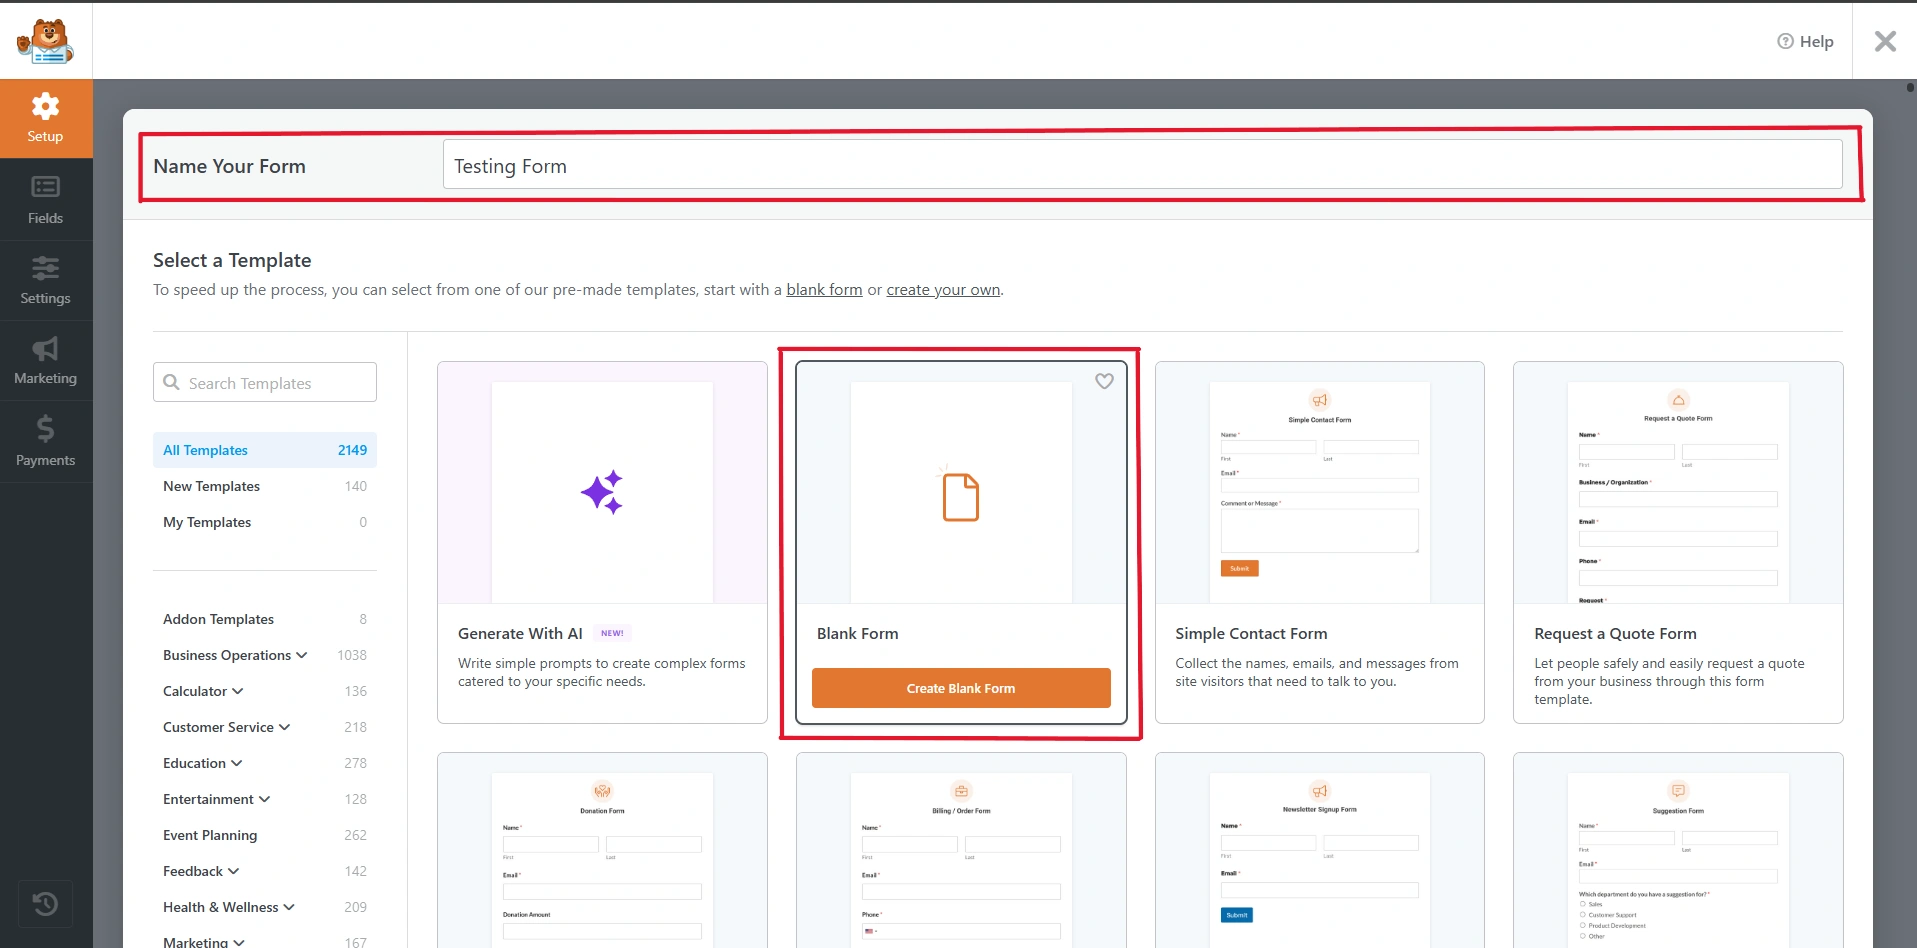
Form Setup & Template Selection
The Form Setup screen allows you to name your form and choose a template to begin with. You can select from pre-built templates or create a Blank Form for full customization. This step defines the structure and purpose of the form before adding fields and configurations.
Form Initialization
After selecting a template, the form builder initializes and prepares the workspace for customization. This ensures that the selected layout is ready for adding fields, configuring settings, and designing the form. Proper setup at this stage helps streamline the form-building process.
Tip: You must be logged in as an Administrator to create and manage forms in WPForms. Use clear and descriptive form names, and select appropriate templates to ensure a consistent and professional structure across all forms.
(4B) Add Form Fields
1. Add Fields to the Form
Click each image to enlarge.
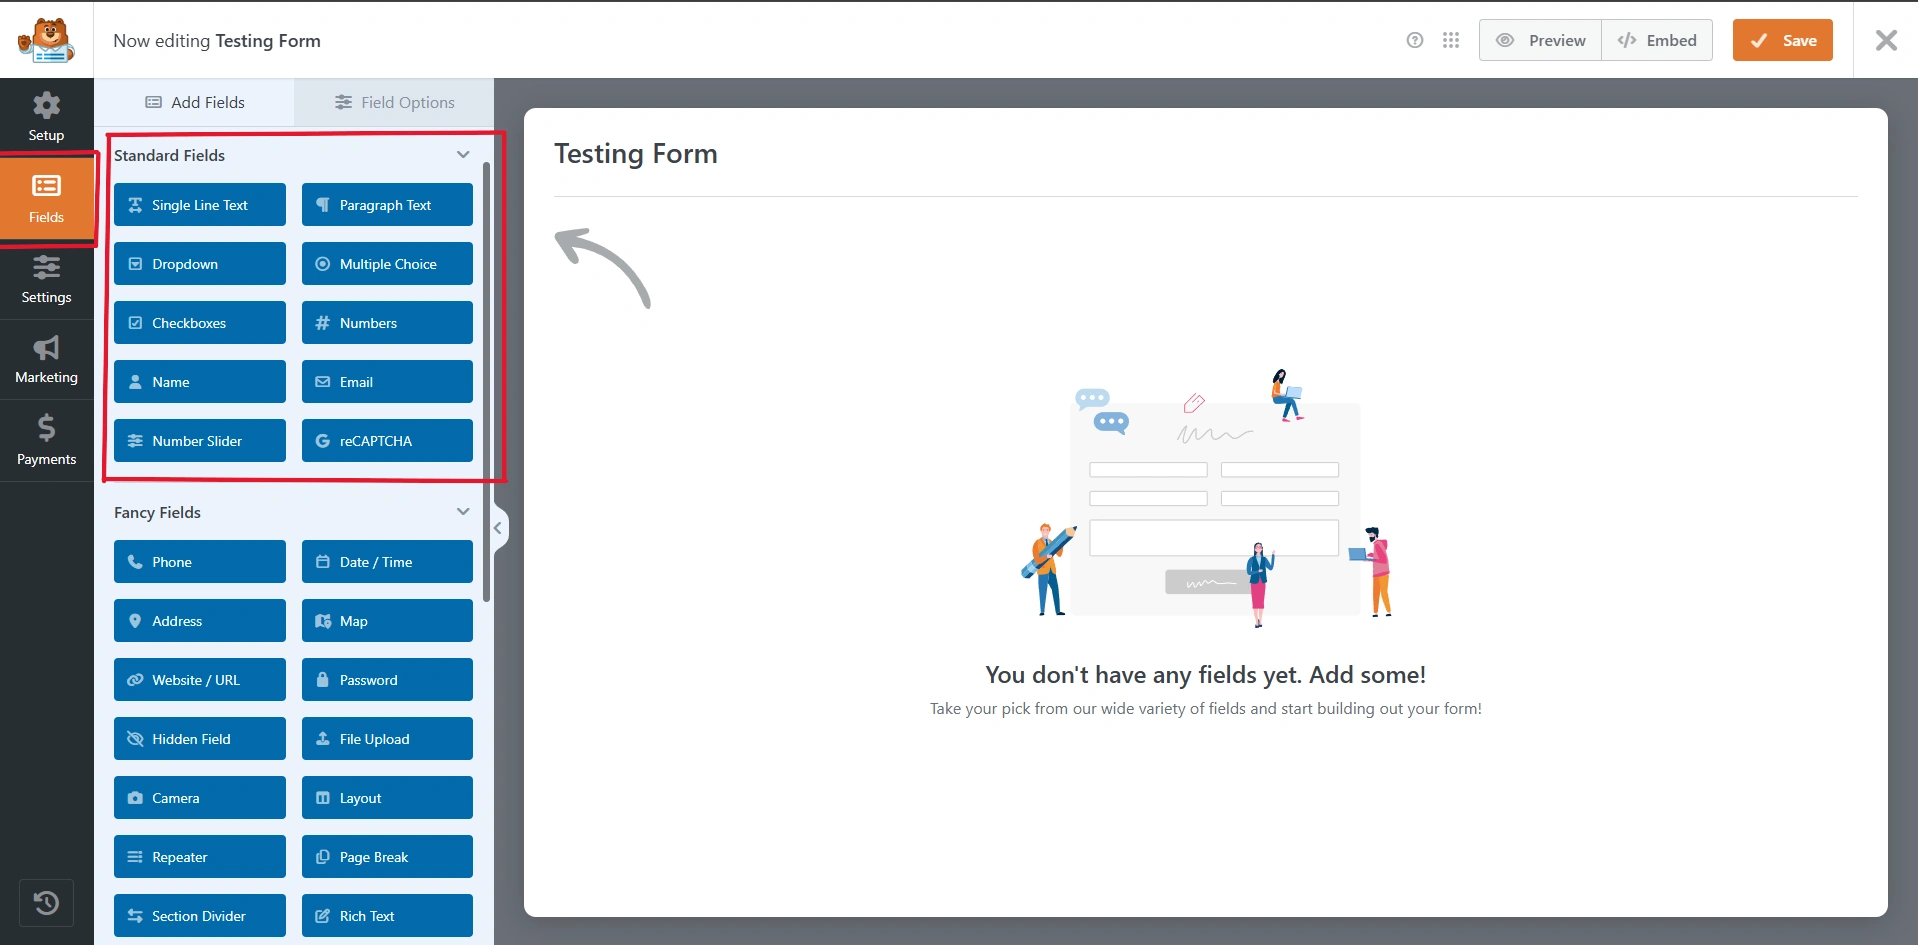
Fields Panel Access
The Fields tab in the WPForms builder provides access to all available form elements. Administrators can choose from standard fields such as text, email, dropdowns, and checkboxes, as well as advanced fields like file uploads and date/time inputs. This panel serves as the main area for building the form structure.
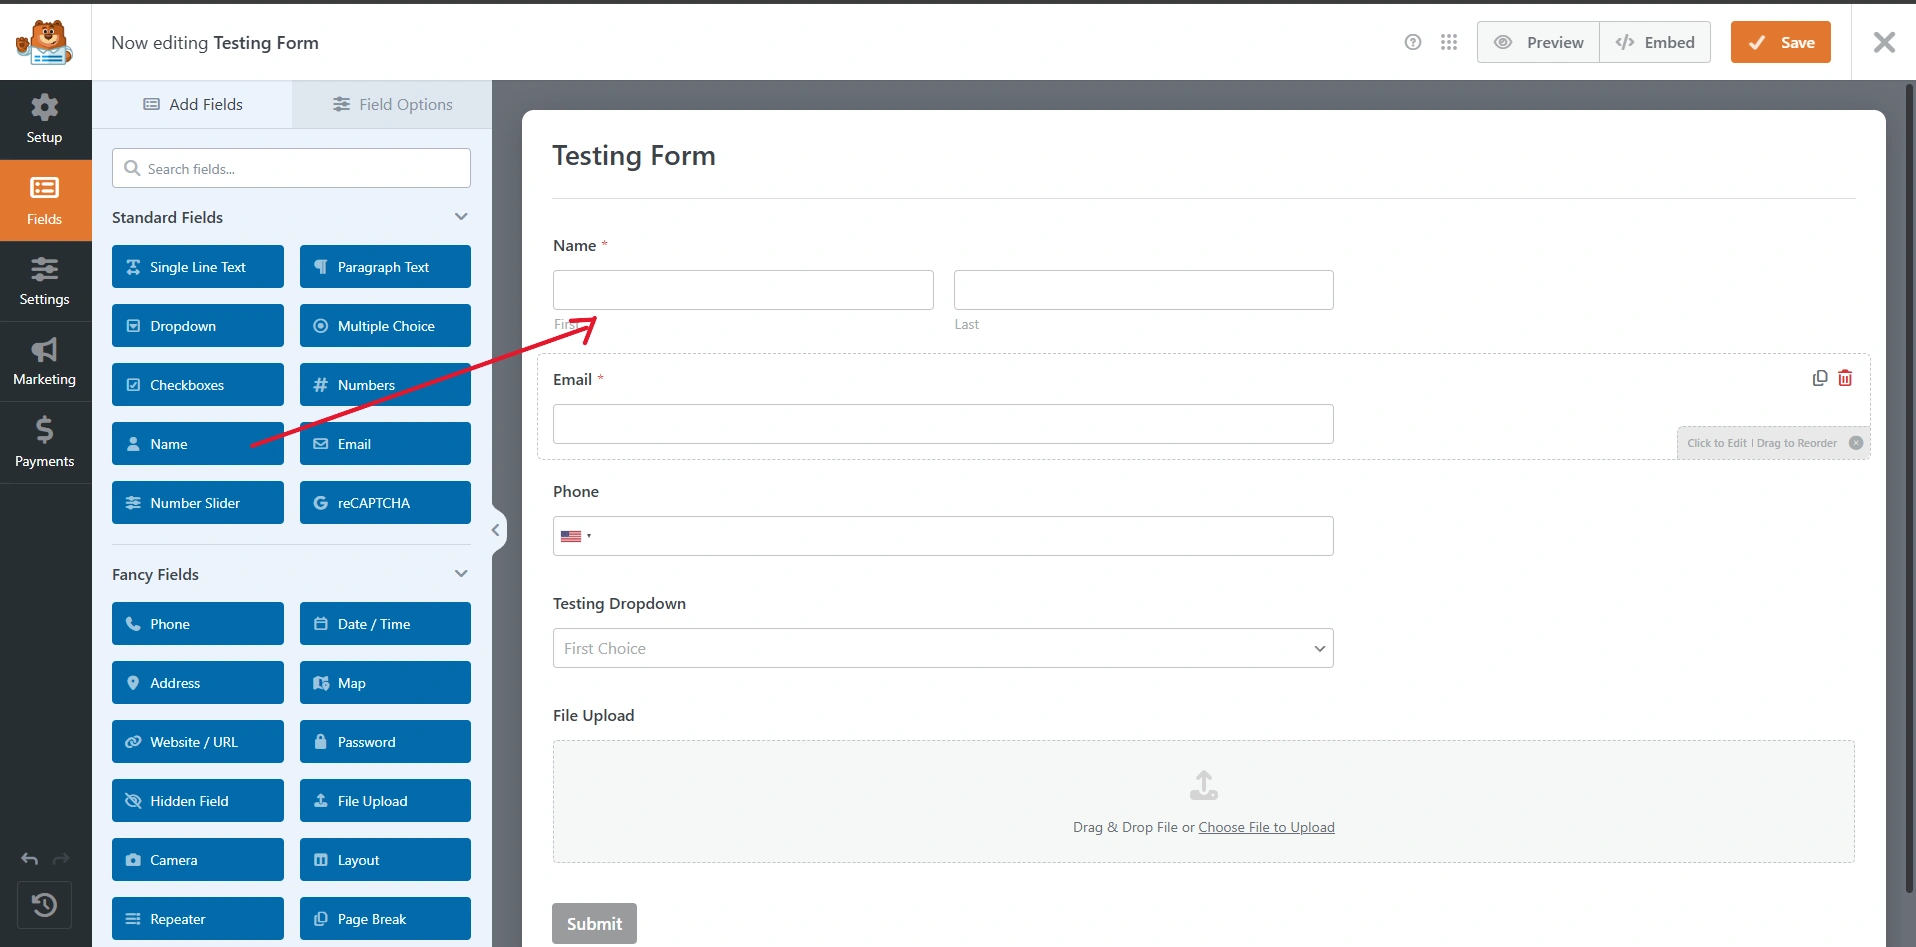
Drag & Drop Field Builder
Fields can be easily added to the form using a drag-and-drop interface. Simply select a field from the left panel and drag it into the form preview area. This allows quick and flexible customization without requiring any coding.
Field Arrangement & Customization
Once fields are added, they can be rearranged by dragging them into the desired order. Each field can also be edited to update labels, placeholders, required settings, and validation rules. Proper arrangement ensures a clean and user-friendly form layout.
Tip: You must be logged in as an Administrator to add and manage form fields in WPForms. Use clear field labels and consistent formatting to ensure a professional and user-friendly form layout.
(4C) Configure Form Settings
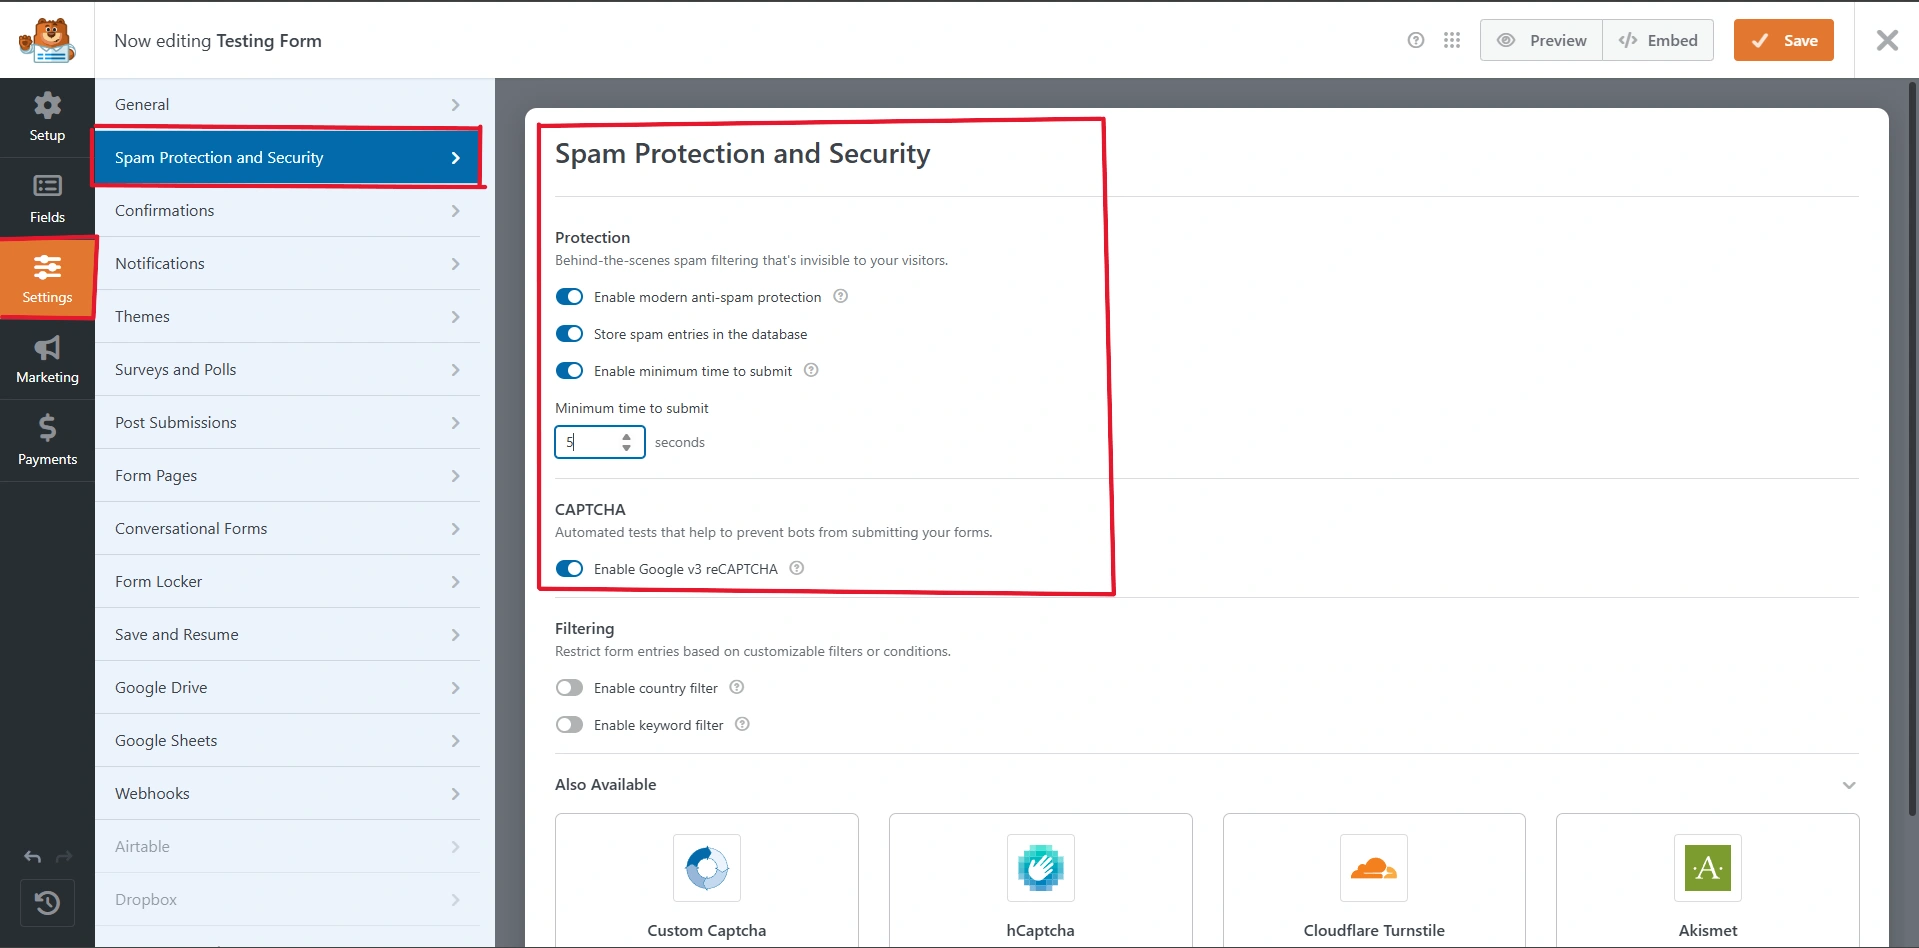
1. Spam Protection and Security
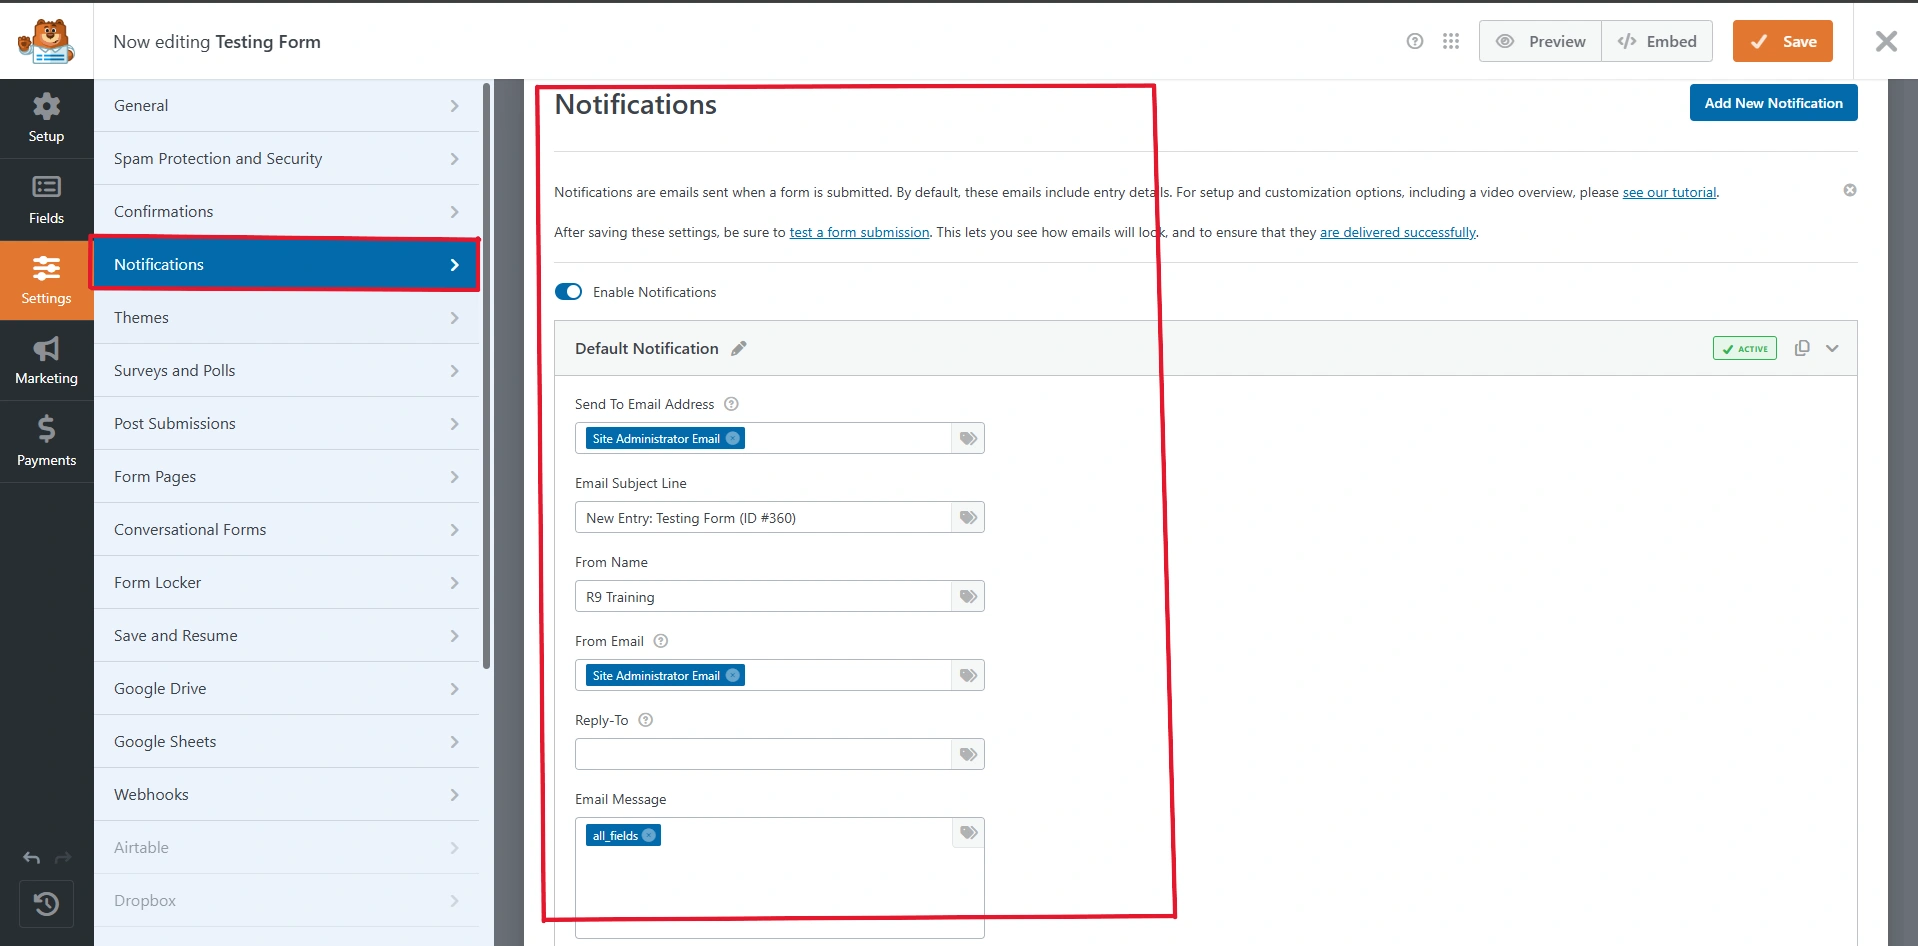
2. Notifications
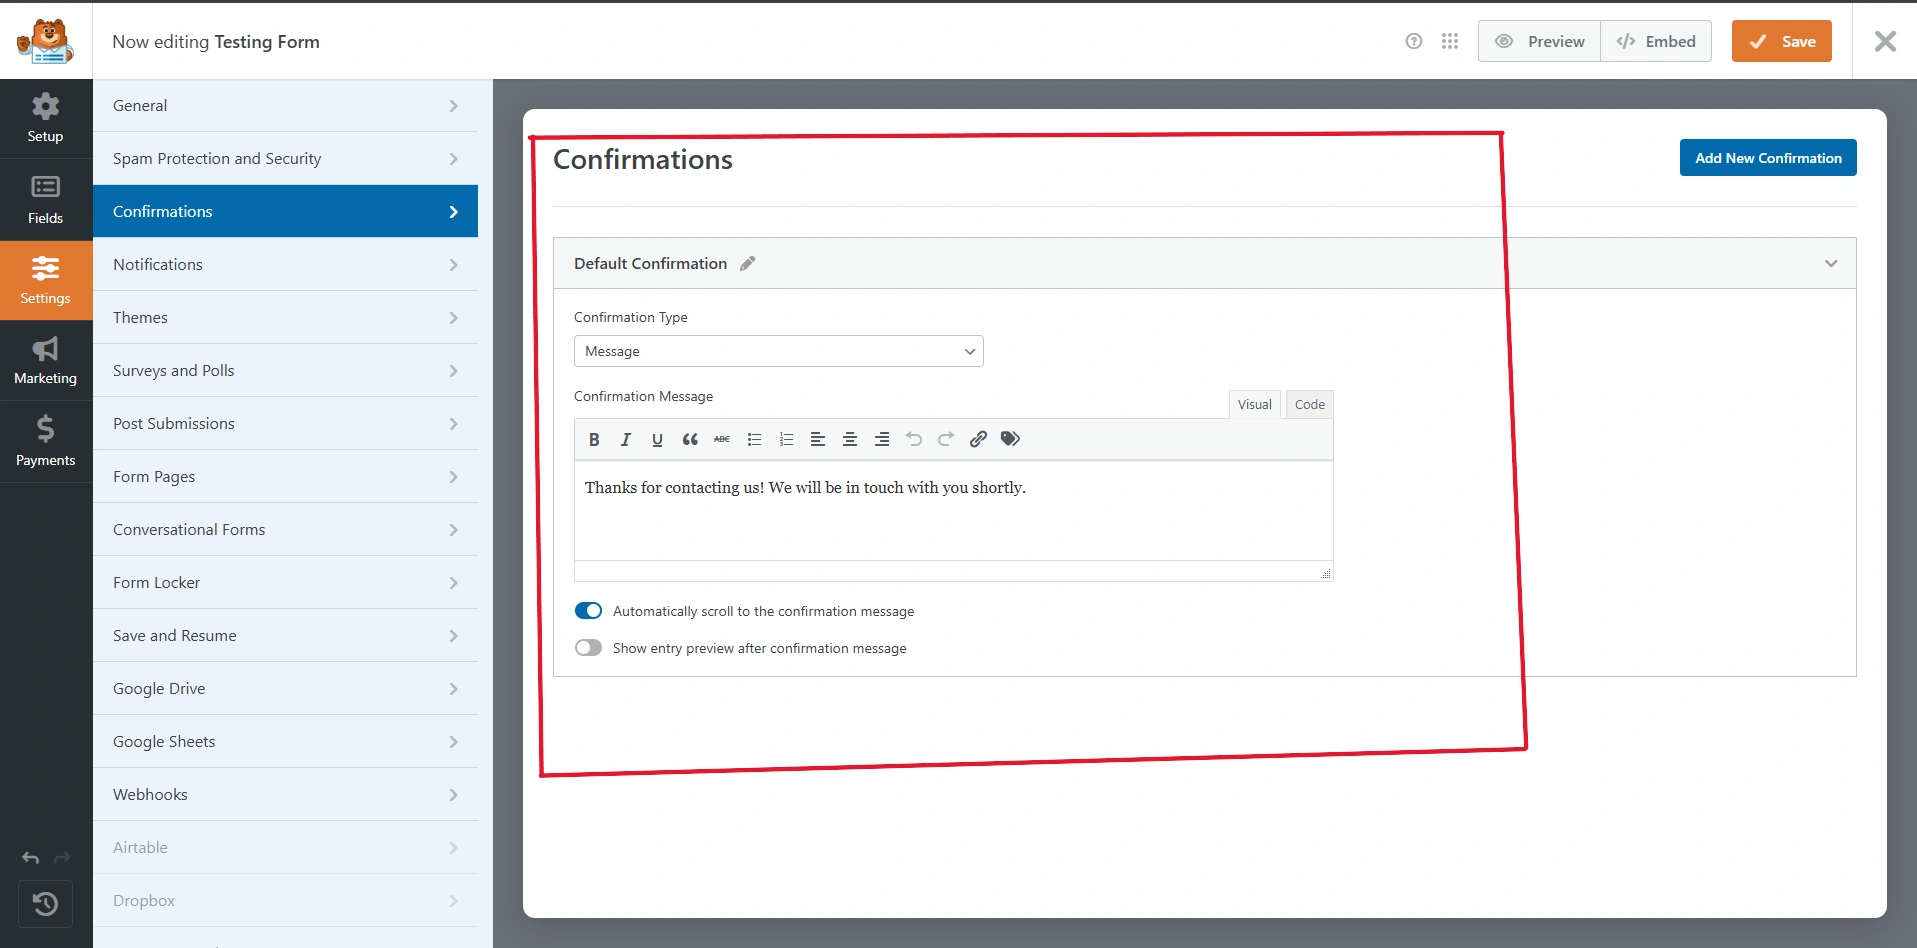
3. Confirmations
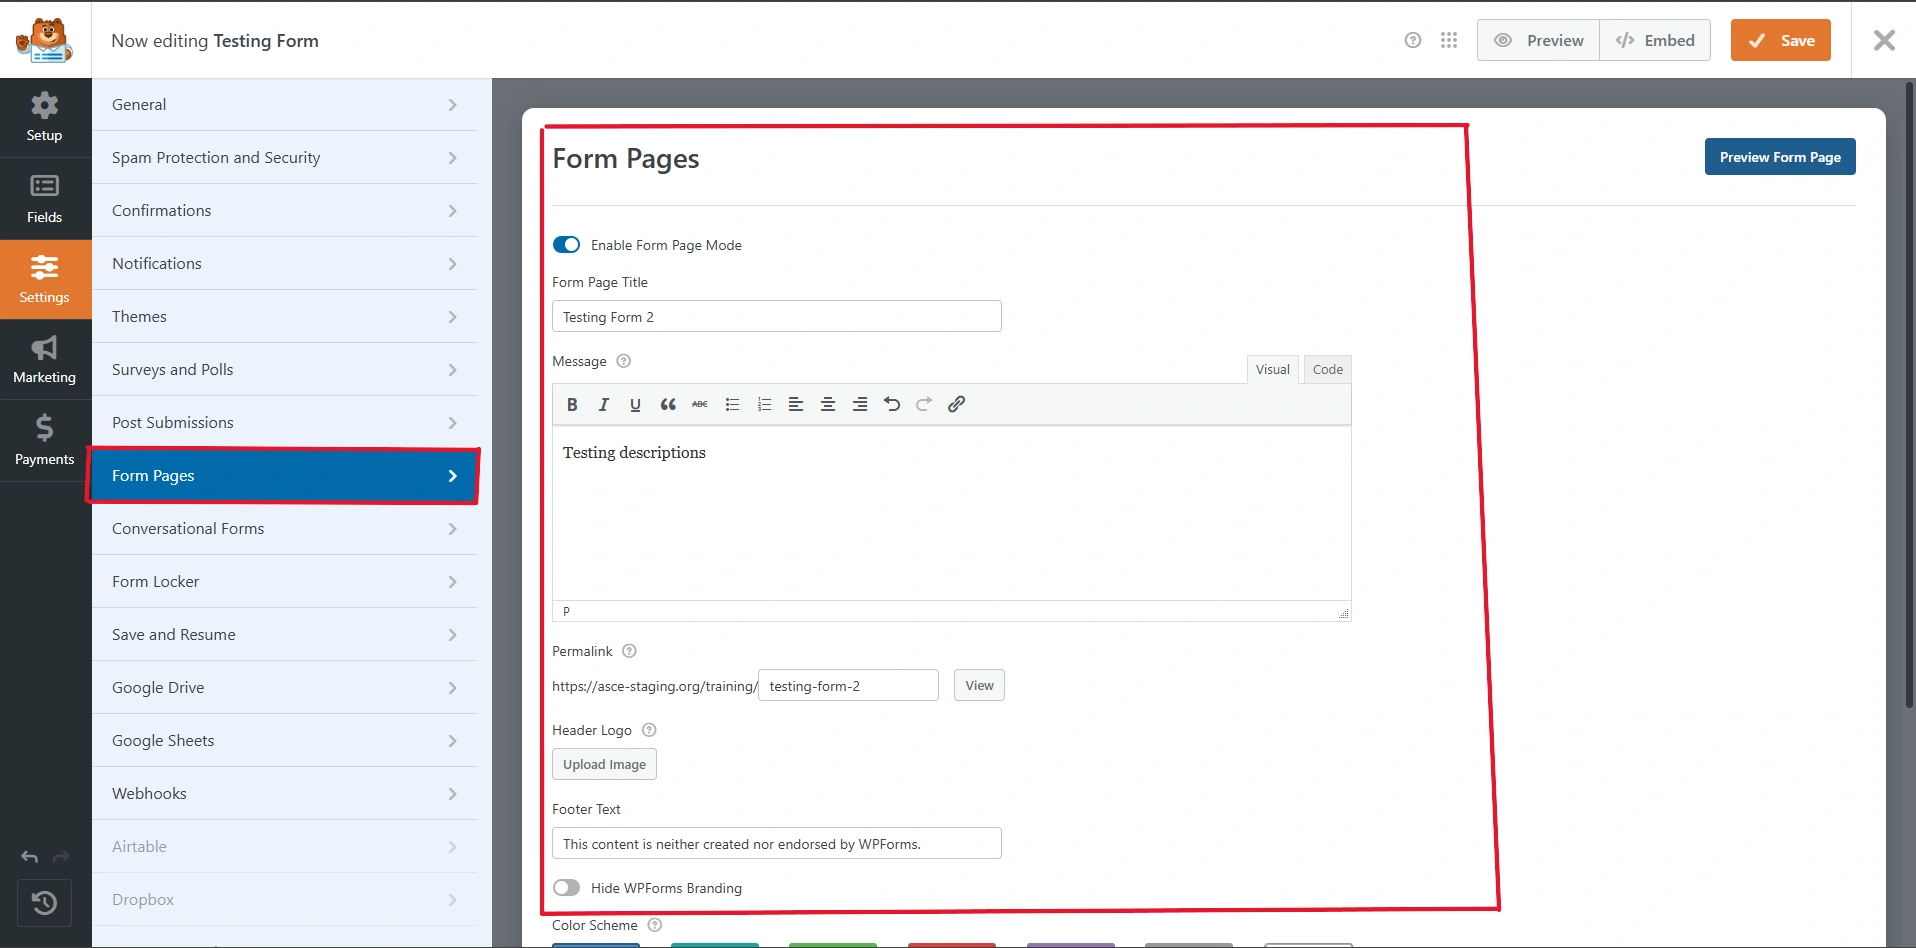
4. Form Pages
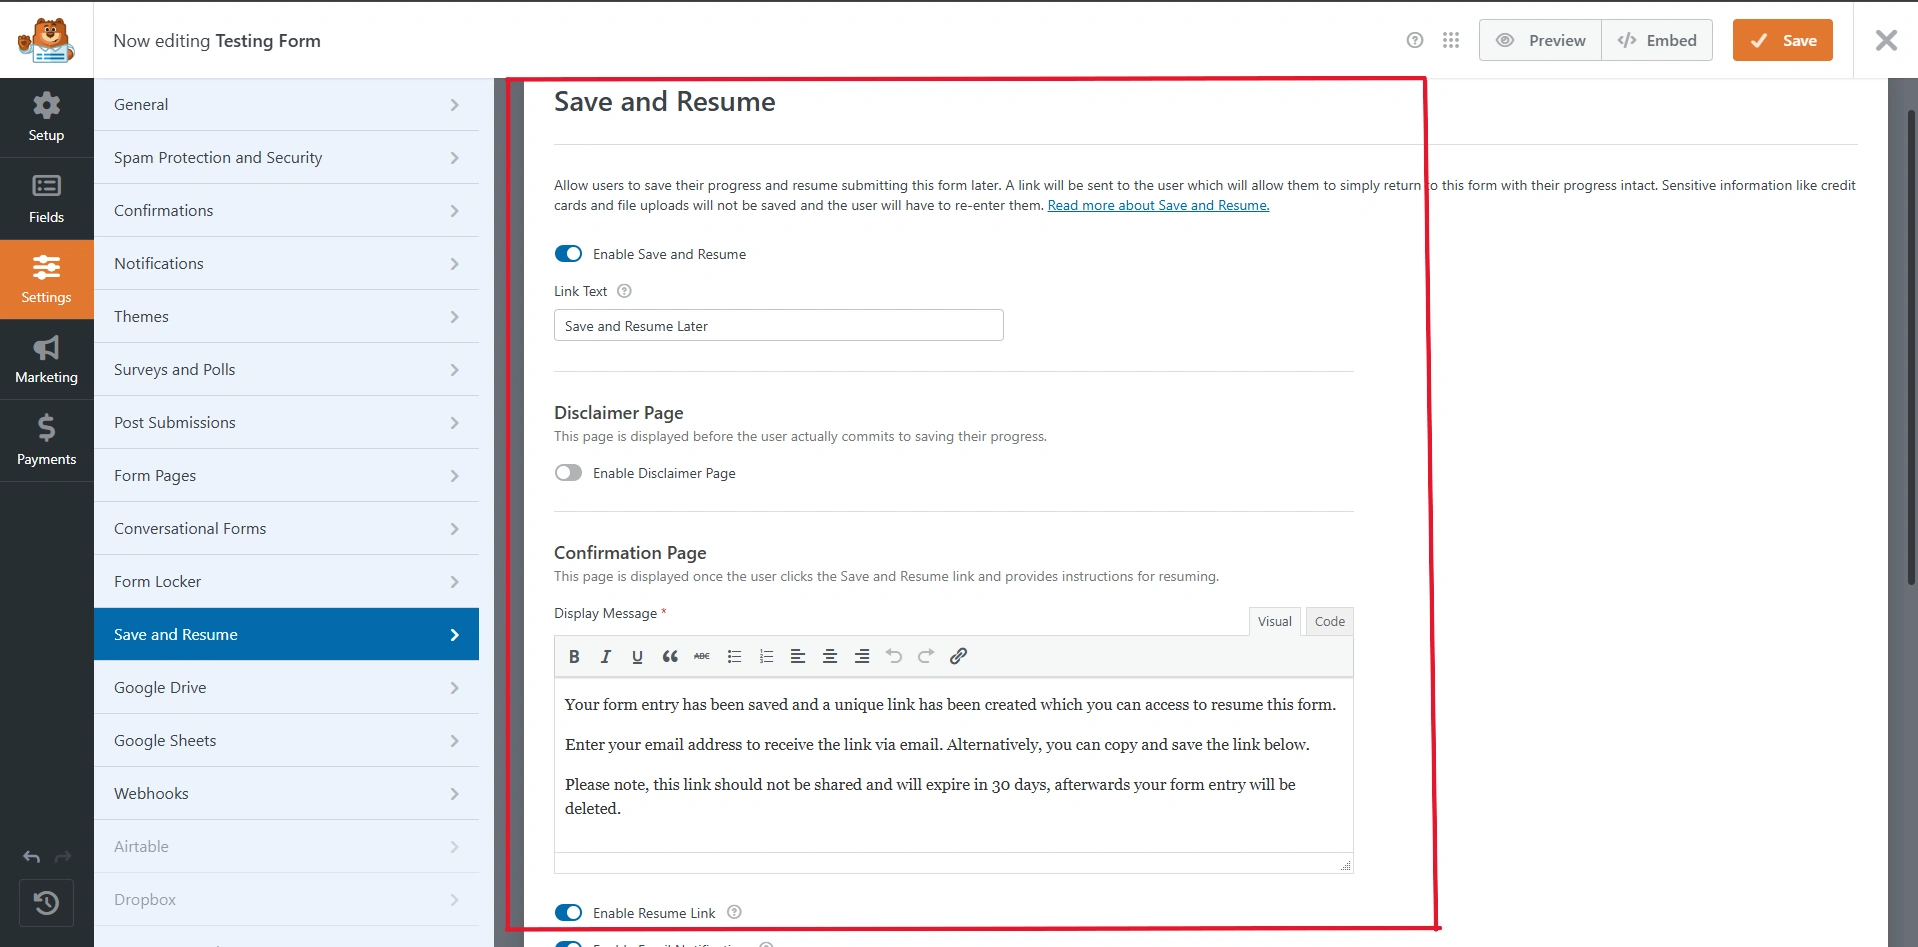
5. Saved and Resume
Click each image to enlarge.
Spam Protection and Security
This section helps protect your forms from spam and automated bot submissions. You can enable modern anti-spam protection, set a minimum time before submission, and store spam entries for review. CAPTCHA options like Google reCAPTCHA can also be activated for added security. These features help maintain the integrity and quality of your form submissions.
Notifications
Notifications are automated emails sent when a form is submitted. You can configure recipients, email subjects, sender details, and include dynamic form data in the message. This ensures that administrators and users are instantly informed of submissions. Proper notification setup improves response time and keeps communication organized.
Confirmations
The Confirmations section controls what users see immediately after submitting a form. You can display a custom message, redirect users to another page, or send them to a specific URL. This ensures users receive clear feedback that their submission was successful and processed. Proper confirmation setup also helps guide users to the next step, such as checking their email or continuing to another page.
Form Pages
Form Pages allows you to create a standalone landing page for your form without embedding it into an existing page. You can customize the form title, description, URL permalink, and even add branding elements like a logo. This is ideal for campaigns, event registrations, or sharing forms directly with users. It simplifies the process by giving your form its own dedicated and clean interface.
Save and Resume
This feature allows users to save their progress and continue filling out the form later using a unique link. It is especially useful for long or multi-step forms where users may not complete everything in one session. You can customize the link text, enable a disclaimer page, and control the confirmation message shown after saving. This helps improve user experience by preventing data loss and allowing flexibility in completing the form.
Form Settings Overview
This section covers the essential configuration options available in WPForms, including Form Pages, Save and Resume, Notifications, and Spam Protection. These settings allow you to control how your form behaves, how users interact with it, and how submissions are handled. Proper configuration ensures a smooth user experience and reliable data collection. Always review these settings before publishing your form to ensure everything functions as expected.
Tip: You must be logged in as an Administrator to access and modify WPForms settings. Make sure all configurations such as notifications, confirmations, and spam protection are properly set before publishing. Test your form submission to verify emails are delivered and settings work correctly. This helps prevent issues and ensures a smooth experience for both users and administrators.
(4D) Configure Payment Settings
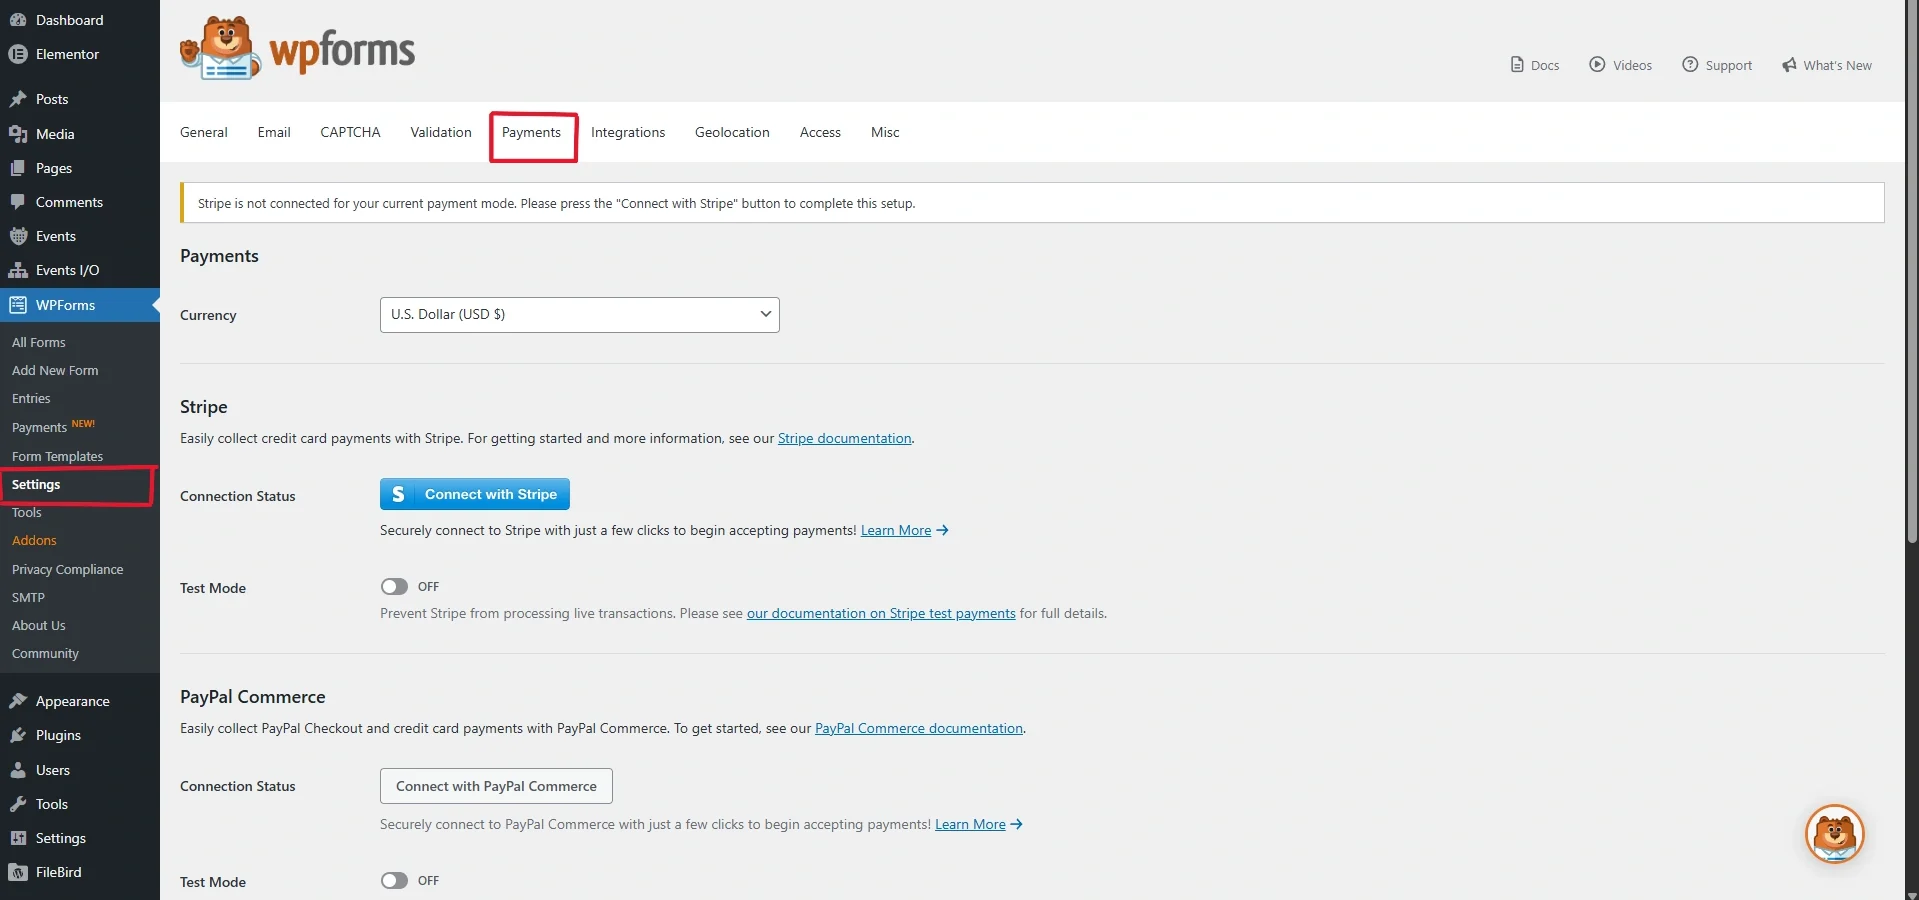
1. Payments Integration
2. Payments Provider Lists
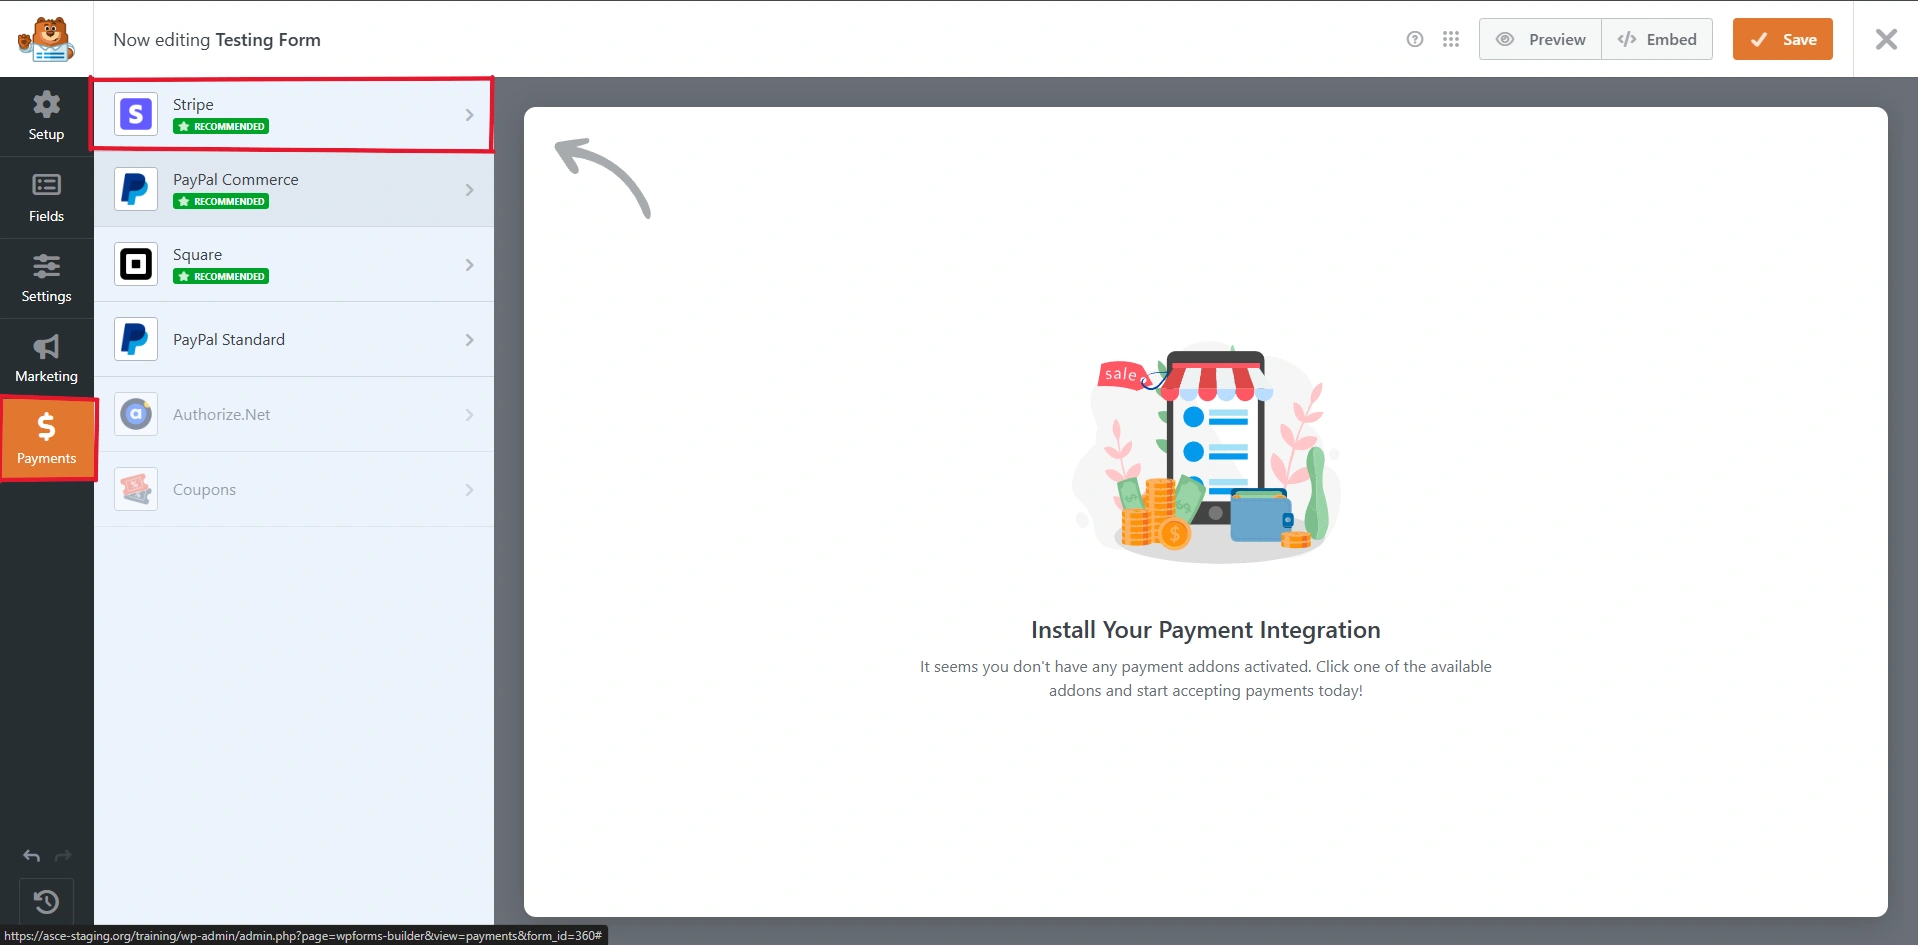
Payments Integration (Example: Stripe)
This section allows you to connect your form to payment gateways such as Stripe, PayPal, and Square directly within WPForms. To activate these options, you must first configure the payment provider under WPForms → Settings → Payments and complete the connection setup. Once connected, you can enable the selected payment method inside your form to start collecting payments. This setup ensures secure transactions and allows you to manage payments efficiently within your website.
Payments Provider Lists (e.g., Stripe, PayPal, Square)
The Payments tab inside the form builder displays all available payment providers that can be integrated into your form. Each provider may require installing an addon and completing a connection setup before it becomes usable. Once activated, you can configure payment fields and settings specific to the selected provider within your form. This gives you flexibility to choose the best payment option based on your business needs.
Tip: Always verify that your payment gateway is set to the correct mode (Test or Live) before accepting real transactions. Ensure that API keys and connection settings are properly configured and kept secure. It is recommended to perform a test transaction using sandbox/test mode before going live. This helps prevent payment errors and ensures a smooth checkout experience for your users.
(4E) Setup Integrations
1. Google Drive Integration
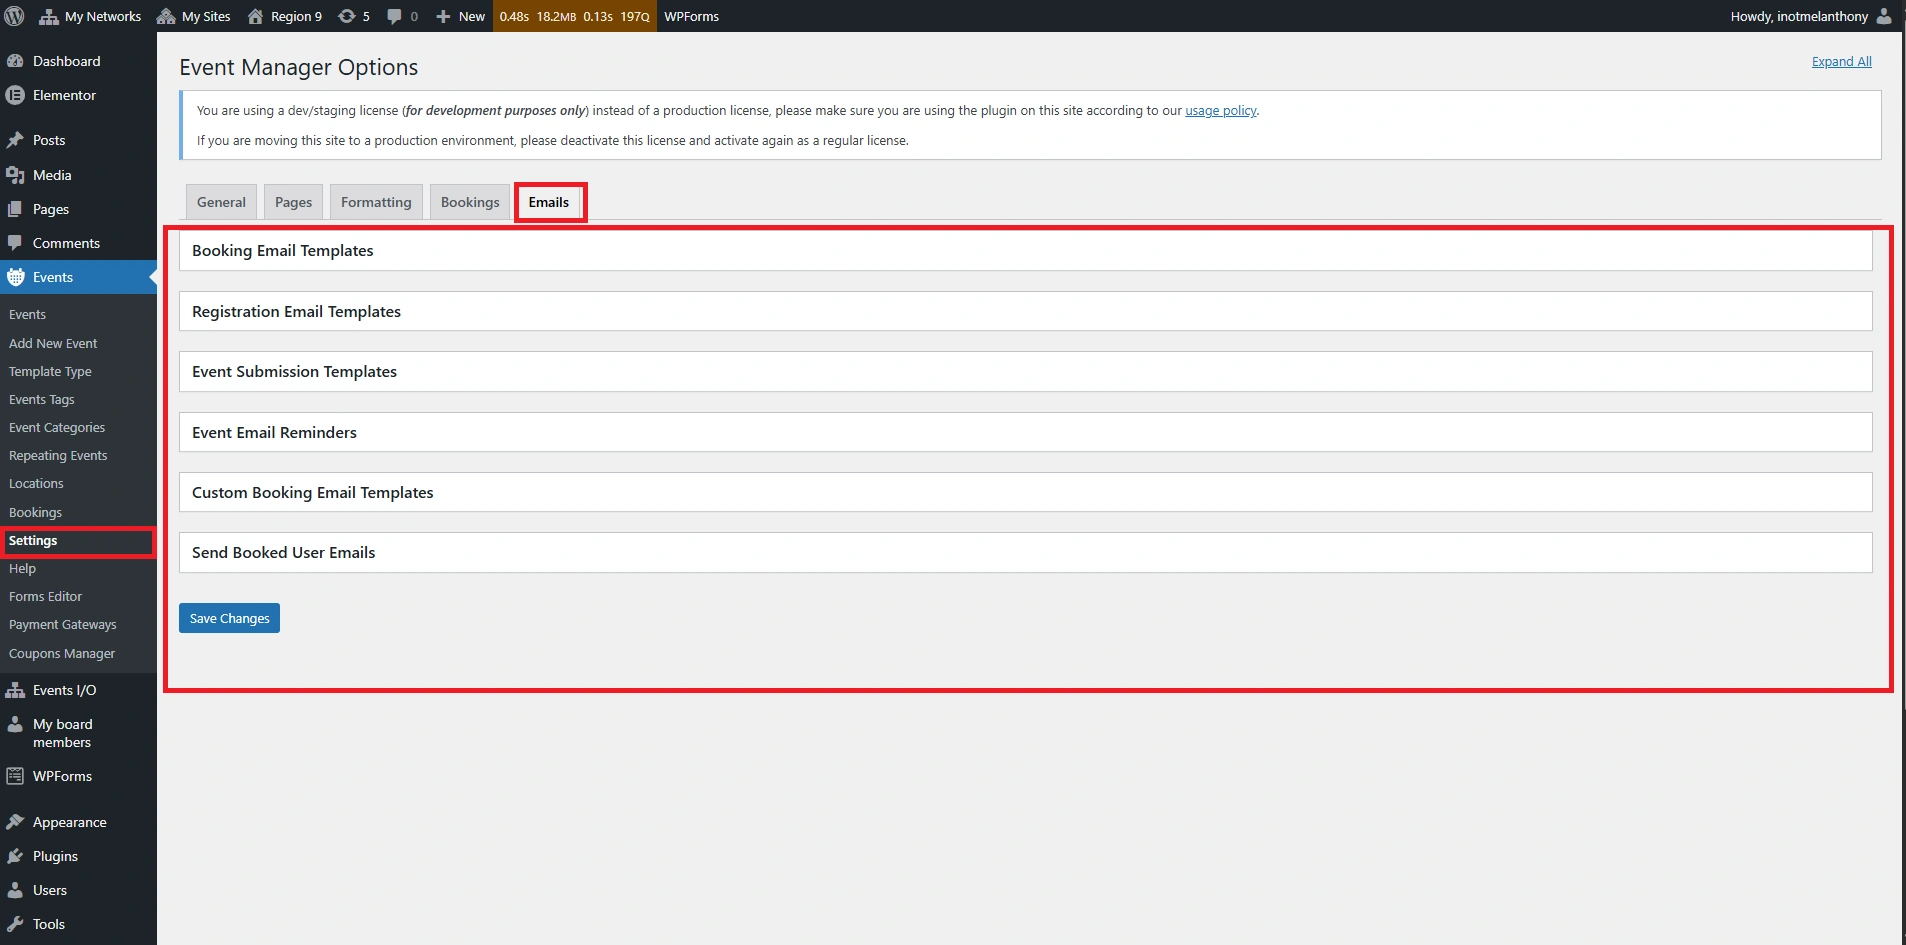
2. Google Sheets Integration
Click each image to enlarge.
Google Drive Integration
This section allows you to connect your WPForms account to Google Drive for file storage and management. By linking your Google account, uploaded files from form submissions can be securely stored and accessed directly in your Drive. To begin, click “Continue with Google” and complete the authentication process. Once connected, you can streamline file handling and keep all uploaded assets organized in one place.
Google Sheets Integration
The Google Sheets integration enables you to automatically send form entries to a connected spreadsheet. This allows you to organize, track, and manage submission data in real time without manual export. To set this up, click “Add New Account” and authorize access to your Google account. Once configured, your form entries will be recorded directly into your selected Google Sheet for easy data management and reporting.
Tip: You must be logged in as an Administrator to connect Google services in WPForms. Ensure that you grant the correct permissions during the Google authentication process to avoid connection issues. After setup, perform a test submission to verify that files or entries are properly saved in Google Drive or Google Sheets. This helps confirm that your integration is working correctly before going live.
(4F) Manage Form Entries
1. Entries Management (WPForms)
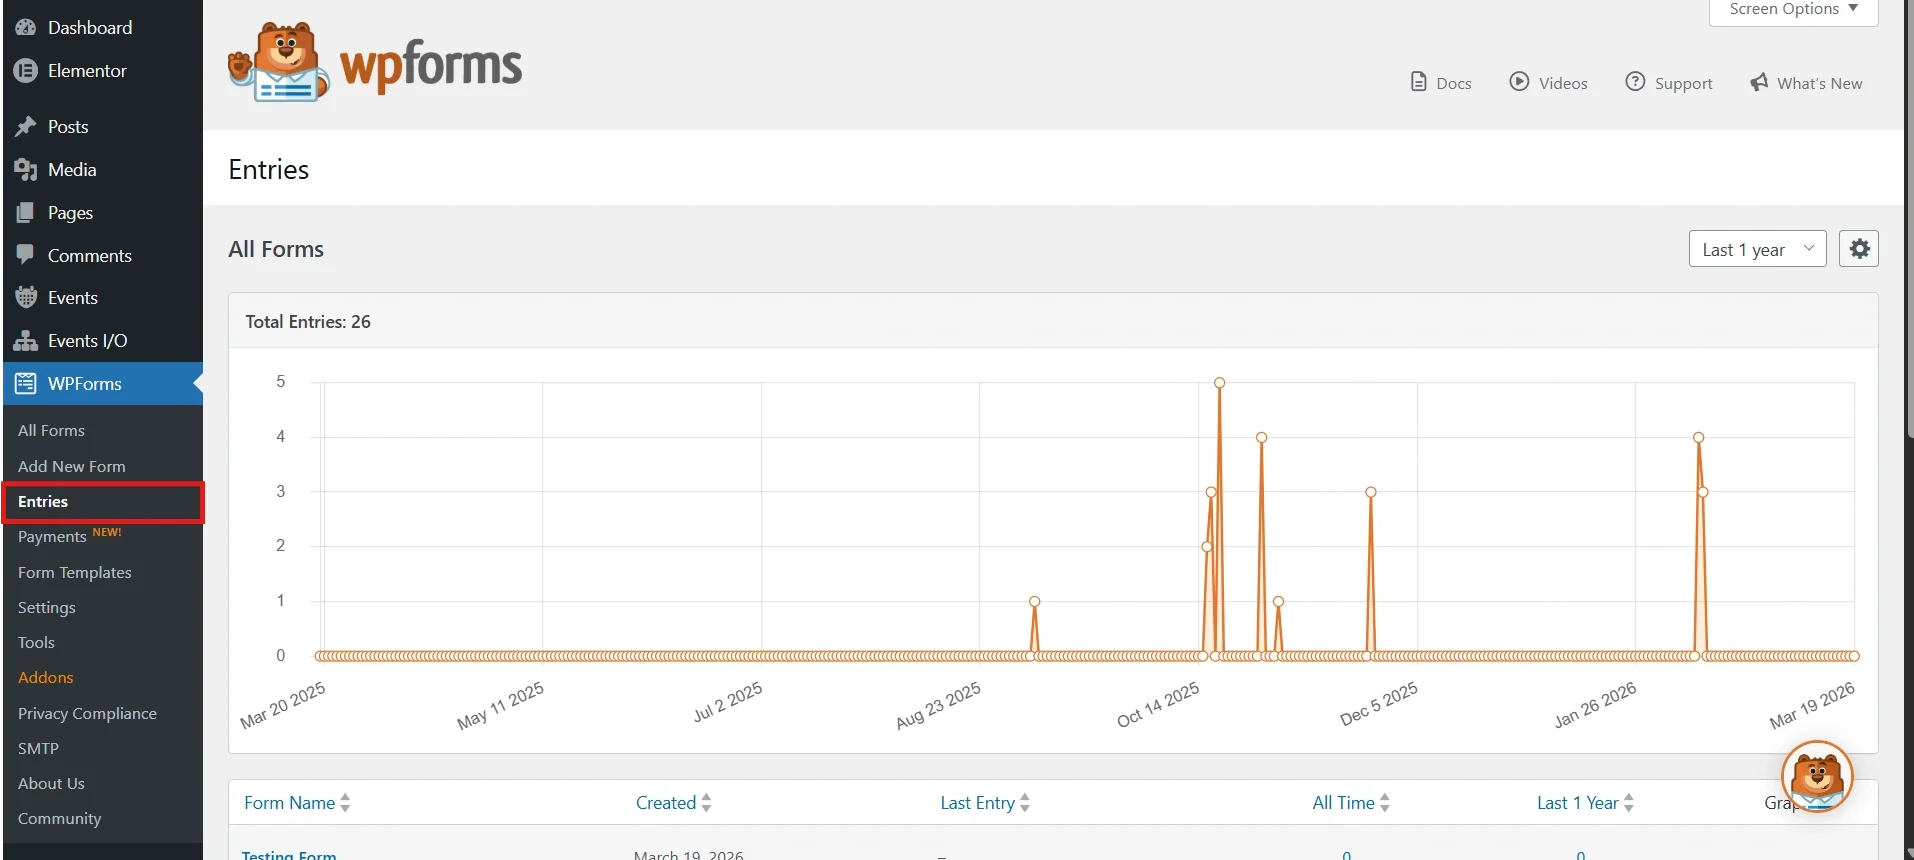
Entries Management (WPForms)
This section allows you to view and manage all form submissions collected through WPForms. You can access individual entries, review submitted data, and track activity using the built-in analytics graph. Each form has its own list of entries, making it easy to organize and filter submissions. This feature helps you monitor responses, export data, and manage user submissions efficiently.
Tip: You must be logged in as an Administrator or have proper permissions to access and manage form entries. Always review entries regularly to ensure no submissions are missed or require follow-up. You can export entries for backup or reporting purposes if needed. This helps maintain organized records and ensures timely response to user submissions.