
Quick Reference Guide for Events Manager Configuration
OVERVIEW -Events Manager
To properly configure the Events Manager system, there are seven (7) key components that must be set up. These elements work together to ensure a complete event workflow—from creation to booking, payment, and monitoring.
(3E) Email Notifications – Set up automated email templates for confirmations, reminders, and booking-related updates.
(3G) Coupons Manager – Create and manage discount codes to offer promotions for events. Set coupon names, define usage limits, and apply conditions such as total required attendees or specific ticket types to control how discounts are used during the booking process.
(3A) Create an Event
1 - Creation of Events
Click each image to enlarge.
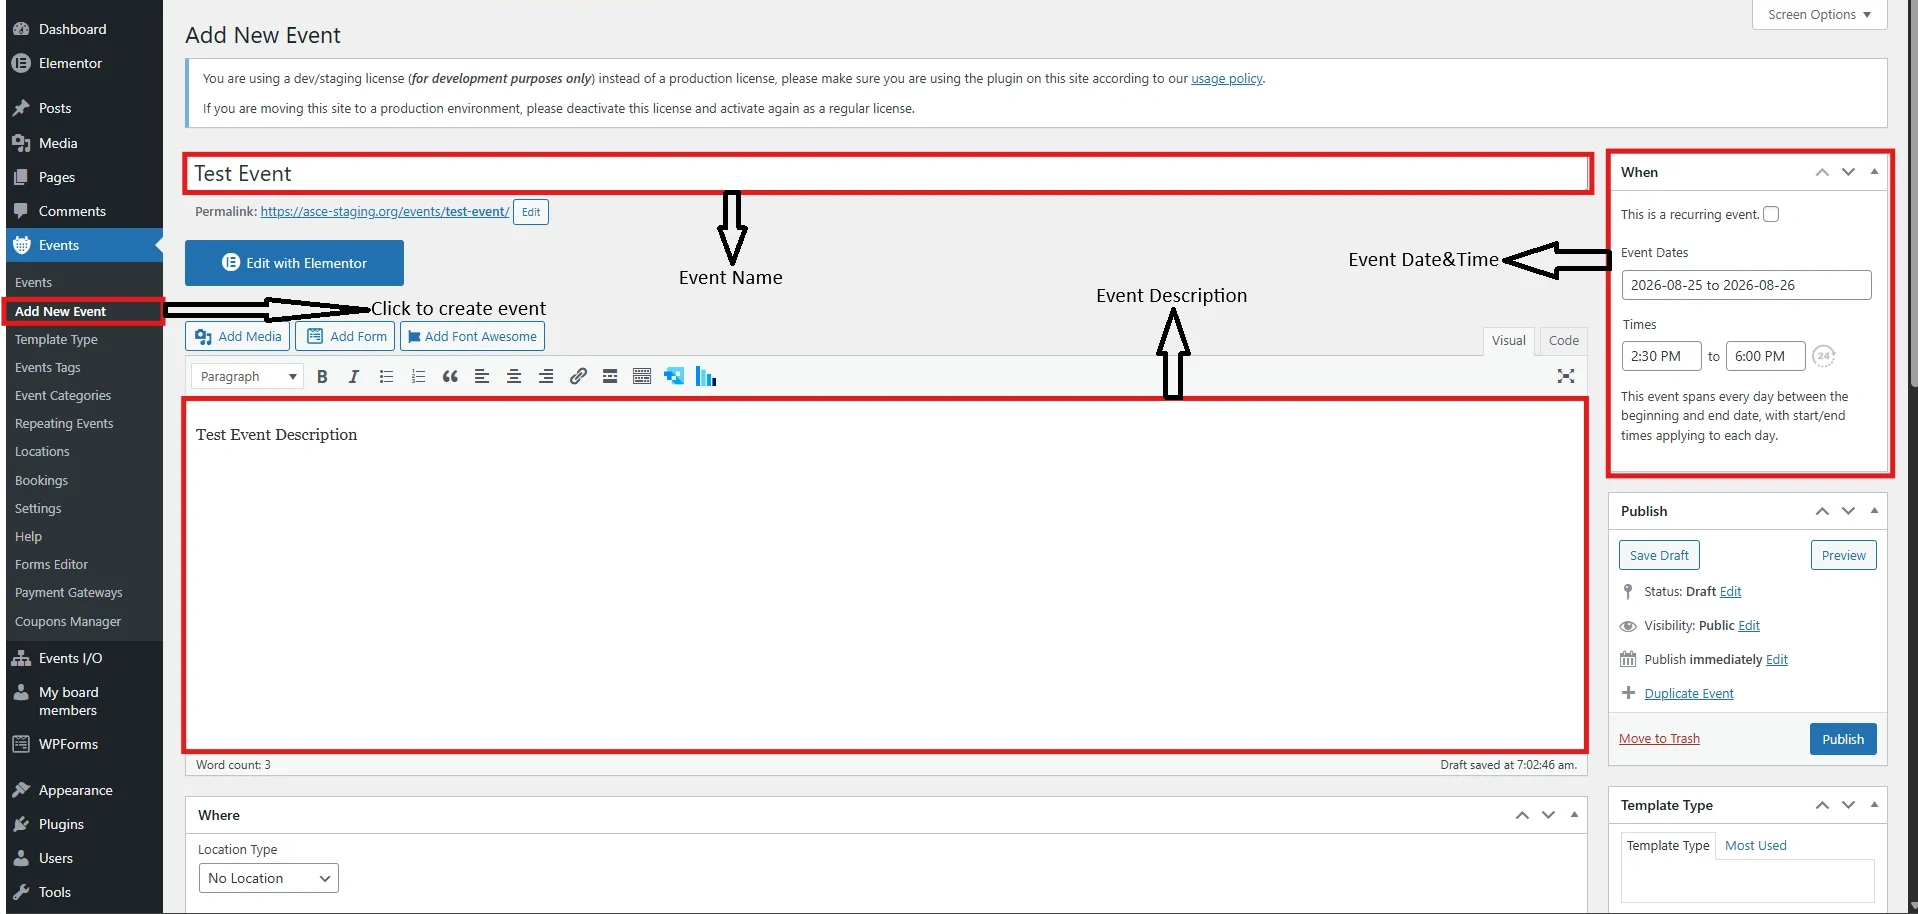
Event Creation Menu Access
The Events menu provides access to event management features including creating, editing, and organizing events. Administrators use this section to manage event listings and ensure that all event information is properly displayed on the website.
Event Details Setup/Date & Time
The Event Details panel is where the main event information is entered, including the Event Name (Title) and Event Description. These details define how the event is presented to users and provide important information about the event. The When panel is used to set the event’s date and time, ensuring accurate scheduling and display on the website.
(3B) Set Featured Image
1. Setting your Featured Image
Click each image to enlarge.
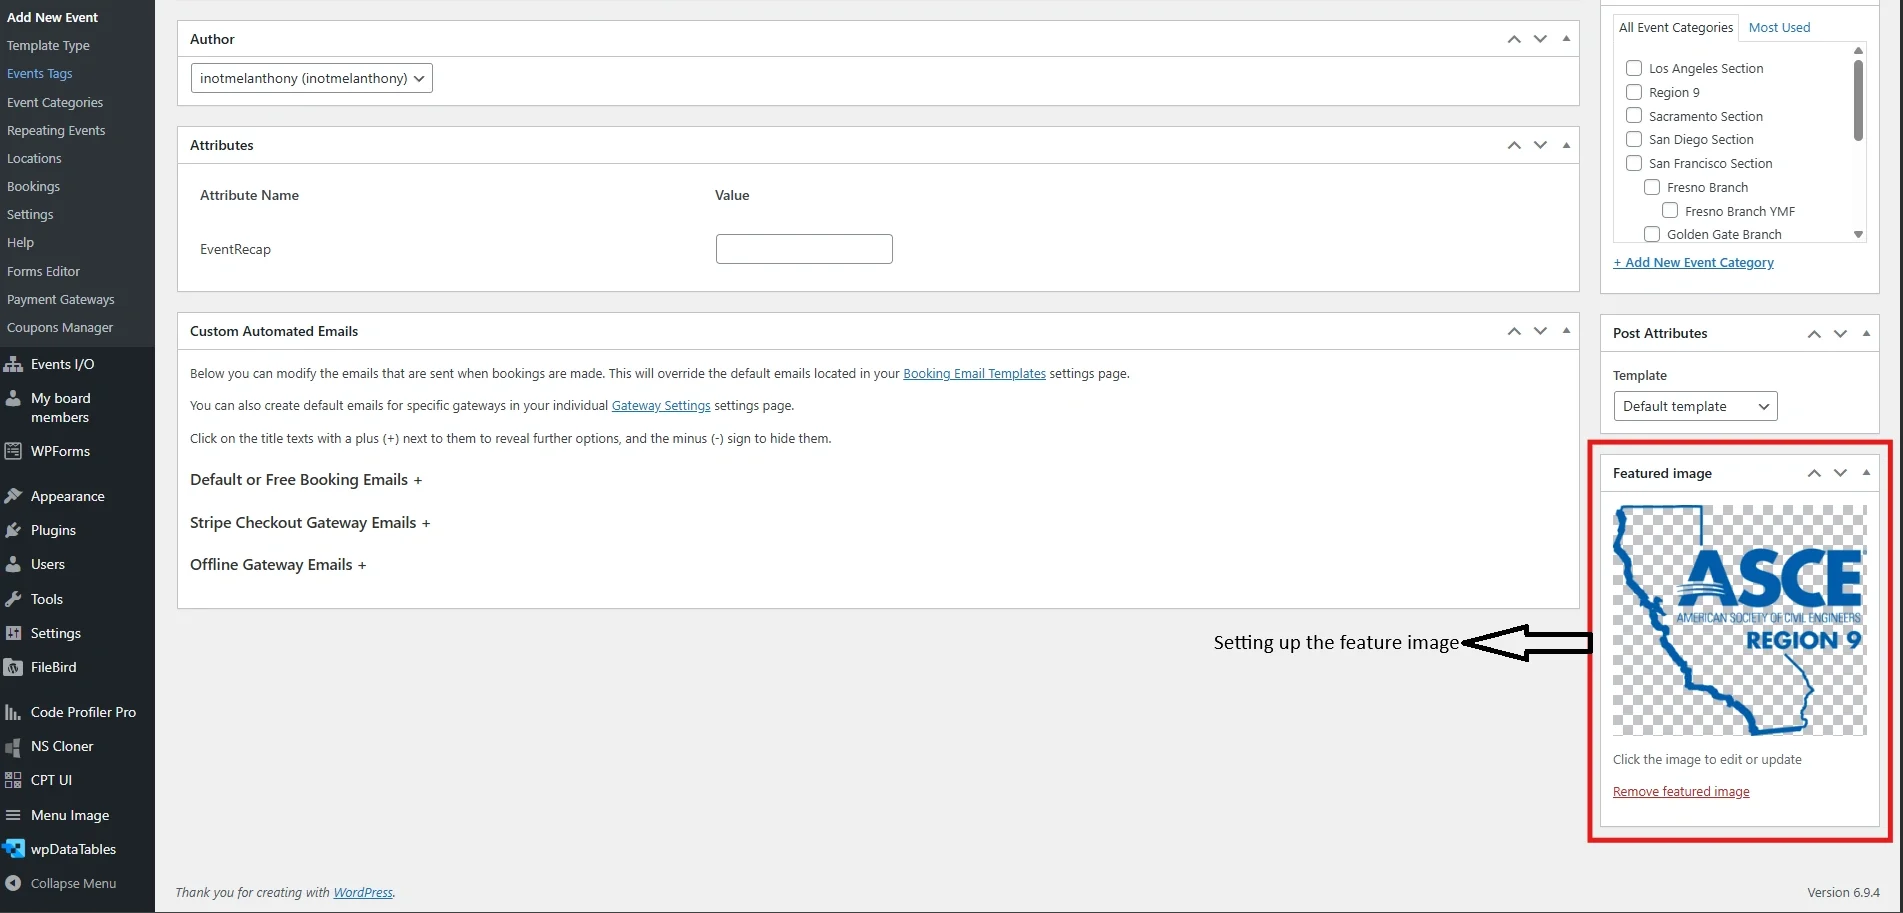
Featured Image Setup
The Featured Image panel allows administrators to upload and assign an image that represents the event. This image is displayed in event listings and detail pages to provide a visual preview. The featured image configuration ensures that each event includes a visual element that enhances presentation and improves user engagement. Adding a featured image helps make event listings more attractive and easier to identify.
Tip: You must be logged in as an Administrator to set a featured image. Use a high-quality image with consistent dimensions to maintain a professional and uniform appearance across all event listings.
(3C) Create Registrations and Tickets
1. Creation of Tickets
Click each image to enlarge.
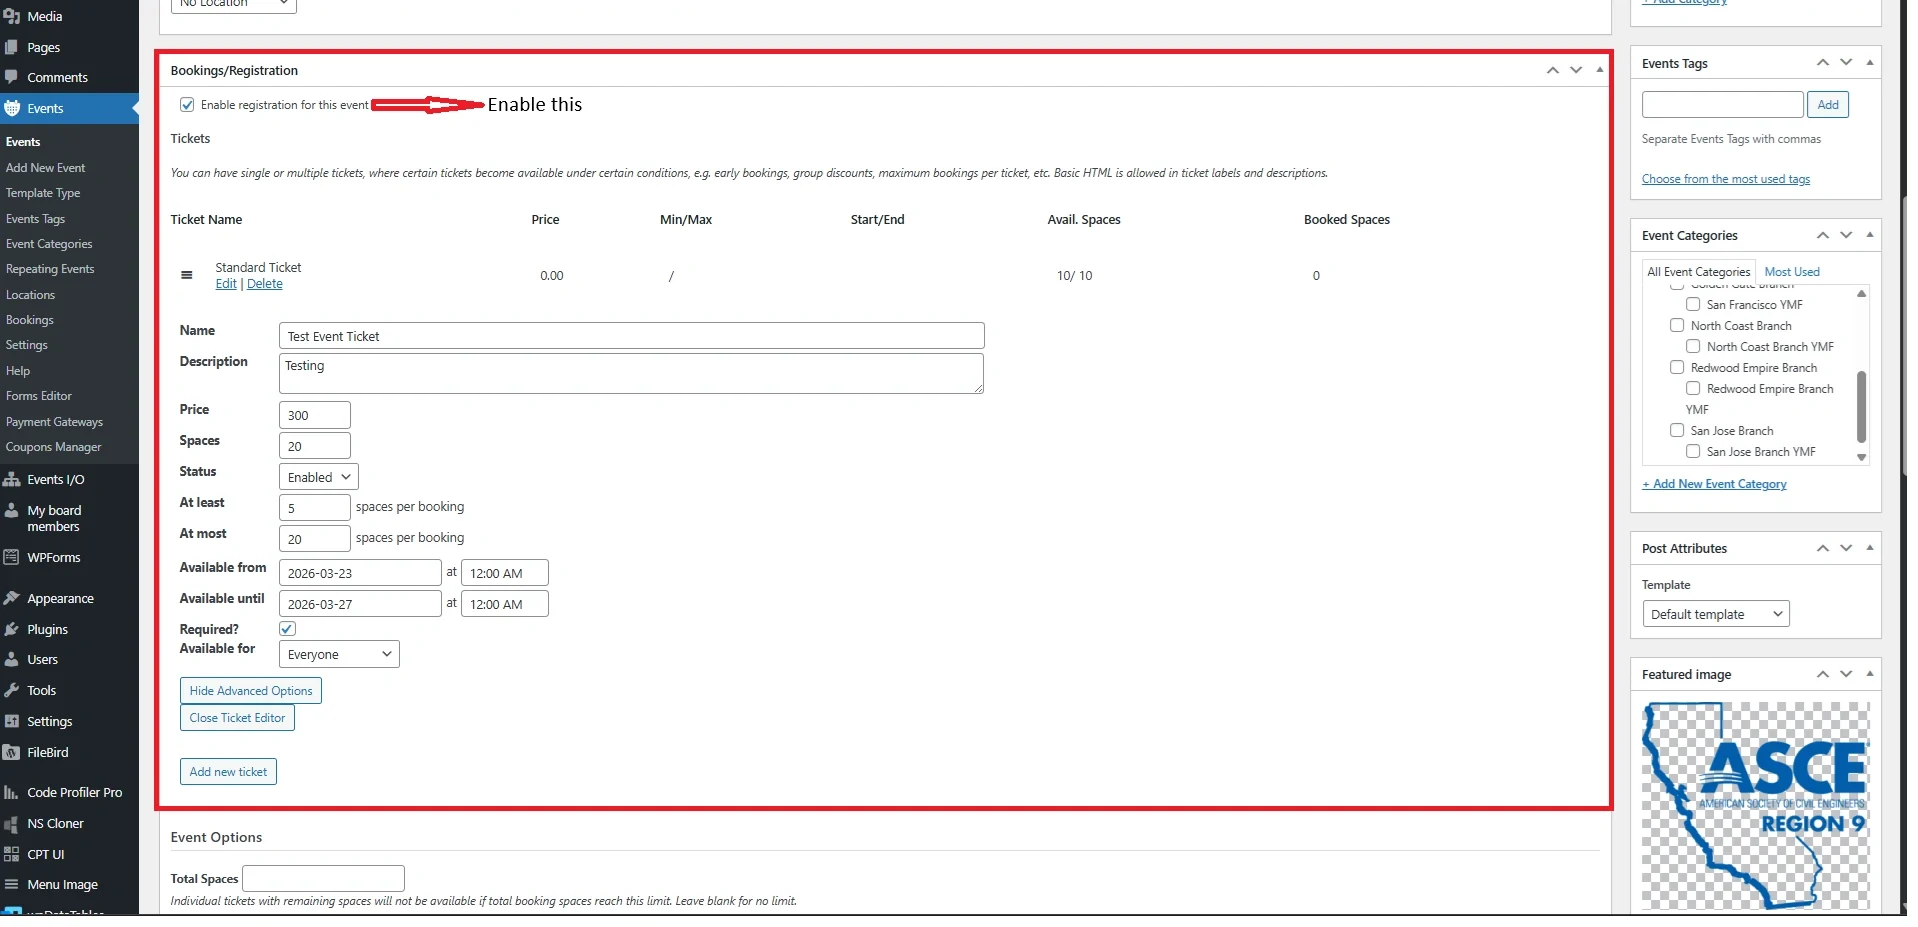
Booking & Registration Setup
The Bookings/Registration panel allows administrators to enable event registration and configure ticket details for attendees. By enabling registration, users can reserve or purchase tickets directly from the event page.
Within this section, administrators can define ticket settings such as ticket name, description, price, available spaces, booking limits, and availability dates. This ensures proper control over attendee capacity and booking conditions.
Tip: You must be logged in as an Administrator to verify plugin licenses. Ensure that a valid license key is entered and that the license status shows Active. If the license is inactive or expired, some premium features and automatic updates may not be available.
(3D) Confirm Payment Settings
1. Payment Lists
2. Payment Gateway Configuration
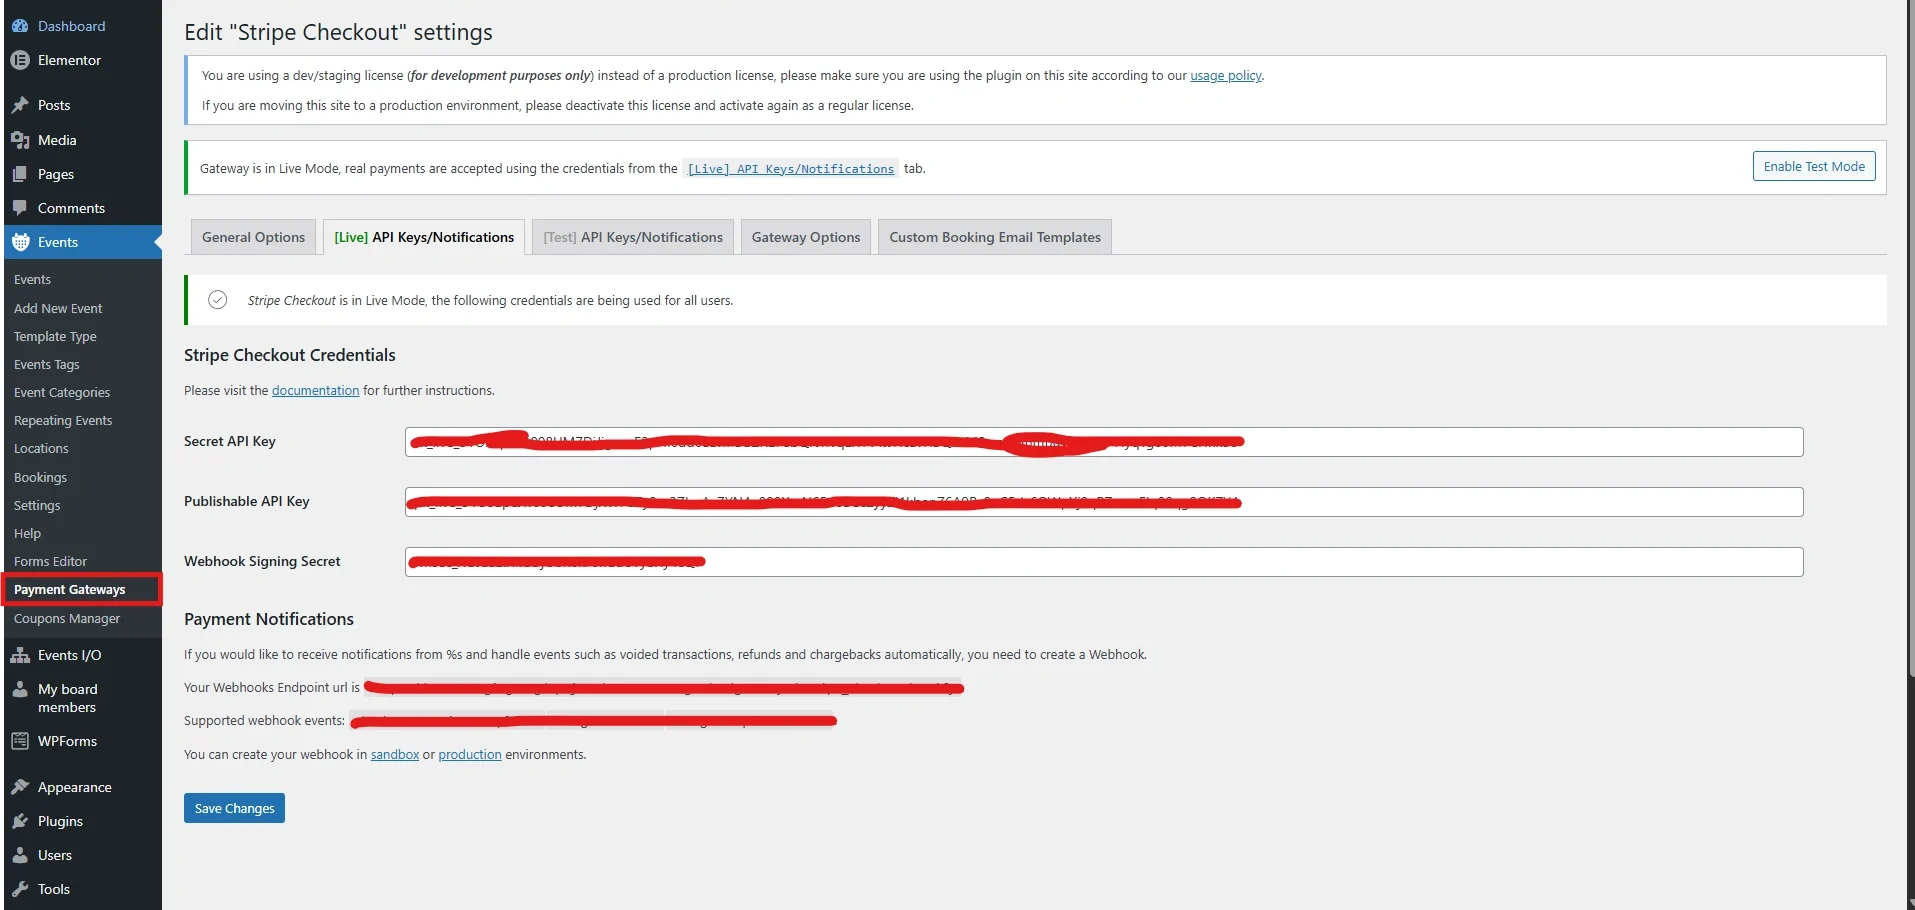
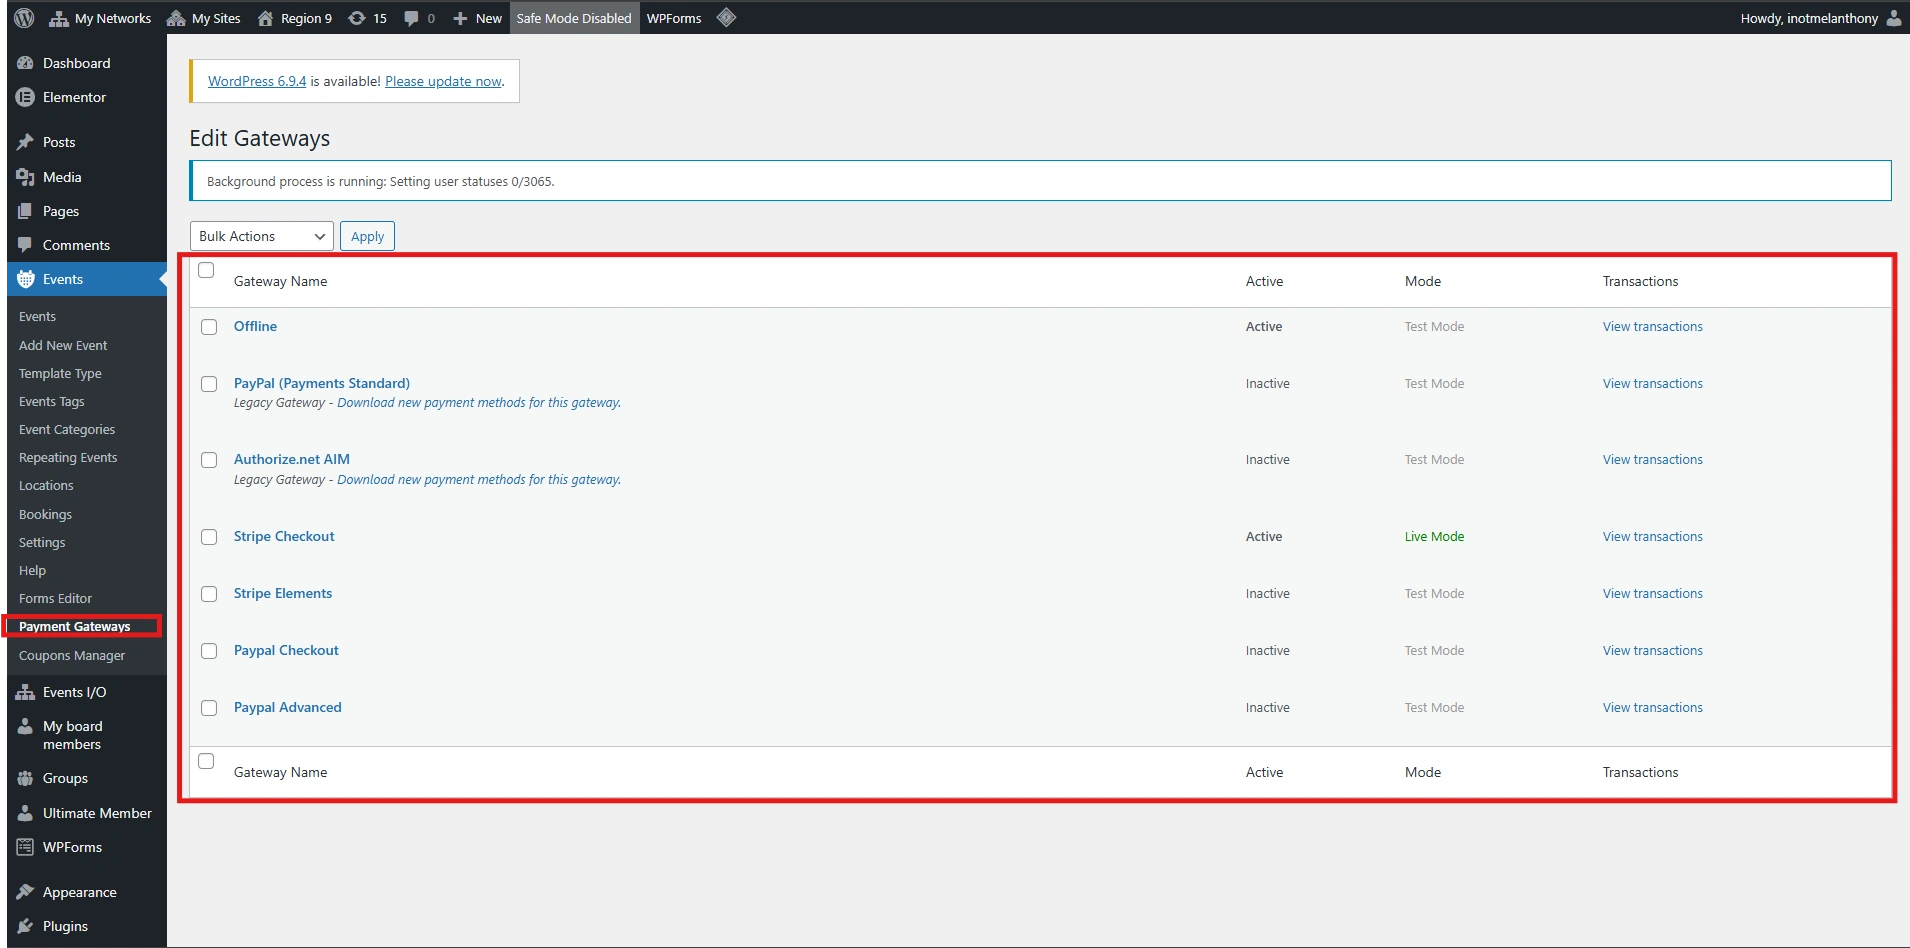
Payment Gateway Setup
The Payment Gateways section allows administrators to manage and enable different payment methods for event bookings. From this panel, you can activate or deactivate gateways such as Stripe, PayPal, or Offline payments, depending on the preferred payment options for users.
Each gateway can be configured individually by accessing its settings, where administrators can define credentials, modes (Test or Live), and transaction handling.
Payment Gateway Configuration (Stripe Example)
The gateway configuration panel (e.g., Stripe Checkout) is where API credentials and payment settings are defined. Administrators must input the required keys such as:
Secret API Key
Publishable API Key
Webhook Signing Secret
These settings ensure secure communication between the website and the payment provider, allowing real-time payment processing and transaction tracking.
Tip: Always verify that your payment gateway is set to the correct mode (Test or Live) before accepting real payments. Ensure API keys are accurate and never share sensitive credentials publicly. For testing, use sandbox/test keys before switching to live mode.
(3E) Email Notifications Settings
1. Email Notifications Setup
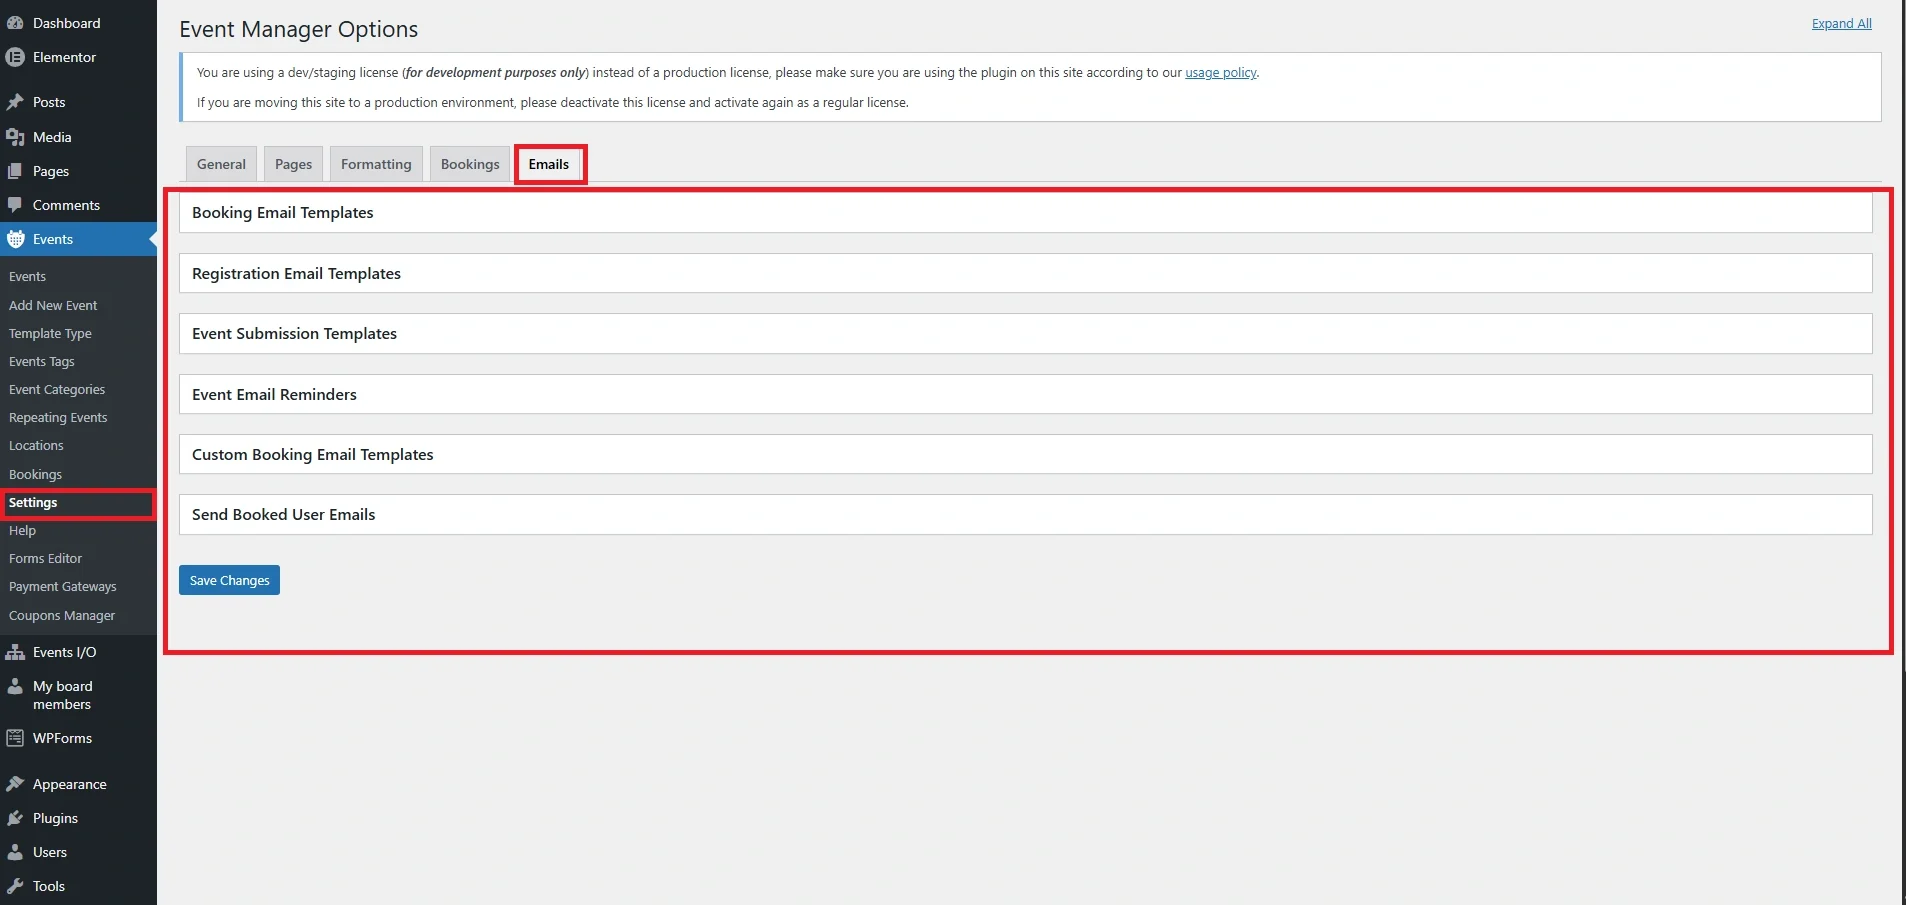
Click each image to enlarge.
Summary Box
The email notification configuration ensures that users receive timely and accurate updates regarding their bookings and events. It helps automate communication, improve user experience, and reduce manual follow-ups.
Email Notifications Setup
The system provides multiple email categories for different use cases:
Booking Email Templates – Sent when a booking is made or confirmed
Registration Email Templates – Sent upon successful registration
Event Submission Templates – Notifications for event submissions
Event Email Reminders – Scheduled reminders before the event date
Custom Booking Email Templates – Override default booking emails
Send Booked User Emails – Controls email delivery to attendees
These templates ensure proper communication flow between the system and users.
Tip: Always test email templates after configuration to ensure correct formatting and delivery. Use a reliable SMTP setup (e.g., WP Mail SMTP) to improve deliverability and prevent emails from going to spam.
(3F) Booking Summaries
1. Booking Summary & Monitoring
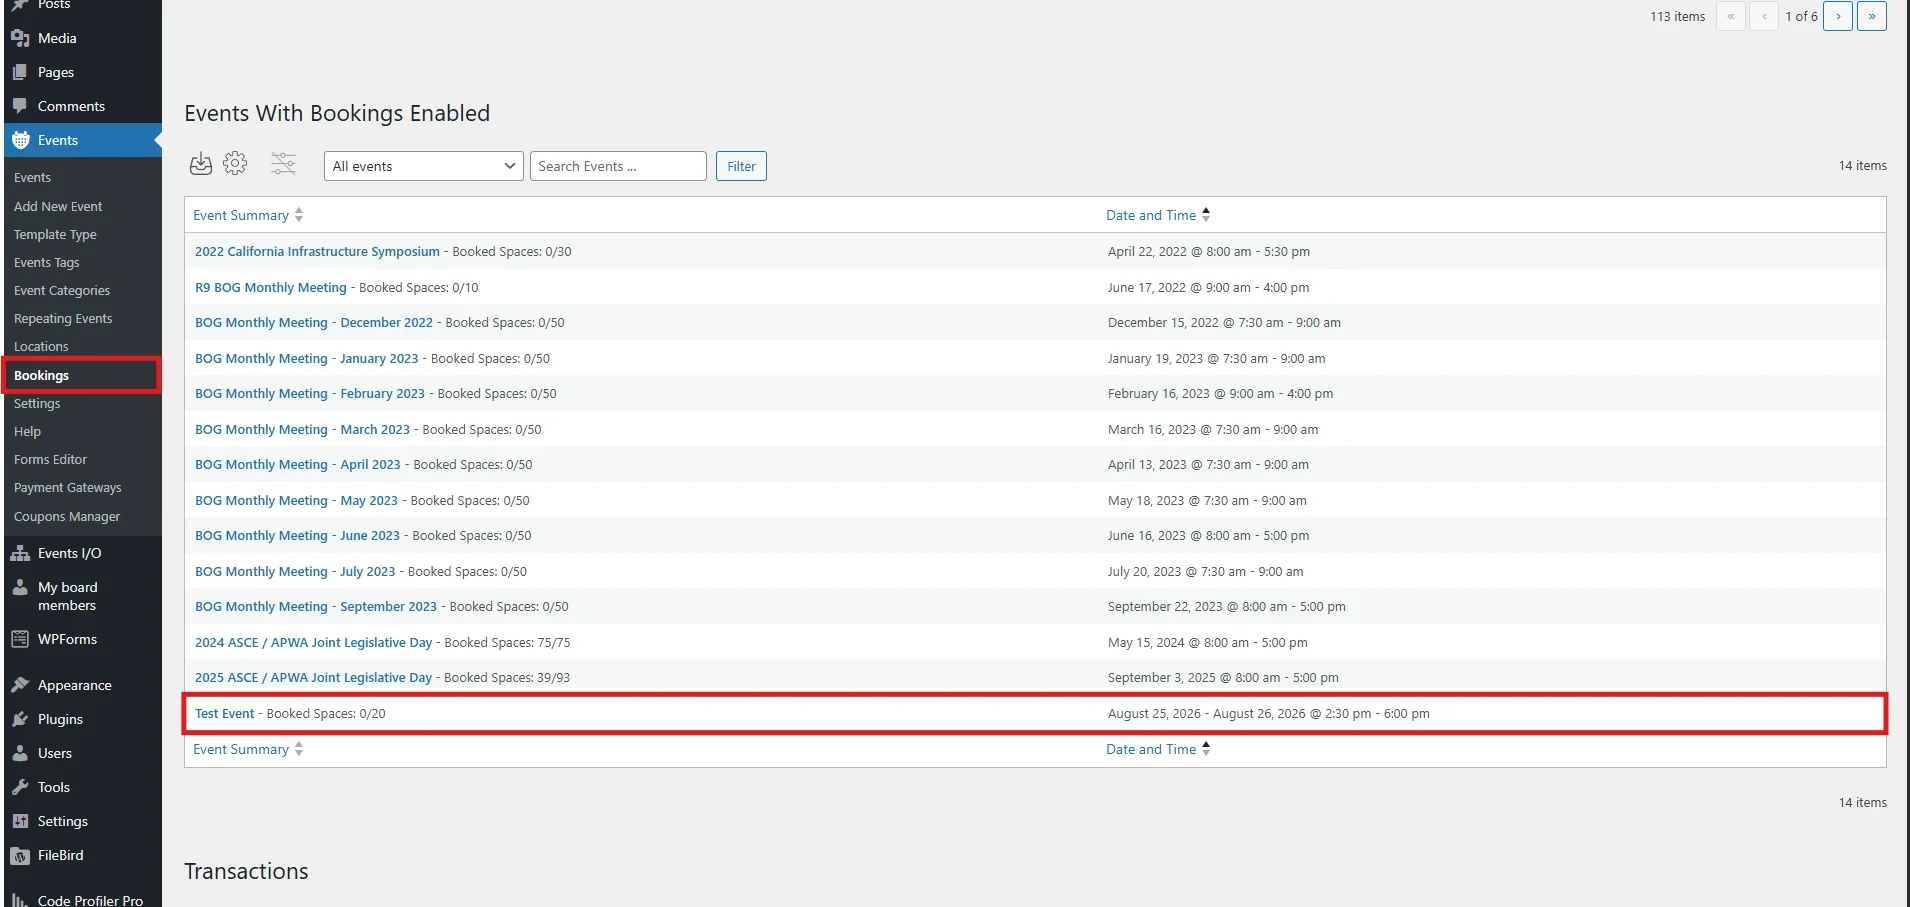
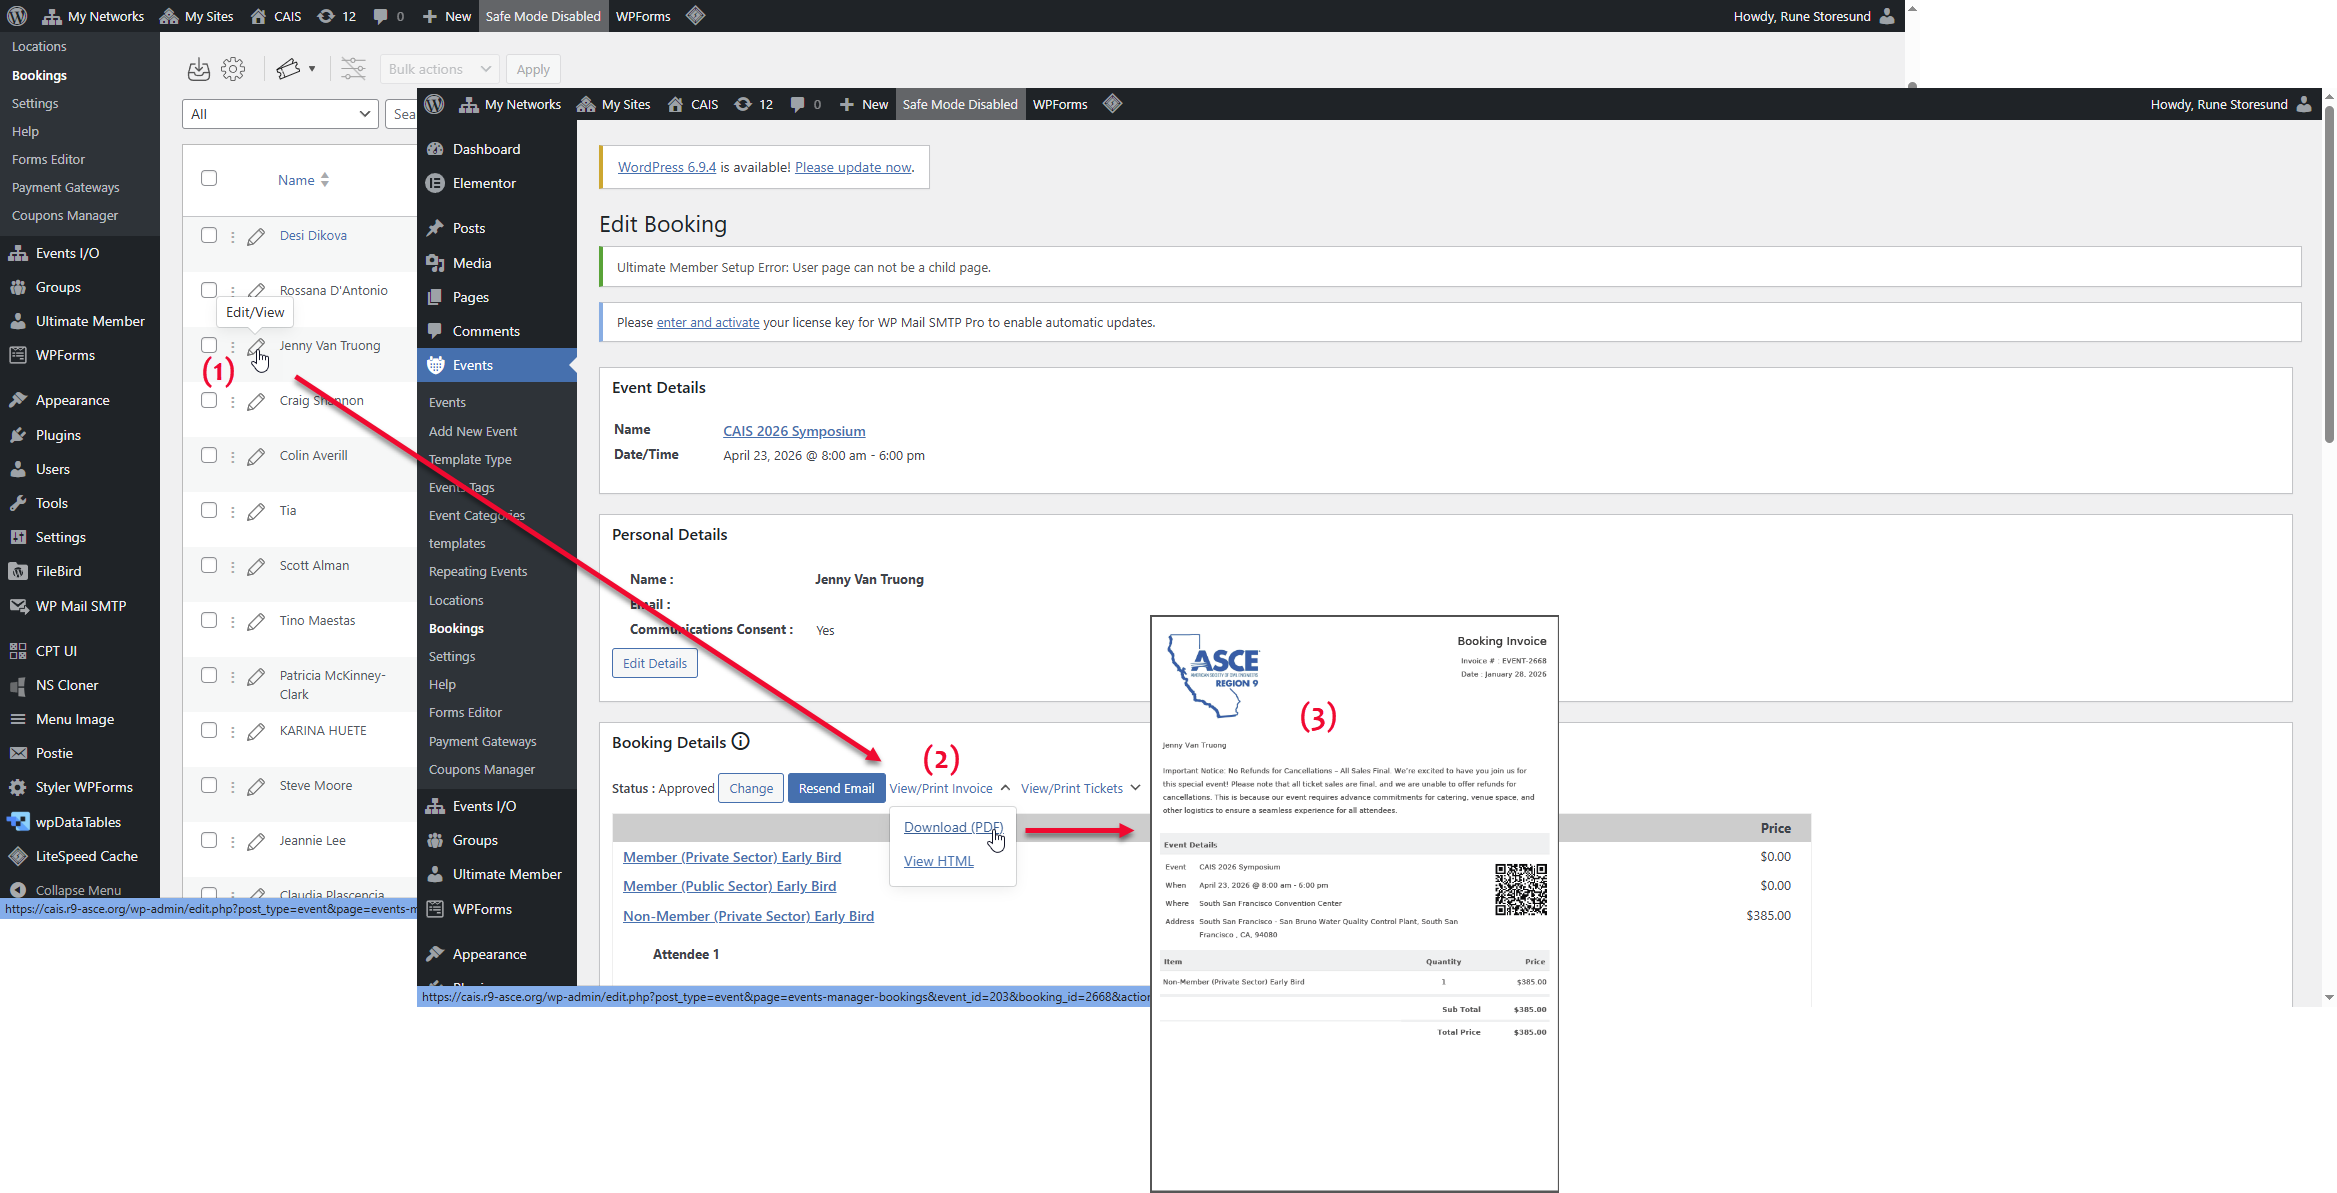
2. Resend Invoices/Tickets Manually
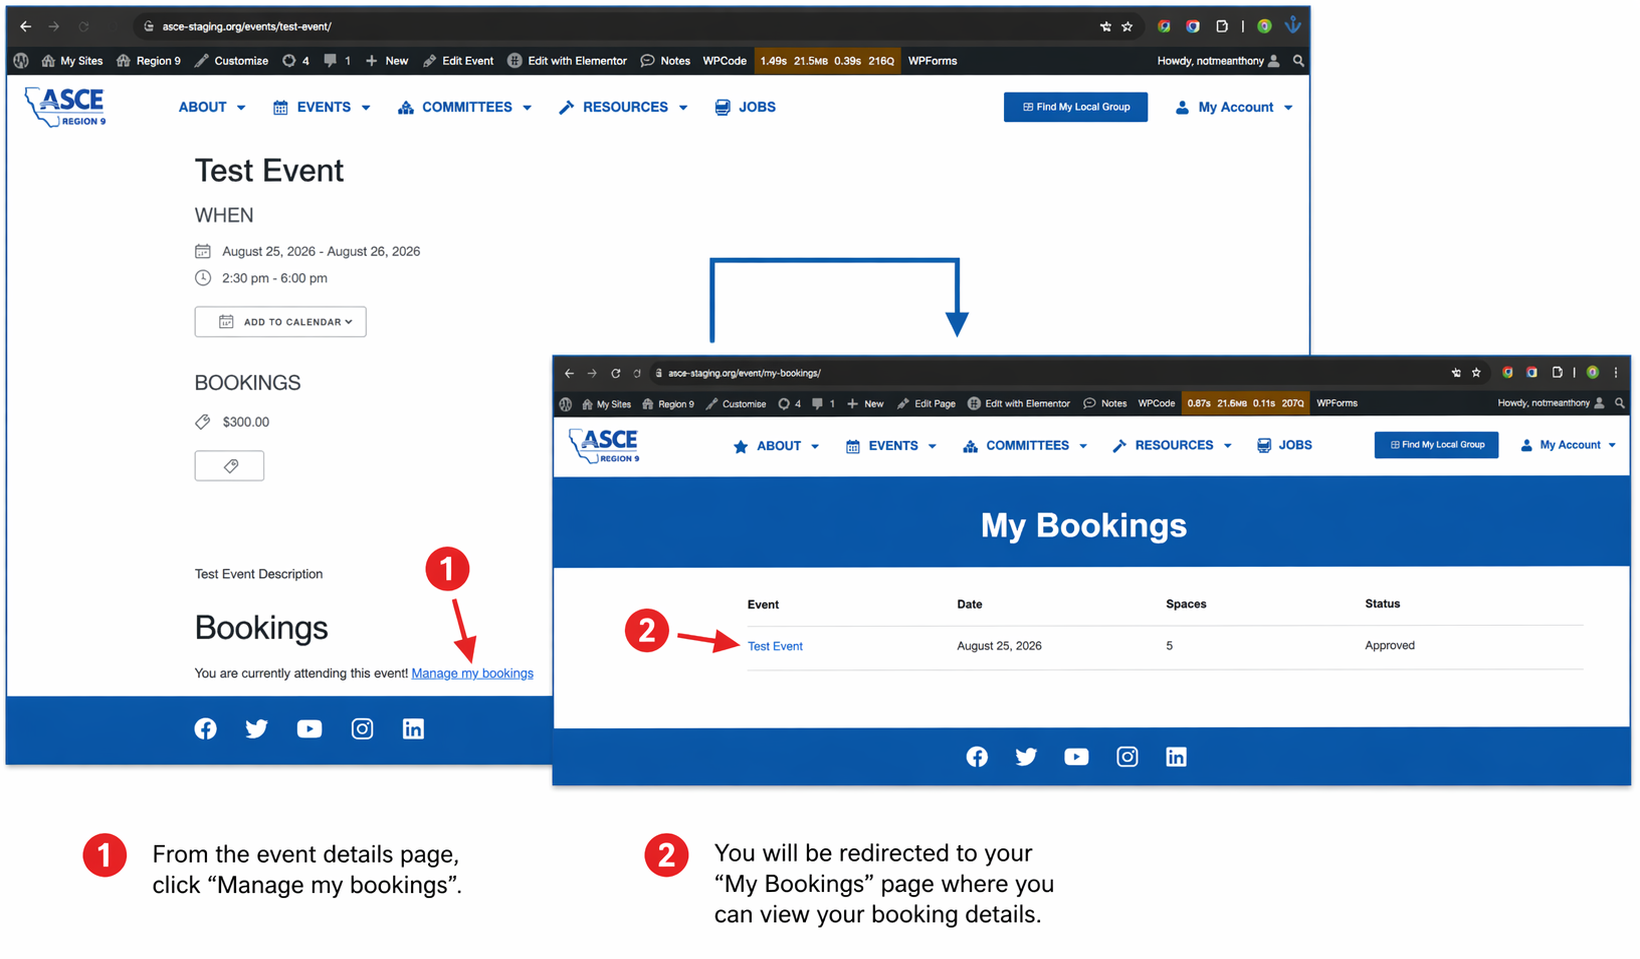
3. Access Your Booking via “My Bookings” in Your Account
Booking Summary & Monitoring
The Bookings section provides an overview of all events with active registrations. Administrators can view each event’s booking status, including total booked spaces, remaining capacity, and event schedule.
This panel allows quick access to monitor event performance and track attendee registrations in real time.
How to resend invoices/tickets from admin
To download a booking invoice, go to Events → Bookings and open the specific booking record. Click the dropdown beside View/Print Invoice, then select Download (PDF) to generate and save a copy, or click View HTML to preview it before downloading. You can also click Resend Email to send the invoice again to the attendee’s registered email address.
How to Access and Manage Your Bookings
From the event details page, click “Manage my bookings” under the Bookings section to access your reservation. You will be redirected to your “My Bookings” page, where all your bookings are listed along with key details such as event name, date, number of spaces, and status. From there, click the event title to open the full booking details, where you can review your registration and confirm all information is correct. This page also serves as your central hub for managing your bookings, making it easy to keep track of your event participation and any updates related to your reservation.
Tip: Regularly check the booking summary to monitor event capacity. If an event reaches its limit, consider increasing spaces or creating additional sessions to accommodate more attendees.
(3G) Coupons Manager
1. Coupon Setup
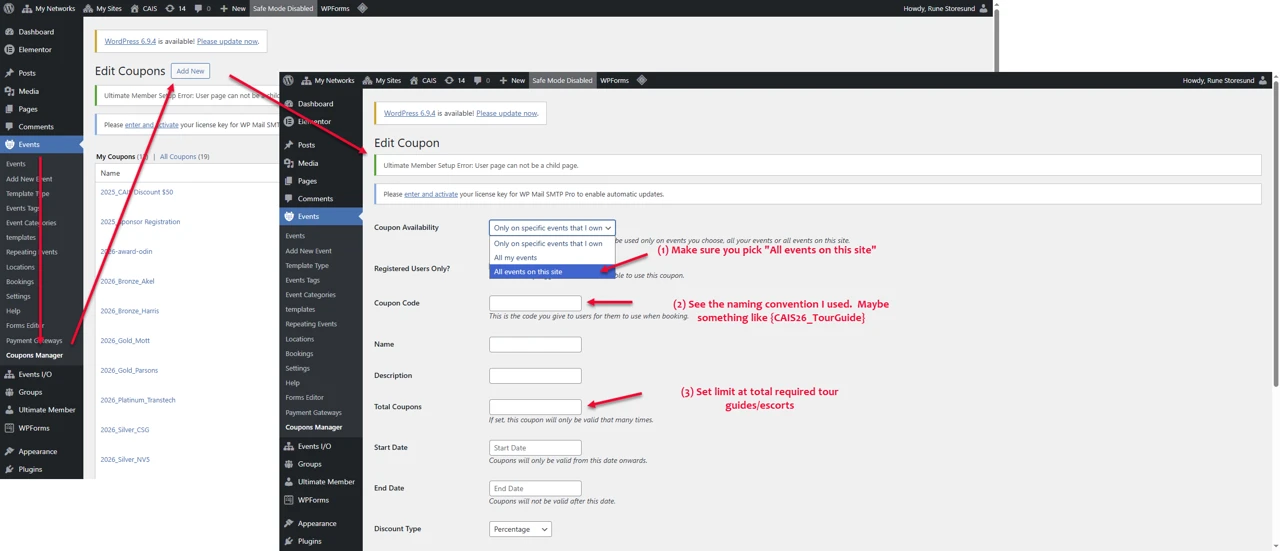
Navigate to Coupon Manager
This guide explains how to create a coupon in Events Manager. Go to Events → Coupons Manager and click Add New, then set Coupon Availability to “All events on this site” to ensure it works across all events. Enter a clear coupon code using a consistent format like CAIS26_TourGuide.
Next, set the Total Coupons based on the required number of tour guides or escorts to control usage. Optionally, define the Start Date and End Date, and choose the appropriate Discount Type. Always review your settings before saving to make sure the coupon functions correctly.
Tip: Always double-check the coupon code and usage limits before saving to avoid issues during booking.